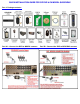
QUICK INSTALLATION GUIDE FOR CIF DVR 8 CH MODEL QH50DVR8C Part 1- Package contents: Part 2A – Connect the DVR to QOCDC cameras Part 2B – Connect the DVR to QPSCDNV cameras
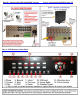
Part 2C – Connect the DVR to QS2350C cameras Part 4 – DVR Controls: Front Panel Part 3 – Connecting the DVR to your TV
Part 5 – Accessing the DVR menus To access the settings on the DVR push the Menu button on the front of the DVR or on the remote. This will display the screen in Pic 5.1. Use the keypad on the DVR or remote to enter the User name and password. The default user is admin and the default password is 12345. This will bring up the screen in Pic 5.2 where you can access the DVR’s functions. You can use the Direction keys to move the cursor (white box in Pic 5.2) and the ENTER button to select the option you want.
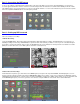
Now go to RECORDING (green square in Pic 6.3) and hit ENTER, this will bring up the screen in Pic 6.5. Go down to ENABLE REC (green square) and use the ENTER key to put a CHECK mark in it. Go to SCHEDULE (orange square) and hit ENTER. This will display the screen in Pic 6.6. Select a day (orange square) and then Select ALL DAY (red square). REC TYPE select MOT. DET. (green square). COPY to all days (blue square), select CONFIRM (yellow square) and hit ENTER. Restart the DVR.
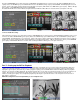
Part 8 – Setting up the DVR to Backup Files This DVR has a USB port you can use to back up to a USB DVD/CD-RW drive, USB Hard Drive, or USB flash drive. To back up to USB DVD/CD-RW, USB HDD, or USB Flash Drive : Go to the Play Back screen and select the camera and files you want using the instructions in Part 7. Push the EDIT button and it will put a check mark on the file (yellow square). Do this for all of the files you want to back up.