User's Manual
Table Of Contents
- Table of Contents
- Section 1 Introduction
- 1.1 Intended Audience
- 1.2 Related Materials
- 1.3 New in this Release
- 1.4 Safety Notices
- 1.5 Sicherheitshinweise
- 1.6 Notes informatives relatives à la sécurité
- 1.7 Communications Statements
- 1.8 Laser Safety Information
- 1.9 Electrostatic Discharge Sensitivity (ESDS) Precautions
- 1.10 Accessible Parts
- 1.11 Pièces Accessibles
- 1.12 Zugängliche Teile
- 1.13 General Public License
- 1.14 Technical Support
- Section 2 General Description
- Section 3 Planning
- Section 4 Installation
- 4.1 Site Requirements
- 4.2 Installing a Switch
- 4.2.1 Mount the Switch
- 4.2.2 Install SFP Transceivers
- 4.2.3 Connect the Workstation to the Switch
- 4.2.4 Configure the Workstation
- 4.2.5 Install SANsurfer Switch Manager
- 4.2.5.1 SANsurfer Management Suite Disk - Windows Installation
- 4.2.5.2 SANsurfer Management Suite Disk - Linux Installation
- 4.2.5.3 SANsurfer Management Suite Disk - Solaris Installation
- 4.2.5.4 SANsurfer Switch Manager Installation Disk - Windows Installation
- 4.2.5.5 SANsurfer Switch Manager Installation Disk - Linux Installation
- 4.2.5.6 SANsurfer Switch Manager Installation Disk - Solaris Installation
- 4.2.6 Start SANsurfer Switch Manager
- 4.2.7 Connect the Switch to AC Power
- 4.2.8 Configure the Switch
- 4.2.9 Cable Devices to the Switch
- 4.3 Install Firmware
- 4.4 Powering Down a Switch
- Section 5 Diagnostics/Troubleshooting
- 5.1 POST Diagnostics
- 5.2 Chassis Diagnostics
- 5.3 Recovering a Switch
- 5.3.1 Maintenance - Exit
- 5.3.2 Maintenance - Image Unpack
- 5.3.3 Maintenance - Reset Network Config
- 5.3.4 Maintenance - Reset User Accounts to Default
- 5.3.5 Maintenance - Copy Log Files
- 5.3.6 Maintenance - Remove Switch Config
- 5.3.7 Maintenance - Remake Filesystem
- 5.3.8 Maintenance - Reset Switch
- 5.3.9 Maintenance - Show Firmware Versions
- 5.3.10 Maintenance - Set Active Image
- Appendix A Specifications
- Appendix B Command Line Interface
- B.1 Logging On to a Switch
- B.2 User Accounts
- B.3 Working with Switch Configurations
- B.4 Commands
- Admin Command
- Alias Command
- Config Command
- Date Command
- Fallback Command
- Hardreset Command
- Help Command
- History Command
- Hotreset Command
- Image Command
- Lip Command
- Passwd Command
- Ping Command
- Ps Command
- Quit Command
- Reset Command
- Set Command
- Set Config Command
- Set Log Command
- Set Port Command
- Set Setup Command
- Show Command
- Show Config Command
- Show Log Command
- Show Perf Command
- Show Setup Command
- Shutdown Command
- Test Command
- Uptime Command
- User Command
- Whoami Command
- Zone Command
- Zoneset Command
- Zoning Command
- Glossary
- Index

4 – Installation
Installing a Switch
59042-06 A 4-5
0
4.2.3
Connect the Workstation to the Switch
You can manage the switch using SANsurfer Switch Manager or the command
line interface. SANsurfer Switch Manager requires an Ethernet connection to the
switch. The command line interface can use an Ethernet connection or a serial
connection. Choose a switch management method, then connect the
management workstation to the switch in one of the following ways:
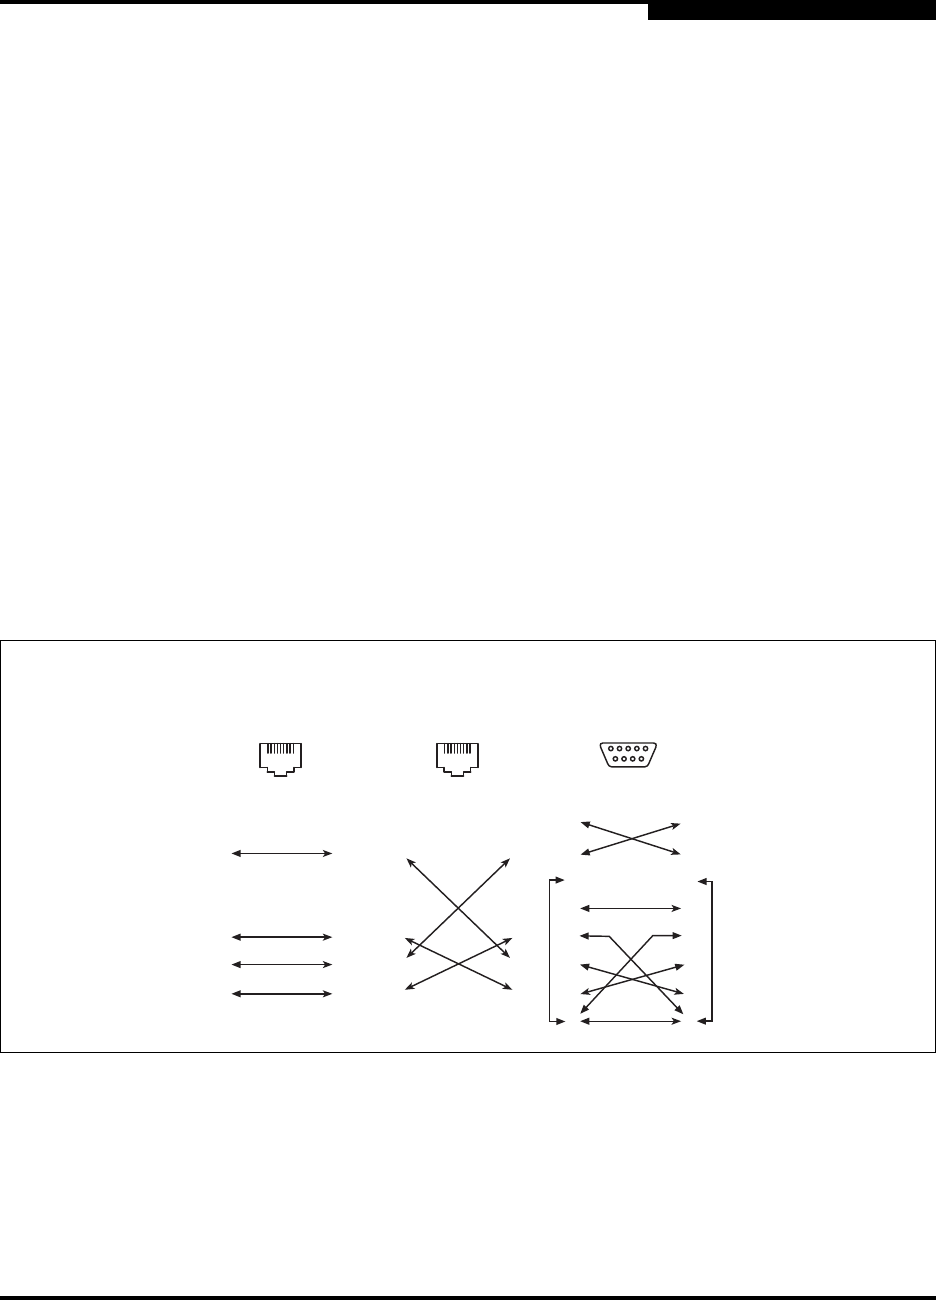
Indirect Ethernet connection from the management workstation to the switch
RJ-45 Ethernet connector through an Ethernet switch or a hub. This requires
a 10/100 Base-T straight cable as shown in Figure 4-2. With this method,
you can manage the switch with the SANsurfer Switch Manager application
or Command Line Interface.
Direct Ethernet connection from the management workstation to the switch
RJ-45 Ethernet connector. This requires a 10/100 Base-T cross-over cable
as shown in Figure 4-2. With this method, you can manage the switch with
the SANsurfer Switch Manager application or Command Line Interface.
Serial port connection from the management workstation to the switch
RS-232 serial port connector. This requires a null modem F/F DB9 cable as
shown in Figure 4-2. With this method, you can manage the switch with
Command Line Interface.
Figure 4-2. Ethernet and Serial Cable Connections
81
8
1
2
7
6
5
4
3
8
1
2
7
6
5
4
3
81
8
1
2
7
6
5
4
3
8
1
2
7
6
5
4
3
8
1
2
7
6
5
4
3
9
8
1
2
7
6
5
4
3
9
1
6
5
9
Direct Ethernet
RJ-45 Connection
Indirect Ethernet
RJ-45 Connection
Serial RS-232
Connection


