
Manual

Page 13
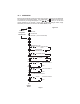
= UP
= DOWN
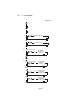
13-1 4 - 20mA CALIBRATION PROCEDURES (All steps must be completed)
= ENTER
{Step 1}
{Step 2}
{Step 3}
{Step 4}
{Step 5}
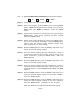
{Step 6}
{Step 7}
{Step 8}
{Step 9}
{Step 10}
Power panel meter for at least 30 minutes.
Enter menu program, go to the SNSR menu. Press the ENTER
button. MAMP should appear on the display. If not, press the
down button until MAMP is displayed. Press the ENTER
button.
Select proper resolution for the decimal point by pressing the
down button. When proper resolution has been selected
press the ENTER button.
Select proper scale indication by pressing the down button.
If °F or °C is not desired, select OFF. Press the ENTER button.
(Note: If OFF was selected, scale indication stickers have
been supplied for the front display)
Now that ZERO appears, press the down or up button, then
select the desired display reading.
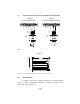
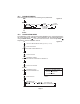
Once the display reading has been established, connect a
4mA source to the input of the meter. Refer to Figure 16 for
proper connections. Press the ENTER button. Wait until
SPAN appears.
Now that SPAN appears, press the down or up button, then
select the desired display reading.
Once the display reading has been established, connect a
20mA source to the input of the meter. Refer to Figure 16 for
proper connection. Press the ENTER button, WAIT until UNDR
appears.
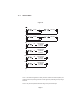
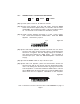
Now that UNDR appears, press the down or up button, then
select the desired display reading for the under indication.
Press the ENTER button.
Now that OVER appears, press the down or up button, then
select the desired display reading for the over indication.
Press the ENTER button. Calibration is now complete.
Refer to 4 - 20mA menu on page 12 for the above steps (fig. 22)