
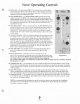
Operating instructions

Stove
Damper
Settings
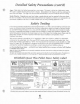
FREESTAND STOVE DAMPER
>\
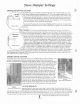
The "push-pul1"damper rod is located on the lower right side of the Freestand model stove. The
I
starting
proper damper setting, to use as a starting point,
is
2".
It
is
set by pulling the damper out all the
way and measuring the distance between the side panel and the inside surface of the set collar.
fj)
If adjustment
is
required, loosen the set screw on the set collar, with the allen wrench provid-
ed.
The collar will now slide freely on the damper rod. After adjustments have been made,
tighten the collar set screw. The damper rod must now be pushed in until the set collar con-
tacts the side panel. This completes the damper setting.
As stated the
2"
setting
is
the recommended "sfartingpoint"for your stove. You may need to
(shown pulled-out)
change this setting depending on the venting configuration, site elevation or the brand of pellets
being used.
Fine Tuning:
This
is
the process that will provide the proper air-to-fuel ratio. If your flame
is
redlorange with evidence of soot at the top of the flame, you need more air. Pull the damper out until
the
flame becomes yellow and begins to "dance". If the air blows pellets out of the grate or puts the
Operating
fire out on low settings, you have too much air. Push the damper farther in. When adjusting the
Position
damper, short 114" changes should be used. Run the stove appx.
30
minutes before additional
damper adjustments are made. When your particular damper setting has been established, the
set collar should be loosened and positioned against the surface of the side panel. The collar
set screw must be tightened at this time. This
is
a safety feature to protect against accidental
damper closure. If the damper is accidentally pushed in too far, pellets can pile-up in the
grate. In extreme cases pellets can accumulate back up in the feed tube. Pellets can smolder
(Damper
Pushed
In)
and produce smoke in the house. Once the damper is set for your particular fuel and installa-
tion, it will not need to be readjusted unless a different type of pellet fuel
is
used. If the flame
begins to look lazy, with a
redlorange colored flame, do not immediately adjust your damper.
First check for ash build up either in the grate, below the grate or in the vent system. These conditions
8
can restrict the combustion air flow and upset the air-to-fuel ratio. Remember to always shut your stove down and allow it to
?
cool completely prior to cleaning. NOTE: If the proper flame cannot
be
achieved with the damper control, adjustment of the
trim controls may be necessary. (see page
7)
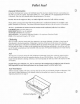
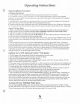
INSERT STOVE DAMPER
The damper plate, for the Insert model Quest "Plus",
is
packed with the product's accessow com-
oonents. The damoer olate needs to be installed before inserting the stove in the fireolace.
-
NO
tools are required :or this installation. Simply slide the damper into the slot between the blow-
er and the rear of the firebox. This
is
located on the right side of the
stove near the exhaust tee, (see photo A). The plastic knob will be
attached to the damper plate along with two nylon flat washers.
I
Remove the plastic knob and on of the nylon flat washers. The
=
threaded stud, on the damper plate, can now pass through the slot
,
i
-,-
-
-
-
1
in the right side shroud panel. The washer and knob can now be
-
-
#.
-
-
>.
-
-
i
attached. The damper assembly should be locked in position by
-
L
1
tightening the black knob. To adjust the damper the knob must be
-
I
unscrewed slightly. With the knob slightly loose the damper will
1
?.4j
slide freely in and out. A total damper travel distance of
3"
is pro-
!
I*
,
.;,
7
vided. The recommended starting point for the damper
is
1"
open,
!
..
L.
"Z
~~
.
(see photo
8)
Your stove may require a different damper setting
PHOTO
A
1
',
'
i
depending on the venting, site elevation and type of fuel being used.
(damper pmition behind firebox)
!
-,
,
When the desired damper setting
is
found the black knob should be
. ..
\~%.S5
iu
threaded tight. This will secure the damper in the proper location.
,I
B
,
.
-
--~
PHOTO
E
i
STOVE BREAK-IN
(recwnmended Starting position)
lmporfant Nofe:All stoves need to go through a break-in period. During this period, (appx.
4-8
bags of pellets), the auger motor and the auger feed screw need to break in to reach the specified
fuel feed rate. Expect the fuel feeds and the flame appearance to be low during this time. The damper will need to be readjusted
after the break-in period. It
is
recommended that the stove be monitored during this period. Due to the fact that the pellet feed
increases through the break-in period, the fuel-to-air ratio could become imbalanced and pellets could pile up in the grate.
a
Simply pull the damper out for more combustion air.