ADVANTAGE PLUS Pellet Stove Owners Manual & Operating Instructions THIS STOVE MUST BE PROPERLY INSTALLED AND OPERATED IN ORDER TO PREVENT THE POSSIBILITY OF A HOUSE FIRE. PLEASE READ THIS ENTIRE OWNER’S MANUAL BEFORE INSTALLING AND USING YOUR WHITFIELD PELLET STOVE. FAILURE TO FOLLOW THESE INSTRUCTIONS COULD RESULT IN PROPERTY DAMAGE, BODILY INJURY OR EVEN DEATH.
Congratulations on the purchase of your Whitfield Advantage Plus Pellet Stove! When you purchased your Whitfield stove, you joined the ranks of thousands of concerned individuals whose answer to their home heating system reflects their concern for aesthetics, efficiency and our environment. We extend our continued support to help you achieve the maximum benefit and enjoyment available from your pellet stove. Please familiarize yourself with this Owner’s Manual before installing your Whitfield stove.
Table Of Contents Safety Precautions Safety Notice . . . . . . . . . . . . . . . . . . . . . . . . . . . . . . . . . . . . . . . . . . . . . . . . . . . . . 4 Installation Disclaimer . . . . . . . . . . . . . . . . . . . . . . . . . . . . . . . . . . . . . . . . . . . . . 5 Detailed Safety Precautions . . . . . . . . . . . . . . . . . . . . . . . . . . . . . . . . . . . . . . . 4-5 Safety Testing . . . . . . . . . . . . . . . . . . . . . . . . . . . . . . . . . . . . . . . . . . . . . . . . . . . . . . . .
Table Of Contents (Cont’d) Stove Installation Stove Installation Check List . . . . . . . . . . . . . . . . . . . . . . . . . . . . . . . . . . . . . . . . .13 Pre-Installation Assembly . . . . . . . . . . . . . . . . . . . . . . . . . . . . . . . . . . . . . . . . . . . 14 Stove Installation Configurations Floor Protection . . . . . . . . . . . . . . . . . . . . . . . . . . . . . . . . . . . . . . . . . . . . . . . . . . . 15 Clearances to Combustibles . . . . . . . . . . . . . . . . . . . . . . . . . . .
Safety Precautions Safety Notice THIS STOVE MUST BE PROPERLY INSTALLED AND OPERATED IN ORDER TO PREVENT THE POSSIBILITY OF A HOUSE FIRE. PLEASE READ THIS ENTIRE OWNER’S MANUAL BEFORE INSTALLING AND USING YOUR WHITFIELD PELLET STOVE. FAILURE TO FOLLOW THESE INSTRUCTIONS COULD RESULT IN PROPERTY DAMAGE, BODILY INJURY OR EVEN DEATH. CONTACT YOUR LOCAL BUILDING OR FIRE OFFICIALS TO OBTAIN A PERMIT AND INFORMATION ON ANY INSTALLATION RESTRICTIONS AND INSPECTION REQUIREMENTS IN YOUR AREA.
Detailed Safety Precautions (cont'd) Auger - Pellet fuel is fed to the burn grate by a screw auger. This auger is driven by a high torque motor. The auger is capable of doing serious harm to fingers. Keep pellets in the hopper at all times and keep fingers away from auger. The auger can start and stop automatically at any time while the stove is running. Smoke Detector - Depending on your local codes, a smoke detector may be required in the room where the stove is installed.
Pellet Fuels General Information Using the UltraGrate burn system, the Whitfield Advantage Plus has been designed to burn wood residue pellets with up to 3% ash content. Agricultural pellets (i.e… Corn, alfalfa etc.) are not permitted to be burned in the stove. Dirty fuel will adversely affect the performance of the stove. Caution: The use of unapproved, dirty, wet and/or high salt content fuel will void the warranty! Wood pellets manufactured to the Pellet Fuels Institute (P.F.I.
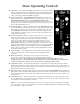
Stove Operating Controls ● Start Switch — The push-button START switch activates the convection blower and the combustion blower. If the exhaust does not reach operating temperature within 30 minutes, the stove will automatically shut down. The blowers can be restarted by pushing the START switch again. ● Auger On/Off Switch — The AUGER ON/OFF switch activates the fuel feed (auger) motor only. The START switch has to be activated to give power to the AUGER ON/OFF SWITCH.
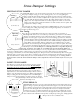
Stove Damper Settings FREESTAND STOVE DAMPER The “push-pull” damper rod is located on the lower left side of the Freestand model stove. The proper damper setting, to use as a starting point, is 2”. It is set by pulling the damper out all the way and measuring the distance between the side panel and the 2” inside surface of the set collar. If adjustment is required, loosen the set screw on the set collar, with the allen wrench provided. The collar will now slide freely on the damper rod.
Operating Instructions Lighting Stove With Fastfire™ Self-Igniter: 1. Fill the hopper with recommended pellet fuel and plug stove into wall outlet. 2. Push the Start button on the control board to activate the igniter. 3. Press the Auger ON/OFF Switch to the “ON” position. 4. Pellets will start feeding into the grate and should begin to ignite within three to seven minutes. The selfigniter will automatically shut-off after 15 minutes. 5.
General Operating Considerations Proper Burn Characteristics: The flame in your stove should be bright yellow under normal operation. If the flame becomes lazy with a reddish/orange color, the damper position may need to be changed to provide more combustion air. Excessive amounts of flyash built-up in the grate, clinkers in the grate, or leakage of air (if the grate is not properly seated) will starve the fire for air. (See ROUTINE MAINTENANCE for information on cleaning the stove).
Thermostat Installation NOTE: ALWAYS DISCONNECT POWER BEFORE PERFORMING THE THERMOSTAT INSTALLATION. Jumper Wire To Install A Wall Thermostat: 1. Check the type of thermostat you are about to install, Solid State Electrical thermostats are NOT approved for use with the Advantage Series pellet stoves. Consult your authorized Whitfield Dealer for more details. 2. Unplug your stove from the wall outlet. 3. Locate the thermostat connection block on the back of the stove. 4.
Routine Cleaning NOTE: STOVE WILL NEED TO BE SHUT OFF AND COOLED ENOUGH TO HANDLE BEFORE ROUTINE CLEANING IS PERFORMED. ALWAYS DISCONNECT POWER BEFORE DOING ANY ROUTINE CLEANING. The following areas need to be inspected during Routine Cleaning: ● Burn Grate ● Ash Slide Plates (Free Standing Model Only) ● Ash Pan ● Heat Exchanger Tubes Burn Grate: The burn grate should be inspected periodically to assure that the air holes have not become clogged with ash or clinkers.
Stove Installation Stove Installation Checklist Check off each item as you go through your installation. As part of the installation process: It is strongly recommended that you have an Authorized Whitfield Dealer install your stove. If you install the stove yourself, you should review your installation plan with the Authorized Whitfield Dealer. ❑ Read the ENTIRE Stove Installation section first. ❑ Read the Insert or Freestand section (whichever applies).
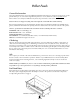
Pre-Installation Assembly 1. After removing the packaging from the stove, lift the hopper lid, and remove all pre-packaged items that were shipped in the hopper. Also open the stove door and remove all pre-packaged items. 2. Using a 7/16”socket or open end wrench, remove the two bolts from the bottom that secure the stove to the wooden pallet. 3. If your stove is a freestanding model, remove the pedestal from its box and place it beside the stove. With a helper, lift the stove onto its pedestal base.
Stove Installation Assembly Your Whitfield Advantage May Be Installed As: ● A freestanding unit with a pedestal placed on a noncombustible floor pad. ● A mobile home heater placed on a non-combustible floor pad, with a source of outside air, bolted down and electrically grounded to the chassis of the home. Floor Protection 6” 6” Your Whitfield pellet stove must be installed on a non-combustible pro tective floor pad of minimum 3/8” thickness material or a masonr y hearth.
Stove Vent Pipe/Intake Installation IT IS RECOMMENDED THAT ONLY AN AUTHORIZED DEALER INSTALL YOUR PELLET STOVE. THE FOLLOWING INSTALLATION GUIDELINES MUST BE FOLLOWED TO ENSURE CONFORMITY WITH BOTH THE SAFETY LISTING OF THE STOVE AND LOCAL BUILDING CODES. General guidelines for installing the exhaust system: A 3 or 4 inch listed type “L” pellet vent exhaust system must be used for freestanding installations and attached (and sealed) to the pipe connector provided on the back of the stove.
Determining Equivalent Pipe Length To determine whether a 3”or 4” exhaust system is required for your installation, review the sample installation below. Fill out the top chart, and calculate your total equivalent pipe length. After you have the total equivalent pipe length, use the chart at the bottom of the page to determine if your installation requires 3”or 4” exhaust pipe. Type of Pipe # of Elbows or Feet of pipe Equivalent Feet Total Equivalent Feet o Elbows x 5(1.
Installing Your Freestanding Pellet Stove STANDARD HORIZONTAL EXHAUST INSTALLATION 1. Locate the proper position for the listed type “L” wall thimble. Avoid cutting wall studs when installing your pipe. Use a saber saw or key hole saw to cut the proper diameter hole through the wall to accommodate the wall thimble. Use extreme caution to avoid cutting into power lines within the wall of the home. The hole size will depend on the brand of pellet vent that you are using. Install the wall thimble in the hole.
Stove Dimensions 25” 5-3/8” 12-1/2” 25” Dimensions Plus or Minus 1/4”
Installation Configurations Standard Horizontal Installations 1”Minimum 45o Degree Elbow 6”Minimum 12” Minimum from outer wall 12”Minimum from ground or other surfaces NON-COMBUSTIBLE Hearth Pad (3/8”Minimum Thickness) Standard Horizontal Installations 3” Minimum Between Wall and Pipe 1” Right Wall 1” NOTE: If you vent to the Right Wall, the vent pipe must maintain a 3” clearance parallel to the left wall.
Installation Configurations (Cont’d) Venting Options The Advantage Plus may be connected to an existing flue or by installing listed type “L” vent pipe. If a liner is run all the way to the top of the existing chimney, the existing flue should be sealed with a steel plate. Start a vertical run with a Tee at the back of the stove. Other options are illustrated below.
Mobile Home Installation IN ADDITION TO THE STANDARD INSTALLATION INSTRUCTIONS, THE FOLLOWING INSTRUCTIONS MAY BE REQUIRED BY LOCAL, STATE OR FEDERAL BUILDING CODES: ● Stove must be permanently bolted to the floor. ● Stove must have a permanent outside air source. ● Stove must be permanently electrically grounded to the steel chassis of the home. The location selected for ground attachment to the stove must be dedicated for this purpose. ● Refer to page 17 for list of commonly used vent components.
Installing Your Insert Pellet Stove VENTING INTO AN EXISTING CHIMNEY The Advantage Insert may be installed in a masonry or factory built fireplace as shown to the right. When installing into a masonry chimney, it is recommended that the exhaust vent be extended to the top of the chimney as shown to the lower right. However, if the vent pipe does not extend to the top of the chimney, the pipe must extend a minimum of 18” above the damper. You must seal the damper area with a steel plate.
Built In Heater Installation Stove Dimensions for the Advantage Plus Insert that will be Enclosed within the frame work are HEIGHT (20 1/4”) WIDTH (24”) DEPTH (13 1/2” + OR – 1/4”). Wood Frame Shroud The Advantage Insert may be framed directly into a wall. Below are two (2) examples of this. The exhaust installation requirements are the same as for a Freestanding stove. Refer to “Installing your Freestanding Stove” for information about installing and proper hook-up of the exhaust.
Routine Maintenance UNPLUG STOVE BEFORE PERFORMING ANY MAINTENANCE WORK The following areas need to be inspected as part of routine maintenance: Door Rope Gasket: The condition of the rope gasket around the door and windows should be checked periodically and replaced or repaired if necessary. A one inch strip of paper may Door Gasket be used to perform a test of the integrity of the door seal. Close the door on the paper in several different locations and pull.
APPENDIX A TROUBLE-SHOOTING Unplug Stove Before Performing any Maintenance work PROBLEM Fire burns with a lazy orange flame. Pellets build up in the grate and the window gets sooted up. CAUSE(S) There is insufficient combustion air. SOLUTIONS Remove any clinkers or ash from the bottom of the grate that might be obstructing the primary air holes. Change to a better grade of fuel if necessary. Check that the damper has been opened enough for the amount of fuel feed.
APPENDIX A TROUBLE-SHOOTING (CONT’D…) Unplug Stove Before Performing any Maintenance work PROBLEM CAUSE(S) SOLUTIONS operating at a medium to high burn rate and the convection fan has been turned down low then the fan should be turned up higher. If this problem persists (particularly at lower burn rates) then the high limit snap switch should be replaced by your certified Whitfield dealer. Pellets will not feed. Stove runs for 30 minutes then shuts down.
APPENDIX A TROUBLE-SHOOTING (CONT’D…) Unplug Stove Before Performing any Maintenance work PROBLEM Blowers will not operate when the start switch is depressed. CAUSE(S) SOLUTIONS There is no power to the stove. Check that the stove is plugged in to the wall outlet. There is no power to the control board. Check to see if your circuit breaker has tripped. Check the wire connections on the high limit snap switch and Control board. There is soot or fly ash in the house.
APPENDIX B Solid Solid OPTIONAL ACCESSORIES Hearth Pads Trimmed in solid oak, Whitfield hearth Pads are available in an array of colors and color combinations to complement and enhance any decor. Each is made from tough tile and non-staining epoxy grout, so they’re as durable and easy to clean as they are beautiful.
APPENDIX C SHROUD PANEL ACCESS 48.00”(Lrg) 44.00”(Med) 40.75”(Sml) 36.00” (Lrg) 22” Shrouds and magnetic shroud trim are available in three sizes for your Advantage Insert: Small: 28.5”(72.4 cm) high by 40.3/4”(103.5 cm) wide Medium: 32”(81.3 cm) high by 44”(111.75 cm) wide Large: 36”(91.4 cm) high by 48”(121.9 cm) wide 32.00” (Med) 28.
APPENDIX D WARRANTY THIS WARRANTY IS ISSUED BY PYRO INDUSTRIES, INC. (MANUFACTURER) AND EXTENDS ONLY TO THE ORIGINAL PURCHASER OF THIS PRODUCT. The Manufacturer provides a five year limited warranty on all steel parts (except the grate), and a 2 year limited warranty on all electrical components. These warranties extend from the date of the original purchase.
APPENDIX E REPLACEMENT PARTS Common To Both Freestand & Insert Freestand Only 1 #17150009 Scraper Rod 31 #11850447 Side Panel-LHS, (slate) 2 #11750400 Door Assembly (slate) 32 #11850147 Side Panel-LHS, (black) 3 #11750100 Door Assembly (black) 33 #11850347 Side Panel-LHS, (brown) 4 #11750300 Door Assembly (brown) 34 #11850547 Side Panel-LHS, (green) 5 #11750500 Door Assembly (green) 35 #11850448 Side Panel-RHS, (slate) 6 #11750123 Hinge Pins, gold (Set of 2) 36 #11850148 Side Panel-RHS, (
Common to Freestand & Insert Stove Parts Freestand Stove Parts
APPENDIX E REPLACEMENT PARTS Insert Only Lid Supt.
Insert Stove Parts
Whitfield Pellet Advantage Plus Owners Operation Manual Part Number 11720198 REV. © 1997 Pyro Industries, Inc.