OWNER'S MANUAL
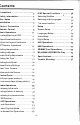
Contents Precautions ................................ , .. 2 [)ISC Special Functions .. :............. 26 Safety Information......................... 3 Selecting Subtitles . . . . . . . . . . . . . . . . . . . . .26 [)isc Notes 4 Selecting audio languages . . . . . . . . . . . 26 Installation .................................... 5 Title menu function . . . . . . . .. . . . . . . . . . . . . 26 Electric Connection 7 Setup 8 System Setup . . . . . . . . . . . . . . . . . . . . . . . . . . . ...
Precautions THANK YOU FOR PURCHASING THIS CAR DVD PLAYER. Before operating the unit, read this manual thoroughly and Weep it handy for future reference . To avoid injury or accident , read the following precautions before installing and operating the unit . ON INSTALLATION • • DO NOT install any receiver in locations where; - it may obstruct the steering wheel and gearshift lever operations, as this may result in a traffic accident.
Safety Information :AUTION: THIS DVD PLAYER IS A CLASS I LASER PRODUCT. HOWEVER THIS$DVD PLAYER USES A VISIBLE/INVISIBLE LASER BEAM WHICH COULD CAUSE . HAZARD OU S RADIAT I O N EXPOSURE IF DIRECTED. BE SURE TO O PERATE THE DVD PLAYER CORRECTLY AS I NSTRUCTED. USE OF CONTROLS OR ADJUSTMENTS OR PERFORMANCE OF PROCEDURES OTHER THAN THOSE SPEC I FIED HEREIN MAY RESULT IN HAZARDOUS RADIAT I ON EXPOSURE . D O NOT OPEN COVERS AND D O NOT REPAIRYOURSELF. REFER SERVI CING TO QUAL I F I E D PERSONNEL.
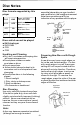
Disc Notes Disc formats supported by this player DVD DVD Audio and Video Disc size 12 em VCD VCD Audio and Video Disc size 12 em CD CD Audio Disc size 12 em MP3 MP3 Audio Disc size 12 unusable) depending on your handle it and conditions in the usag S' environment. Note these scratches are not an ind ication of any problem with the player. � (.:VtI �o o em Do not bend Discs which cannot be played • • Do not touch the underside ofthe disc c> DVD-RAM CDV CDG '" � Jf0 I.,l.
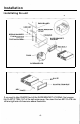
nstallation �OTES: Choose the mounting location where the unit will not interfere with the rt'ormal driving function of the d river. Before finally installing the unit, connect the wiring temporarily and make sure it is all con nected up properly and the unit and the system work properly. Use only the parts included with the unit to ensure proper installation. The use of unauthorized parts can cause malfunctions.
Installation Installating the unit • DASH BOARD SPRING WASHER --,,, PLAIN WASHER--�'i"" TAPPING SCREW SLIDE BRACKET HOUSING --- I TABS �=--jlf' SCREWDRIVER ,--__ " '" PLATE KEY PLI\TE----"' If you want to take CHASSIS out of the SLIDE BRACKET HOUSING, first remove the PLASTIC TRIM OUT of the both sides away, then insert the two KEY PLATE into left and right side of chassis as above illustration.
Electric Connection WIRING CONNECTION • ,;�:�:::=�� RCH RED LCHWHITE '-__-r= FRONT RCA CABLE REAR CAMERAINPUT YELLOW SUBWOOFER GREY VIDEO IN YELLOW FRONT RCA RED R VIDEO OUT YELLOW FRONT RCA WH ITE L RADIO ANTENNA JACK (B+)12V REAR CAMERASWITCH BROWN IGNITION SWITCH(B,f) MEMORY BACK-UP(B+) RED ORANGE YELLOW GROUND(B-) FRONT REAR (B-)PARKING BRAKE BLUE AUTO ANTENNA BLACK + LCH SPK. LCHSPK. CHOKE BOX GREY WHITE WHITE/BLACK + GREY/BLACK VIOLET GREEN + FRONT RCHSPK. REAR RCHSPK.
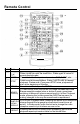
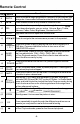
Remote Control ----==- 17 �)--*�9�3It�i5���nt��5 @----- lft-iIToiioa iF>' ���_tH @1----'- ���m������lmn Ref# Button Function Press it briefly to view the clock time, Press again to return to normal display mode . Press it to select the input mode, such as DVD, RADIO, etc . Press once to pause playback. Press PLAY/PAUSE to resume playback. Please note: if you press STOP twice, playback will start at the beginning of the disc. Press this button to open the SETUP menu.
------, ------------ Remote Control Ref# Button Function 8 GOTO Press it button to begin playback at a moment in the program you designate. Use number buttons to enter the data that is needed. 9 ... /� Press these buttons to skip ahead or back one track . 10 SEL Press this button repeatedly to cycle through the various audio and video adjustments you can make: Volume, Bass, Treble, Balance, Fader, Color, Brightness, Contrast and Tint. 11 VOL+/- Use these controls to adjust the volume level.
Remote Control Function Ref# Button 23 This button is used to confirm selections and settings within ENTER many of the menus in the OSD system. 24 � 25 0-9 26 + 10 27 1 -6 I n DISC mode, press i t to reverse rapidly Use to input numerical values during programming, with the GOTO button, or to di rectly select a track to play . In Radio mode, (when the RDS engaged , ) , 0 serves as TA function, 9 serves as the AF function .
Basic Operation � POWER ON/OFF Touch the "OFF" ICON on screen to turn the unit off, Press the " � "on the front panel to turn it on, press it again to turn off, FIG.2 LOADING/EJECTING A DISC Loading a Disc • 1, Press the POWER (2) button to turn the device on .
Basic Operation • When the monitor turns downward to a certain angle, it will draw in . Touch the "SET" ICON on touch screen to enter the setting mode, the message will display like following': to return to the previous playback FIG.6 TFT Monitor Adjustment In Radio modes, touch the" RADIO" icon or In DVD mode , touch the [i IT! II range to enter the home menu, the message like following as below. (1) (2) Left Right Touch "SYSTEM" on the setting menu, touch the " A / ....
----- ---- Basic Operation WALLPAPER I n SETT I N G mode, touch the "SYSTEM" range to select the wallpaper mode, in wallpaper mode, you can select the among of I/Yellow, Red, L B lue, D Blue, BALANCE: R 0·10 to L 0·1 0 Adjust sound balance betwe6ln left and right speakers, , FADER: F 0·1 0 to R 0·10 Adjust sound balance between Iront and rear speakers . P urple, G reen, AUTO ". When you select the "AUTO" item, the player will change the background automatically .
Basic Operation Setting Audio Modes Rear View Camera In any modes, touch the "EO" range o n t he touch screen (or press the EO button on remote control) to select one of the preset sound modes: ROCK/POP/ JAZZ/CLASSIC/USER , EX.: I n RADIO mode • When connecting the rear view camera the mirror image of the rear view is auto matically displayed on the monitor when you change the gear to the back position. (Note: additional monitor can not display . the image.
------- ------- Control Panel UNIT KEYS -- � c • Touch Area � OJ �� = !AI =� fQ-.' 1 2 3 " 4 ill 5 . 6 0"", 0 I ., �·��db��·� ,�:..' .. "' : 0"," 7 CD � (EJECT) Insert the d isc, label side facing up, until the mechanism senses its presence and draws the disc in. Press to eject the disc. @ ® @ @ @ ([) VOL-IVOL+ BUTTON I n normal mode, this button is used to adjust the volume to desired level.
Control Panel UNIT K EYS • (touch sensitive control) (iD CI (POWER On/Off )/MODE �1K Touch this button to switch the device on. WELCOME appears in the display. U Touch it again to switch the device all. SEE YOU appears in the display. I n playback mode, you can touch this range to select the input mode by touching repeatedly until the proper one i s lound : DtSC > AUK tN > RADIO. @i\L =V BAND Touch to switch between the 3FM and the 2AM(MW) bands.
Control Panel (0£,. \ :1K U 1>11 (PLA�/PAUSE) ICH 1-6 (RADIO PRESET) • A) In DIsc Playback Mode Touch this button to pause playback, touch again to resume playback. B) In Radio Mode Touch repeatedly to preset station. With this system a total of 30 stations can be stored in the memory. Each band sto.re up to six preset stations. The stations might be FM1, FM2, FM3, AM1 (MW1) and AM2 (MW2) band. The operation as below: -Store in Memory > Select the frequency band.
Touch Screen Operation RADIO MODE Start Searching For a Station Touch the RADIO ICON in home menu to enter the RADIO mode: Manual Search During Radio mode, briefly touch " � to increase frequency by one step of channel spacing. Briefly touch " � " to decrease frequency by one step of channel spacing. Automatic Search During Radio mode, touch and hold (for more than 2 seconds ) either " � / � " ICONS to start search for a radio station automatically.
·- Touch Screen Operation Storing Stations In Memory Automatic Preset Setup � I n Radio Mode, touch and keep (for more than 2' S) the screen of" APS " range to active automatic station storage. The radio searches within the current frequency band, e.g. FM1 , for the stron ger signal level until the search cycle has finished . The six strongest stations are then allocated to the corresponding storage locations . Then the station of the first storage location is set .
Touch Screen Operation ADJUSTABLE ITEMS: TA Traffic Announcement (Priority ForTraffie I n for mat io '!,) REGION SET Touch to switch the REGION function ON and OFF . PISET Touch to change between P I MUTE and PI SOUND . REG FUN CTION at certain times some stations divide u p their programs into regional programs with varying content . REG ON: the message "REG ON" will appears in the display for a few seconds . Note : - the display capacity is limited .
Touch Screen Operation Touch the AF section on touch screen or swing and keep the SEL knob in the TA/AF direction for about 2 seconds , the A F function is activated . The AF symbol appears in the display . When the AF function has been switched on, the radio continuously tests the signal strength of the AF frequency . The test interval for each AF frequency depends on the signal strength of the current station and varies from a few minutes in the case of weak signals.
Touch Screen Operation !ill DVDMODE In any modes, press the MODE button on the front panel to enter the DVD play mode . The message will display as below : (When Parking Brake supplied ) A �ti\ �� "Ze !t MENU T���' ... MENU '\" - --- ��'<';' Q SWF · LOUD am 0, CLK OSD � Mute function � To decrease the volume level � To i ncrease the volume level 1i.
Touch Screen Operation BASIC OPERATION Note: when the JPEG disc playback', in normal mode, you can use the cursor buttons to rotate the picture . Press UP to invert an image . Press DOWN to m irror an image . Press LEFT to rotate a n image to left . Press RIGHT to rotate an image to right . Stopping Play o Touch. ICON to stop the unit � playback. Touch." to start play. Pause (still picture) Touch HI during playback to temp orarily pause play. Touch again to return to normal playback.
Touch Screen Operation DISC Search (GOTO) seconds part of each track/chapter on disc. (Touch it again to cancel this mode) • FO R DV D : Touch the screen the o f "GOTO" range the screen will display the following message : FORVCD: Touch the screen of the "INT" section (or longer press the 3/1NT button on the the remote control ).
Touch Screen Operation ON-SCREEN DISPLAY FUNCTION 2.Examp[e for VCD/SVCD/CD: A.Touch or Press aso for fir�t time: During playback, touch the screen of the aSD section, it will display the following as be[ow : VCD TRK 1/1904, PSC e C 0:01:36 1. DVD: A. Touch or Press aso for first time: B.
Touch Screen Operation DVDIVCD Special Function 3. Title Menu Function 1. Mul ti-subtitle Language Function (for DVD Only) .......... I IR During DVD playback. Touch the SUBTITLE section on touch screen(or press the SUBTITLE JIt., U on the remote). Each time the button is pressed or touch, number of the su btitle language changes in sequential order. Notes: - The language number is different according to the disc. - Some discs only contain one subtitle language.
Touch Screen Operation SYSTEM SETUP DVDSETUP USING THE MENU 1. Touch the screen of "[oJ" range or press the SETUP button on remote . 2.The SETUP menu is displayed. 3. Touch directly the desired item to select the preferred item . Or by using the � /-<1. /" / ... buttons . 4. Touch the EXIT section to clear the setup menu or press the SETUP on the remote control . TV TYPE SETUP This player is capable of playing discs recorded in eith.ar PAL or NTSC formats.
Touch Screen Operation I TV TYPE I!iI - 4�'3L8iB1 '(:L,i {:Jr@ PASSWORD SELECTION The password must be used to make changes to the Parental Control menu below . The factory default password is 0000. You will be asked for the current password. Key in "0000" and press the ENTER on the remote control, Once you have entered it, you have the opportunity to change it and enter your new pass word . Then when you enter the Parental Control men u , you can make any changes.
Touch Screen Operation DEFAULTS Selecting the DE FAULT item and confir ming RESTORE will return ALL personal settings you have made, including radio and TV presets, to the factory default settings. AUDIO LANGUAGE SETUP Select the preferred AUDIO soundtrack language by touching directly the desired language . LANGUAGE SETUP OSDLANGUAGE SETUP Select the preferred OSD language by touching directly the desired language .
Touch Screen Operation \OFp;: :���:'�(:t.f/N,-;- !,\�q.�� to) !Yl:�,;�'_� ' - -:;;'{;:X:l;-'li!-:}c: '-:!!�1,tF:- "ENOLISH ;;;;-.\\:idl;'�"'l:: ,:;}-{'Y,'i;
Touch Screen Operation DIGITAL SETUP eXIT SATURATION· the saturation 01 the video signal (the vividness olthe color) all above can be adjusted to your tasters . DYNAMIC RANGE CONTROL Select DRe and adjust the dynamic range 01 a Dolby Digital encoded prog ram. There are 8 steps between lul l compression and off compression. EXIT SHARPNESS· the sharpness olthe video signal (the image setting acumination) .
Touch Screen Operation AUX Operation To return to the main menu O n the front panel of this unit, there i s an AUX I N jack, follow the diagram below to connect analogue replay devices(only for the Audio connect, if you want to connect the Video, please plug the RCA
Touch Screen Operation Changing From DIS C t o USB P layback Mode If the disc present in the pla er is an DVD or VCD o r MP3/WMA or MP4 disc, USB OPERATION Following the diagram below, connect your USB device to the front panel USB port . If it is properly connected, the device will be mounted and start playing automatically. )' touch the screen of the " [!Ii}] " range to enter the home men u , then touch the "USB" ICON to enter the USB mode .
Touch Screen Opera.tion SD/MMC card OPERATION The unit can support playback MP3/WMAlJPEG/MP4 and Divx form�t which are stored into SD and MMC memory card . Please read below before you start the operation of memory card . INSERTING THE SO OR MMC CARD . Labelside facing upward o L / .. '\) In sert the memory card into slot with label side facing upward . Press in till heard a "CLICK" REMOVING THE SO OR MMC CARD . o =- . Press in till heard a "CLICK" � '\) Remove the memory card Mode change to SD/M
Touch Screen Operation MP3/WMA/JPEG/MPEG4 DISC PLAY The unit is support MP3/WMA/JPEG/MPEG4 . When a disc is inserted illlto player, the following picture will appear on the monitor . The unit will play the first track automatically . You can touch to directly others mode (MP3/JPEG IMPEG4) to play . EX. : when the MP3 mode is selected . lJdlliSl IT�" I 110"''1' 1 Current type (highlighted bar) . TJ'VIQI: '>,. I 2 Current track (ID3 TAG display) . 3 The current play mode(MP3).
Specification GENER ALL : Supply Voltage: Current Consumption: Signal System: Discs Played: Audio Signal Output: Characteristics: 1 2V DC ( 1 1 V- 1 5V) Less than 1 0 A Compositive video 1 .
Trouble Sh ooting Before going through the check list, check wiring connection. If any of the problems persist after check list has been made, consult your nearest service dealer. s S Y M P TOM SOL UTION CAUSE The car ignition switch is notan No power The fuse is blown If the power supply is properly connected to the car accessory terminal,switch the ignition key to "ACe" Replace the fuse Presence of disc inside the Remove the disc in the player, player.