PLRVST400 RV Wall Mount Audio/Video Receiver AV Stereo Headunit with Wireless BT Streaming, Multimedia Disc Player, HDMI ARC, AUX/MP3/USB Reader
CONTENT Installation Front-Mount Mounting Wiring Connection Operation Location of Keys Turn ON/OFF the Unit Settings Adjustment Loudness Loc ON/OFF Stereo/Mono Function Liquid Crystal Display (LCD) Alarm ON/OFF Setting Alarm Time Stop the Alarm Output Brightness of the LCD Clock Display Clock Setting Volume Control ARC function Auxiliary AV Input Function Reset Function Radio Operation Switching to Radio Mode Selecting the Radio Band Selecting Station Auto Store & Preset Scan Manually Store Station & Recall
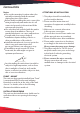
INSTALLATION Notes: Choose the mounting location where the unit will not interfere with the normal driving function of the driver. Before finally installing the unit, connect the wiring temporarily and make sure it is all connected properly to the unit and if the system works properly. Use only the parts included with the unit to ensure proper installation. The use of unauthorized parts can cause malfunctions.
INSTALLATION MOUNTING CAUTION: Do not install radio without rear cover installed. No user serviceable parts inside. Rear cover provides protection against potential fire hazard. 4 www.PyleUSA.
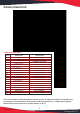
WIRING CONNECTION WIRE INSERTION VIEW PIN NO 1 2 3 4 5 6 7 8 9 10 11 12 13 14 15 16 17 18 19 20 WIRE COLOR DESCRIPTION ORANGE ORANGE / BLACK PINK C RIGHT SPEAKER (+) C RIGHT SPEAKER (-) ILLUMINATION CONTROL BLUE POWER ANTENNA GRAY / BLACK GRAY PURPLE / BLACK PURPLE BROWN BROWN / WHITE A RIGHT SPEAKER (-) A RIGHT SPEAKER (+) B RIGHT SPEAKER (-) B RIGHT SPEAKER (+) C LEFT SPEAKER (+) C LEFT SPEAKER (-) RED YELLOW BLACK ACC B+ GROUND WHITE / BLACK WHITE GREEN / BLACK GREEN A LEFT SPEAKER (-) A LEF
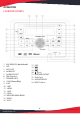
OPERATION LOCATION OF KEYS 1. VOL/PWR/SEL (Audio knob) 2. LCD 3. DISC SLOT 4. ALARM SET 5. ALARM ON/OFF 6. DIM (Dimmer) 7. SPEAKER A/B/C 8. 1 PAU (Pause/Play) 9. 2 INT 10. 3 PRT 11. 4 RDM 12. 5 DIR13. 6 DIR+ 14. WEATHER BAND/BAND 15. MODE 16. AS/PS 17. 18. 19. 20. 21. 22. 23. 24. DISP (Eject) EARPHNE OUTPUT AV IN Jack USB INTERFACE RESET button 6 www.PyleUSA.
OPERATION TRUN ON/OFF THE UNIT Press PWR button (1) to turn on the unit. When the unit is on. Press and hold PWR button (1) for 2 seconds to turn the unit off. SOUND ADJUSTMENT will flash. Rotate the VOL control (1) to adjust the minutes. Press the ALARM SET button (4) again to store the alarm time.
OPERATION RESET FUNCTION RESET button (24) must be activated with either a ballpoint pen or thin metal object. The RESET button is to be activated for the following reasons: Initial installation of the unit when all wiring is completed. All the function buttons do not operate. Error symbol on the display. Note: When RESET button is pressed. All the memory will be lost. RADIO OPERATION SWITCHING TO RADIO MODE Press MODE button (15) to select radio mode.
OPERATION SELECTING TRACKS Press button (18) or button (19) to move to the previous track/file or the following track/file. Hold / button to fast reverse or fast forward. DISC play starts from when you release the button. PAUSING PLAYING Press PAU button (8) to pause playing. Press it again to resume play. PREVIEWING ALL TRACKS Press INT button (9) to play first several seconds of each track/file. Press again to stop intro and listen to track/file.
OPERATION The USB solution can support: 1. Folder: 500 max. 2. File: 999 max. 3. Depth of folder: 8 layers 4. Size: 32 GB FOLDER SEARCHING Press AS/PS button three times. It enters into “Folder searching” mode. Rotate the audio knob (1) to select desired folder. After that press audio knob (1) to enter the folder. Rotating audio knob (1) to select desired file and then press audio knob (1) again to play. USB PLAY OPERATION In the front panel of the unit, there is an USB interface (23).
OPERATION 2. The unit cannot play a CD-R and CD-RW that is not finalized. (Please refer to the manual of your CD-R/CD-RW recorder or CD-R/CD-RW software for more information on finalization process). 3. Depending on the recording status, conditions of the disc and the equipment used for the recording, some CD-Rs/ CD-RWs may not be played on this unit. (see *1) *1: To have more reliable play back, please see following recommendations: a: Use CD-RWs with speed 1x to 4x and write with speed 1x to 2x. b.
OPERATION Display the current disc’s LANGUAGE, AUDIO TYPE, SUBTITLE LANGUAGE and PLAY ANGLE. For VCD: The meaning of the menu is the same with the DVD menu above. GO TO FUNCTION FOR DVD: Press GOTO button, the screen will display the following message: Use the number keys to input the desired Title, Chapter or Time, then press ENTER key to confirm. FOR VCD (WITH PBC OFF)/CD: You can input the Track and Time then press ENTER key to confirm. ZOOM FUNCTION Allows the picture to be increased in size.
OPERATION ATTACHMENT: PARENTAL CONTROL DVD discs have a parental level assigned to the disc. The range of parental controls is from 1 to 8. The player can be set in a similar way. If the player’s parental level is set to 8 it will play all discs. If the player’s parental level is set below 8, only discs with a lower or equal parental level will play. For example if the player is set to 5, only discs with parental control ratings of 5, 4, 3, 2, & 1 will play.
OPERATION 1. Use or cursor button to select the items you want to program. 2. The items you selected will become highlight. 3. Input the sequence number you want to program by numeric buttons (0- 9,10+) on the remote control. 4. Press OK or select “play” operation button on the bottom area to program playback. NOTE: For audio CD, the play interface and operation is similar with the Music page operation. For details, please refer to the description of Music page above.
OPERATION LANGUAGE SETUP • When you open the setup menu, you will see the language setup page LANGUAGE SETUP OSD LANGUAGE AUDIO LANG SUBTITLE LANG MENU LANG EXIT SETUP You can change the OSD / AUDIO/ SUBTITLE / MENU language between ENGLISH / GERMAN / SPENISH / FRENCH / PORTUGUESE / ITALIAN / (RUSSIAN) only for MENU LANG) AUDIO SETUP • When you open the AUDIO menu, you will see the following picture: AUDIO SETUP AUDIO OUT KEY EXIT SETUP 1. AUDIO OUT: Change among SPDIF/OFF, SPDIF/RAW and SPDIF/PCM. 2.
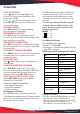
REMOTE CONTROL REF 1 2 3 DESCRIPTION MUTE POWER 0-9 TUNER Silence Audio output Turn the radio on or/standby Press 1-6 to access preset station: Press and hold to store the station to 1~6 button. CD/MP3/USB Silence Audio output Turn the radio on or/standby Entertrack number to access track directly. 4 LOUD/E-Q Press to select desired 5 SEL Access the Bass, Treble, Balance... setting. 6 STOP Access the Bass, Treble, Balance... setting.
REMOTE CONTROL 17 www.PyleUSA.
TROUBLESHOOTING Before going through the checklist, check the wiring connection. If any of the problems persist after checklist has been made, consult your nearest service dealer. Symptom No power. Disc cannot be loaded or ejected. No sound. Cause Solution The car ignition switch is not on. If the power supply is connected to the car accessory circuits, but the engine is not moving, switch the ignition key to “ACC”. The fuse is blown. Replace the fuse. Presence of CD disc inside the player.
PLRVST400 RV WALL MOUNT AUDIO/VIDEO RECEIVER AV Stereo Headunit with Wireless BT Streaming, Multimedia Disc Player, HDMI ARC, AUX/MP3/USB Reader Features: • Audio + Video Digital Mobile Receiver System • Built-in Bluetooth Wireless Receiver for Music Streaming • Universal Standard Size: Console/ Wall Panel Installation • Multi Speaker ‘3-Zone’ Audio Source Control • Digital LCD Display with AM/FM Radio • Front-Loading CD/DVD Player • Versatile Digital Media File Support • • • • • • • • • • • • • Connect &
What’s in the Box: • A/V Receiver System • Power & Wiring Harness • Remote Control Technical Specs: • MAX Power Output: 4 x 50 Watt • Universal Size Standard: Double DIN • Sound Mode: Stereo/Mono • Frequency Response: 40Hz-18kHz (+/-3dB) • Impedance: 4 Ohm • S/N Ratio: 60dB • • • • • • • • • • • • Stereo Separation: >50dB, @ 1kHz Tone Control: Bass/Treble +/-10dB PLL Synthesizer Stereo Radio Electronic Shockproof (ESP) Function Maximum USB Flash Support: 32GB Radio Station Memory: Up to 30 Presets Digital
www.PyleUSA.