
User`s manual
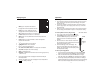
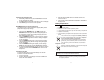

Display Layout
MAX (top of LCD): Max Hold function
engaged for the Air Temperature function
HOLD (top of LCD): Data Hold function
engaged for the Air Temperature function
VEL: indicates that meter is in air velocity mode
FLOW: indicates that meter is in air flow mode
MAX (bottom of LCD): Max Hold for the IR Temperature and
RH function
HOLD (bottom of LCD): Data Hold for the IR Temperature
function and RH function
o
C/
o
F: Temperature units of measure
CFM/CMM: airflow units of measure
Ft
2
,m
2
: units for area dimensions
m/s, ft/min, km/h,
MPH, knots: air velocity units of measure
X10, X100: multipliers for air flow readings
AVG: air averaging mode
RECORD: indicates that min/max function is running (top for temp
, bottom for air)
Large LCD digits at center of display for Relative Humidity an
d IR Temperature
Smaller LCD digits at top, right of display for Probe Temperature
: Low battery indicator
Operation
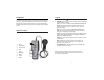
Connecting the Vane
1. The vane plug is inserted in the meter’s sensor jack at the top of the
meter. The plug and jack are keyed so that the plug can only fit in
the jack one way.
2. Turn the plug carefully until it lines up with the jack and then firmly
push the plug in place. Do not apply undue force or try to twist the
plug side-to-side.
3. If the vane is not connected to the meter or if the sensor is defective,
the LCD display will indicate OL in place of a Temperature reading.
Air Velocity Measurements (Single Point)
1
. Turn on the meter using the ON/OFF button.
2. Press UNITS button to select the desired unit of
measure. NOTE: At power up the meter will
display the last unit of measure previously
entered.
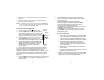
3. Place the sensor in the air stream. Ensure that
the air enters the vane as indicated by the arrow
sticker placed inside the vane.
4. View the readings on the LCD Display. The
large main LCD display shows the Air Velocity
reading. The upper right LCD sub-display shows
the temperature reading.
Air Velocity Averaging Mode
1. To enter 20 P
oint Averaging Mode, press and hold the AVG
button until it beeps twice. The AVG icon will be displayed.
2. Take a measurement and press the AVG button. A single
beep will sound and the HOLD icon will appear in the display.
3. The average reading will be displayed and number of readings
measured will appear in the upper right hand corner of the display.
After 5 seconds, the display will return to the current reading.
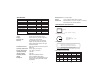
airflow
Arrow
Side view of Vane
3 4