PLTS73UB Car Stereo Video Receiver with Multimedia Player, BT Wireless Streaming, Hands-Free Talking, Motorized Fold-Out 7’’ Touchscreen Display, MP4/MP3/USB/SD/AM/FM Radio, Single DIN
CONTENTS Safety Information 3 Precautions 3 Installation 4 Control Panel 6 Remote Control 8 Set Up Operations 10 Radio Operations 13 USB/SD Card Device Operations 14 Wireless BT Operations 16 Android Phone Link Operations 17 Features 19 Technical Specs 20 Download the “Phonelink” Apk from Google Play Store 2 www.PyleUSA.
IMPORTANT: • Do not operate this digital video player while the vehicle is moving. • This is a safety feature to prevent driver distraction. • It’s illegal in most country for the driver to view video while the vehicle is moving. • The digital video functions will only be operated when vehicle is parked and the parking brake is engaged. To establish a safe level: Start your volume control at a low setting. • Slowly increase the sound until you can hear it comfortably and clearly, and without distortion.
INSTALLATION: Before Installation: • We recommend you to let a professional technician install the unit in the vehicle. • Disconnect negative battery terminal of vehicle. Installation Process: • Carefully remove the existing head unit. • Before finally installing this product, connect wiring harness temporarily and make sure it’s all connected up properly and test the head unit if it can work properly.
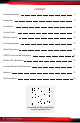
Wiring Connections: BLACK SWC - GND BROWN ACC B+ GROUND POWER ANTENNA RED BROWN / WHITE YELLOW ORANGE PINK BLACK ORANGE / BLACK BLUE FRONT LEFT CHANNEL SPEAKER WHITE GRAY WHITE/BLACK GRAY / BLACK REAR LEFT CHANNEL SPEAKER GREEN VIOLET GREEN/BLACK VIOLET/BLACK SWC - 1 SWC - 2 REVERSE (+) PARKING BRAKE (B-) ILLUMINATION (+) FRONT RIGHT CHANNEL SPEAKER REAR RIGHT CHANNEL SPEAKER Note: the ground connection cable (parking brake B-) must be connected in order for pictures to be played ba
Control Panel Buttons: 1. OPEN/ BUTTON • Briefly press this button to slide the monitor out of slot. • Repeatedly press this button to tilt up and down the monitor. • Press and hold this button to slide the monitor inside of the slot. 2. /MODE BUTTON ON In power on mode, short press it repeatedly to select one mode of the RADIO, USB, SD Card, Phonelink, Bluetooth and AUX IN(AV IN). 3. Volume KNOB / SELECT BUTTON Rotate the VOL knob to increase or decrease the volume level.
8. Tune Next/ Skip Next track In Radio mode, press it to scan strong singal radio station upward step by step. Press and hold it to tune radio frequency upward one step at a time. In USB/Micro SD card/BT music playback, press to skip next track. Press and hold to fast forward playback. 9. MUTE ON/OFF, In power on mode, press the MUTE 10. Receive and Redial Last Call ( ) In BT phone mode, press the button to make a call / receive a call / redial the last dialed phone number. 11.
REMOTE CONTROLS: 1. OPEN / Briefly press this button to slide the monitor out of slot. Repeatedly press this button to tilt up and down the monitor. Press and hold this button to slide the monitor inside of the slot. 2. Power ON/OFF, MODE Press it to turn the unit ON , press and hold to turn the unit OFF. Phonelink, Bluetooth and AUX IN(AV IN). 3 & 7. / In USB/SD Playback mode, press each one to fast forward and fast backward playback with X2, X4, X8, X16 speed.
. RPT (Repeat playback) / 2 In USB/SD playback mode, press and hold the RPT button to repeat playback modes: Repeat Track, Repeat All, Repeat Cancell. In radio mode, press to store or recall the preset station 2. 10. DISP / 1 In video playing mode, press and hold the DISP to show information such as Title number, Chapter number, Track number, elapsed time, remain time etc.. In radio mode, press to store or recall the preset station 1. 11.
Setup Operations: Main Menu: In each mode, touch the icon to enter the main menu as below image. In the main menu screen, press the desired icon to enter each of the following settings : Radio, Bluetooth(Phone & Music), USB, SD Card, Phonelink, AUX In(AV In), F. CAM (Front View Camera), Setup. Time Brightness Control In main menu, touch the icon to enter the setup menu, as below images. Then user can set up or adjust the general settings for this multimedia player. A.
• SWC(Steering Wheel Control) Tap “SWC” to enter the study operation menu. First, make sure the SWC connecting wires have been connected to this unit. Before study, tap the icon to clear all previous settings. Press and hold a steering wheel button, at the same time, tap the function button on touch screen that you want to set on to the steering wheel.
C. Audio Settings Tap the icon to enter the audio setting: mode, tap the EQ button to enter EQ setting. • Sound effect: Tap the FL, FR, RL, RR, ALL button to preset the Move the blue circle at the middle of “car inside” front seat passenger, left back passenger, right back passenger and all passengers in the car. - Tap the “ ” button to clear all the audio settings. - Tap the “ ” button to exit from the audio setting. • EQ Presets: - User can preset EQ: Standard -> POP -> Classic -> Rock -> Jazz.
Radio Operations: Press MODE button on the control panel or on the remote control, or tap the “Radio” icon on touch screen until Tuner is selected. 1 2 3 4 5 6 7 8 9 10 11 12 13 14 15 1. Home Page 2. Clock Time 3. Volume Level Adjust 4. TFT Screen Backlight brightness Adjust 5. Active Media 6/7. Tune/Seek Down & Tune/Seek Up Tap this button to seek tuning down or up. Tap and hold this button to move radio frequency down or up one step at a time. 8. Current Radio Reception State 9.
USB/SD Card Operations: USB Connection, Mini SD Card Slot The USB port is designed for media playback from a flash memory device. The mini SD card slot is desiged for media playback from mini SD card. If you would like to play video/song/photo files contained in a USB flash memory device or SD card, please insert the USB flash memory device into the USB port or insert a mini SD into the mini SD card slot. The unit will play automatically video/song /photo files.
USB/SD Card Operations: - Movie Playback: 1 2 6 7 34 8 9 5 10 11 12 13 14 15 16 1. Home Page 2. Clock Time 3. Volume Level Adjust 4. TFT Screen Backlight Brightness Adjust 5. Active Media 6. Previous Movie / Fast backward 7. Play/Pause 8. Next Movie / Fast forward 9. Sort the List of the Folders and Files 17 18 10. View the Movie File List 11. Next Page 12. Previous Page 13. Repeat Playback 14. Random Playback 15. Zoom In/ Zoom Out 16. Multi-Audio Language 17. Multi-Subtitle Language 18.
Wireless BT Operations: Pairing and Connecting Before using a Wireless BT phone with this unit, the phone must be paired and connected. The Wireless BT signal of the unit will broadcast when the power is on. This multimedia player will displayed as "PyleUSA" on your phone. When prompted, enter the pass code "0000" on your phone. Once paired, the BT phone should automatically connect this unit whenever the unit is in range. Make a call Input the phone number by using the keypad in Wireless BT mode.
Contacts List (Phonebook) Tap icon to view the contacts(phonebook). Tap icon to refresh the phone book. Tap icon to and input a key-letter to retrieve the Streaming Audio In Wireless BT phone mode, tap icon to change to BT music (A2DP) mode. Tap icon to skip to the previous track. Tap icon to play or pause the music. Tap icon to advance to the next track. Setup Tap icon to set auto connect, auto answer and Pin Code. Audio Settings www.PyleUSA.
Android Phone Link Operations: Phone link allows you to mirror the screen of certain Android smartphones on the screen of this car DVD player. Simply connect your device to the USB port and you're ready to see your favorite smartphone apps directly on the screen. - Android phone link: 1) Please scan one of QR code on right side to download the “Phonelink” app and install it to your smartphone. AMAZON GOOGLE the USB port, and then connect it to your phone.
www.PyleUSA.
Features: • Multimedia Stereo Radio Receiver • 7’’ -inch HD Video Display • Wireless BT Music Streaming • Built-in Microphone for Hands-Free Talking • CD/DVD Player • Touchscreen Control • User-Friendly Control Interface • AM/FM Radio with LCD Display • Connect & Stream Audio from External Devices • MP3 Digital Audio File Playback • Front Panel Aux (3.
What’s in the Box: • Single DIN Receiver • Remote Control • Power & Wiring Harness Technical Specs: • Single DIN Size Universal Standard • Power Output: 4 x 80 Watt (320 Max.
Questions? Issues? We are here to help! Phone: (1) 718-535-1800 Email: support@pyleusa.