Retro Style Vinyl Turntable With USB-to-PC Recording Entertainment Center MODEL : PVNTT5U Operating Instructions Manual
CAUTION TO PREVENT FIRE OR SHOCK HAZARD, DO NOT USE THIS PLUG WITH AN EXTENSION CORD, RECEPTACLE OR OTHER OUTLET UNLESS THE BLADES CAN BE FULLY INSERTED TO PREVENT BLADE EXPOSURE. TO PREVENT FIRE OR SHOCK HAZARD, DO NOT EXPOSE THIS APPLIANCE TO RAIN OR MOISTURE. , WARNING:TOREDUCETHE RISK OF ELECTRIC SHOCK DO NOT REMOVE COVER (OR BACK), NO USER S E R V I C E A B L E PA R T S INSIDE REFER SERVICING TO QUALIFIED SERVICE PERSONNEL.
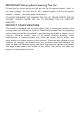
PREPARATION FOR USE UNPACKING AND SET UP Carefully remove the unit from the display carton and remove all packing material from the unit. Unwind the AC power plug and extend it to its full length. Place the unit on a stable, level surface, convenient to an AC outlet, out of direct sunlight, and away from sources of excess heat, dust, moisture, humidity, or strong magnetic fields. Connect the plug to your AC outlet.
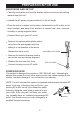
IMPORTANT: Raising And Lowering The Lid To open the lid, raise it as far as it will go until the lid support bracket ‘locks’ in the open position. To close the lid, lift it upward slightly until the lid support bracket ‘unlocks’ , and then gently lower the lid. TO AVOID DAMAGING THE CABINET OR THE LID, NEVER FORCE THE LID CLOSED. ALWAYS RAISE THE LID TO RELEASE THE LID SUPPORT BRACKET.
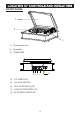
FRONT PANEL 1 2 3 1) Phonograph Lid. 2) Turntable. 3) TONE ARM. PC-USB LINE OUT AUX IN PH-AUX R L L R 4 5 6 7 4) PC-USB SLOT. 5) PH-AUX SWITCH.
PHONOGRAPH 2 1) 2) 3) 4) 5) Turntable. 45 RPM Adapter. Automatically shut off. Cue Lever. Speed Selector 1 (33 &45 &78 RPM). 6) Tone Arm Lock. 7) Tone Arm with Stylus. 4 3 5 6 7 AUX IN OPERATION 1) Set the PH-AUX switch to AUX position. Rotate the volume control to desert level. 2) Insert the audio cable (not included) into the matching "AUX IN" (L/R) socket of the unit ,operate A as usual and through the speaker of the unit, we can hear the sound exported from A.
PLAYING TURNTABLE This system includes a full-size, 3-speed, belt-drive turntable. You can play 33, 45, and 78 RPM records. 1) Set the PC-AUX switch to PH position. Insert the PC-USB line into the Computer. Rotate the volume control to desert level. 3) Make sure that you have removed the stylus cover from the stylus and have released the Tone Arm Lock that secured the tone arm to the tone arm rest. 4) Set the turntable Speed Selector to the appropriate speed, 33, 45, or 78 RPM.
AUX IN/PHONO RECORDING 1、 Set the PH-AUX switch to PH or AUX in position, playback the tacks on the AUX or PHONO. 2、Install Audacity on your computer using the included disc. 3、Set the computer before record: 1) Set the volume control attribute record(R) mixer:AK5371 YES and then adjust the volume to max..
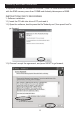
Audacity and USB Connection It supports Window 95 /Window XP/Window 7/Vista or more advanced version, with the EMS memory more than 128MB and Audacity takes space of 5MB. INSTRUCTION FOR PC RECORDING 1. Software installation 1.1) Insert the CD disk into drive of PC,and read it; 1.2) Open the software, double press the file"Audacity.exe",then press"next"to go forward; 1.
1.4) Press“next” to go forward; 1.
1.6) Press“next” to go forward; 1.7) Waitting for installation finished, and press“finish”to end the installation; 1.
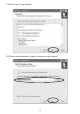
2. Recording: 2.1) Open the software; 2.2) Choose “Edit”menu,then choose“Preferences”; 2.3.
NOTE: you need to check your computer audio properties,the sound recording should be selected “sss usb Audio Device” as below. 2.4. Adjust the output and input volume. Output Volume Input Volume 2.5.
2.5.1 Press this button •,start recording. 2.5.2 Click the button to skip to start; 2.5.3 Click the button to skip to end; 2.5.4 Click the button to play; 2.5.5 Click the button to pause the record play, 2.5.6 Click the button to stop the recording. 3. Export the Music Files for WAV,MP3,Format. • Once you have finished recording, you should save your music to the computer. • Click File menu and move down to Export as WAV format,MP3format or Ogg Format. • Click on any format to save the music.
3.3) After opened, it will come to the following menu, click"YES" to go to "Llame-enc. dll", and find the file"s Iocation. 3.4)After you find the"lame-enc.dl"file,open it and dick "Y" to finish the installation.
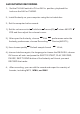
THE TURNTABLE DRIVE BELT IS FACTORY FITTED – USE THESE INSTRUCTIONS ONLY IF THE TURNTABLE FAILS TO REVOLVE.... STEP 1 Use a screwdriver to remove the black iron C-clip and lift the turntable off the phonograph mechanism. STEP 2 Retrieve the dropped black rubber turntable drive belt and replace it around the column on the bottom of the turntable, then pull it out gently without overstretching and hook the band around the small column point at the edge of the turntable, as shown in the diagram.