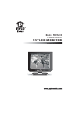
Model:PM15LCD 4:3 DIGITAL LCD-Monitor 15 LCD MONITOR OPERATING MANUAL
Contents 1 PREFACE 2 2 SAFETY PRECAUTIONS 2 3 FRONT BACK/SIDE CONNECTIONS OF LCD 4 4 5 6 INSTALLTION DRAWINGS REMOTE CONTROL FUNCTIONS CONFIGURATION OF THE LCD Power Cable Connection 5 Connecting Antenna 5 Video Connection 6 S-Video Connection 6 Y Pb Pr Connection 7 PC-RGB Connection 7 Remote control instructions in TV mode 8 Battery Installation 9 Battery Usage Caution 9 Enter picture menu 10 Enter sound menu 10 Enter Timer menu 11 Enter other setting menu 11 9 TRO
1. PREFACE Thank you for buying this TV ! Please read this manual thoroughly before operating the monitor. Make sure the monitor was not damaged in transit. Should the monitor is damaged, do no install it and contact your dealer. Check that you have all the accessories according to the model. 2. SAFETY PRECAUTIONS Preparation Put the monitor on a stable surface. Do not place any material on the monitor.
Heating sources and humidity Keep the monitor dry and away from humidity. Keep the monitor away from heat sources Cleaning and maintenance Unplug the monitor before cleaning it. Do not use solvents or liquids to clean the monitor. Only clean the monitor with a soft and dry cloth. In case of troubleshooting, do not use spare parts other than those suggested by the manufacturer. Using inadequate spare parts can lead to electric shocks, short-circuits fire or other incidents.
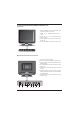
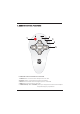
3. FRONT BACK/SIDE CONNECTIONS OF LCD Front View 1.Press“POWER” Switch on the LCD TV when at standby mode or vice versa. 2.Press“UP”or “DOWN”to select option in menu 3.Press“V+”or “V-”to increase or decrease the sound level. 4.Press “MENU”to bring up the main menu to the screen 5.Press“SOURCE”to select the input source Back View and Control Connections 1.DC 12V IN: DC input socket 2.VGA: Connect the PC-RGB output jack of PC 3.YPbPr: Connect the DVD YPbPr output jack of the DVD Player 4.
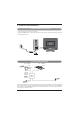
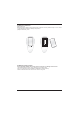
4. TV INSTALLTION DRAWINGS Power Cable Connection Connect the power cord correctly as shown. Press the POWER switch of your LCD VT to switch on the LCD TV. The power indicator on the front panel lights up in green. DC IN 12V Connecting Antenna VHF ANTENNA VHF ANTENNA OUTDOOR ANTENNA AMPLIFIER INDOOR ANTENNA AMPLIFIER 75 OHM ANTENNA PLUG POWER PLUG OF ANTENNA AMPLIFIER To ensure good picture and sound, TV antenna system needs to be installed.
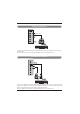
Video Connection AUDIO L R IN VIDEO IN TV Back AUDIO DVD Back Connect the VIDEO and AUDIO output jack of the DVD or VCR to the AV IN jacks on the set using the RCA cable. Select the AV input source with using the SOURCE button on the remote control. S-Video Connection TV Back 1 R 1 L AUDIO DVD Back Connect the S-VIDEO output of the DVD or VCR to the S-VIDEO input on the set. The picture quality is improved; compared to connecting a regular VCR to the video input.
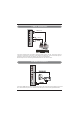
Y Pb Pr Connection AUDIO L R IN Y PbPr IN 1 TV Back Y Pb Pr L R DVD Back Connect the YPbPr output of the DVD or VCR to the YPbPr input on the set. The picture quality is improved; compared to connecting a regular VCR to the video input. Connect the Audio output of the DVD or VCR to the Audio input jacks on the set using the RCA cable. Select HD input source with using the SOURCE button on the remote control.
5. REMOTE CONTROL FUNCTIONS 2 1 3 4 5 6.1 Remote control instructions in TV mode 1. POWER Switch on LCD TV when at standby mode or vice versa. 2. SOURCE Press to cycle through the input source in following. 3. MUTE Press to mute the sound. Press again or press V+ to unmated. 4. MENU Brings up the main menu to the screen. 5. THUMB STICK (▲/ ▼/ ◄ / ►/ ENTER) Allows you to navigate the on-screen menus and adjust the system settings to your preference.
5.2 Battery Installation a)Open the cover b)AA size batteries, When inserting the batteries, make sure correct polarities as per”+“and ”-“marks on the batteries and within the battery compartment c)Replace the battery cover 5.3 Battery Usage Caution To prevent battery leakage which may result in bodily injury or damage to the remote: 1.Install all batteries correctly, and as marked on the remote control. 2.Do not mix batteries:(OLD and NEW or CARBON and ALKALINE, etc) 3.
6. CONFIGURATION OF THE LCD 6.1 Enter picture menu 1. Press MENU key to open the main menu, 2. Press V-/+ to select: 3. Press V- enter setting picture menu, the outline border turns green. 4. Then press / to select options in the picture menu 5. After setting, press MENU to quit. Or wait for few seconds it will be quit automatically. Brighness Contrast Colour Sharpness Preset 50 50 50 Normal Personal Options: 1. Brightness Press V- to darken the picture. Press V+ to brighten the picture. 2.
6.3 Enter Timer menu 1. Press MENU key to open the menu, A B C 2. Press V-/+ in main menu to move menu bar, select 3. Press V- enters other setting menu. 4. Then press / to select option in submenu 5. After setting, press MENU to quit. Or wait for several seconds it will be quit automatically. Option: 1. Clock If you select clock, press0-9 to set time. Clock Reminder timer Off time Swith time 2.
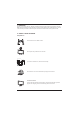
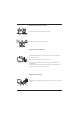
7. TROUBLESHOOTING AND ADVICE Before calling our SAS centre, please check if you can solve the troubleshooting by yourself. Troubleshooting Control No signal Please check that all cables and cord's are correctly plugged in. No color shades Adjust the contrast, the color and the brightness Stain show on the screen. May be result from a lighting signal from car, motor, neon light and other electrical devices or appliances.
8. SPECIFICATIONS Screen Size 15 Inch Display Type TFT LCD Resolution(Pixel) 1024 X 768 Brightness 250cd/㎡ Color 16.7M Contrast Ratio 450 : 1 Aspect Ratio 4:3 Power Source AC 100-240VAC, 50/60HZ DC 12V Adapter ≤60W Video Input Format PAL / NTSC Antenna Input Standard antenna socket 75Ω Audio Output L / R 3WX2 Video Video 1.0Vp-p 75 Ω; RCA S-Video Y:1.0Vp-p±3db C:0.3Vp-p±3db PC 800 600/60Hz 1024 600/60Hz 1280 1024/60Hz Audio (S-Video/Video/YPbPr/PC) R/L 200mVrms (max3.