
Specifications


7
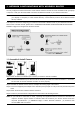
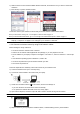
1.3.1 Connect to wireless routers with one press
Note: The quick wireless connection setup function could be a virtual button on the wireless
configuration page, or a physical button on the wireless router depending on the router’s brand.
Note: If you hear “Failed”, check if the wireless authentication of your router is WPA or WPA2. If no,
please change the authentication method to WPA or WPA2, or check “1.3.2” or “1.3.3” to
complete the setup and connection in another way.
Continue to connect your camera to Internet.
If you don’t have iPhone, iPad or Android mobile device, go to “1.4.1 Configure on Laptop / Computer” at page 12.
If you have iPhone, iPad or Android mobile device, go to “1.4.2 Configure on iPhone / iPad” at page 15.
Note: The HTC Android mobile devices do not support this function. Please go to “1.4.1 Configure on
Laptop / Computer” at page 12 to configure your camera to Internet.
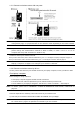
1.3.2 Connect to wireless routers by ad-hoc
You may connect this camera to your wireless router from your laptop / computer, or from your iPhone / iPad.
From laptop / computer
Before starting the setup, make sure:
Your laptop / computer supports wireless network connections.
You know the user name and password to join the wireless network you want to use.
The IP address of your laptop is changed to “192.168.2.xx”, where xx could be 1 ~ 255 except 10.
Note: For details, please refer to “APPENDIX 1 CHANGE IP ADDRESS OF YOUR LAPTOP / COMPUTER” at
page 22.
The camera is powered on.
Follow the steps below to wirelessly connect this camera to your wireless router:
a) Scan and join the wireless network with the SSID “IP-CAMERA” from your laptop.
Note: The wireless network, “IP-CAMERA”, is generated from the camera itself. If you can’t find it, wait
for a while and try again. No password is needed to join the network.