
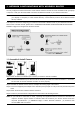
Specifications


5
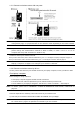
1. NETWORK CONFIGURATIONS WITH WIRELESS ROUTER
You may configure the network connection of this network camera to Internet for remote surveillance with your laptop
/ computer, or with your iPhone®, iPad® or Android™ mobile device based on your network environment.
Note: The HTC Android mobile devices do not support configuring this camera to Internet. Please use
your laptop or computer, or other mobile devices, such as iPhone, iPad or other Android mobile
device, instead.
This chapter is focused on configuring your camera to Internet with a wireless router. If your network environment
doesn’t have a wireless network, please refer to “APPENDIX 2 NETWORK CONFIGURATIONS WITH ROUTER /
MODEM” at page 25 to configure the camera to Internet.
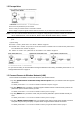
1.1 Assemble & Install Camera
Step1: Fasten the base of the bracket (the round one) to where the camera is installed.
Note: The distance between your camera and the location you want to monitor should be 3 ~ 4 meters,
for the built-in human detection function to work properly.
Step2: Assemble the bracket and the camera, and adjust the viewing angle of the camera.
Step3: Connect the supplied power adapter to the camera’s power jack (DC 5V / 2A) on the rear panel and the power
outlet.
Step4: Fasten the antenna for wireless network connection.
Step5: Continue to proceed network configurations as instructed in the following sections.
Note: If you find Wi-Fi connection is weak, replacing the supplied antenna could be an alternative to
improve wireless signal. Please be advised that the antenna you choose should meet the
required specifications: (1) IEEE802.11b/g/n 2.4Ghz Wireless Network. (2) Antenna with
reverse-SMA male connector.