
Specifications


39
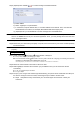
APPENDIX 6 ADDING WIRELESS PROFILE MANUALLY
You can also add the wireless profile manually in the system configuration page from the web browser.
Step1: Click “Add” to create a profile manually.
Step2: In “Profile Detail”, enter all the necessary information for access the wireless network, and click “Save”.
The selected wireless access point / router will be added to “Profile Name List”.
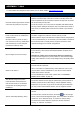
Note: The setting items shown below may vary based on each option selected.
Item Description
Profile Name Give a meaningful name for this Wireless profile.
SSID This is the name of the wireless access point / router your camera wants to
configure for.
Network Type Infra Select it when the camera will access the wireless network via an access point or
router.
Ad-hoc Select it when the camera will connect to other wireless devices, such as your
computer or laptop, with a wireless connection.
Authentication Check which authentication method is used for the wireless access point / router
and select the correct one: “Open”, “Shared”, WPAPSK” or “WPA2PSK”.
Encryption Type Check which encryption type is used for the wireless access point / router and
select the correct one: “WEP”, TKIP” or “AES”.
Select “NONE” to disable key authentication for wireless network access.
Default Key In 64-bit WEP, 4 keys are available; in 128-bit WEP, only 1 key is available.
Check which key is used for the wireless access point / router and select the
correct one.
Key Enter the key used to access the wireless access point / router.
When “WEP” is selected
For 64 bit, the length of the key allows up to 10 alphanumeric characters or 5 ASCII
characters.
For 128 bit, the length of the key allows up to 26 alphanumeric characters or 13 ASCII
characters.
When “TKIP” or “AES” is selected
The length of the key allows 8 ~ 63 alphanumeric characters.
Channel Check which channel is used for the wireless access point / router and select the
correct one.