
Specifications


28
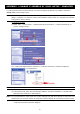
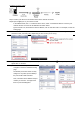
Step2: Open “IPScan.exe” ( ) to search your camera. You will find two IP addresses:
192.168.2.10 - Please ignore this IP address.
192.168.30.155 - This is the address assigned by your wireless router, and the address may vary depending on router
you’re using. Note down the IP address you see, such as 192.168.30.155 in our example below, and also the port number.
Then, select the IP address assigned by your wireless router (such as 192.168.30.155), and click
“Configure” to note down the gateway IP address. It’s the IP address of your wireless router, and you
might need it later for port forwarding.
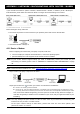
Note: You may change the port number of “88” to another value if you know 88 is blocked by your
Internet service provider or mobile carrier.
For the port number change to take effect, please also enter the user name (admin) and
password “admin” to confirm.
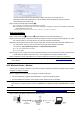
Step3: Open Internet Explorer on your laptop / computer, and enter the IP address and port number you just set
in the URL column to access this camera, such as http://192.168.30.155:88 in our example.
In the login page, enter the user name, password, and security code to access.
Note: Please skip the wizard.
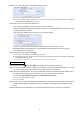
Step4: Go to “Config.” “Wireless”, and in the setting page, switch from “DHCP” to “Static”.
Change “Server IP”, “Gateway”, and “Port” as needed.
“Server IP” is the IP address you’re currently using for this camera.
“Gateway” is the IP address you note down in Step2.
“Port” is the port number you’re currently using for this camera. The default value is “88”. If you change it in Step2, please
change the value here accordingly.