
Specifications


26
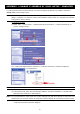
Step3: Open Internet Explorer on your laptop / computer, and enter the IP address and port number you just set
in the URL column to access this camera, such as http://192.168.30.155:88 in our example.
In the login page, enter the user name, password, and security code to access.
Note: Please skip the wizard.
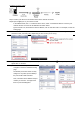
Step4: Go to “Config.” “Wireless”, and in the setting page, switch from “DHCP” to “Static”.
Change “Server IP”, “Gateway”, and “Port” as needed.
“Server IP” is the IP address you’re currently using for this camera.
“Gateway” is the IP address you note down in Step2.
“Port” is the port number you’re currently using for this camera. The default value is “88”. If you change it in Step2, please
change the value here accordingly.
Step5: Go to “Config.” “DDNS”, and enable the DDNS service.
If your router supports UPnP, please proceed Step6.
If your router doesn’t support UPnP, click “Save”, and access your router for port forwarding as instructed in “APPENDIX 5
CONFIGURE PORT FORWARDING” at page 38.
Step6: Go to “UPnP”, and enable the UPnP service.
Then, enable “Port Mapping”, and click “Save” to start port mapping.
When the configurations are saved successfully, you’ll see a message indicating the IP address and port
number assigned to your device.
Note down the IP address and port number, and log out the camera.