
Specifications

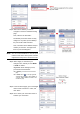


18
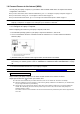
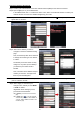
Connect a camera to the Internet
Step1: Connect your Android device to the same wireless network (SSID) as the camera connected.
Step2: Open “EagleEyes” on your Android device.
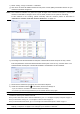
In the address book, click “+” to add a new device. Then, select “Local Network Search” to search your
network camera. You’ll see an IP address assigned by your router.
Note: If you can’t find the camera, make sure your LAN status indicator ( ) is always on, and search
again after 3 minutes.
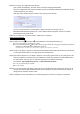
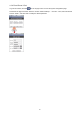
Step3: Select the IP address you want to
configure to show the IP address setting
page.
Then, click the drop-down list of “Network”
to change the network type from “DHCP”
to “Static”.
The default port number is 88. You may
change it to any value (such as 8080) if
you know the port number of 88 is
blocked.
Then, note down the IP address and port
number you see here. You might need
them for port forwarding later.
Note: It’s not recommended to use the port number of 80 since some phone carriers mi
g
ht block this
port for network access.
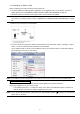
Step4: Select “Apply” to confirm all your
changes. Then, wait till you see “Done”
or “Fail” in “Status”.
Regardless which message you see,
proceed as instructed below:
For Done, you’ll return to the new device
page.
For Fail, select “
” on the top right side.
You’ll later be prompted to select “DDNS” or
“Local IP”. Select “DDNS” and return to the
new device page.