
Specifications


11
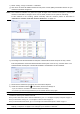
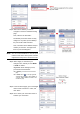
f) Select “Config.”, and go to “Network” “Wireless”.
g) Click “Scan” to search all available wireless access points / routers (SSID), and double-click the one your
camera is intended to configure for.
Note: This method is available only when the signal strength of the wireless access point / router your
camera is intended to configure for is not too weak, and it’s set to open for searching.
If this method is not working, please manually add the wireless profile as described in
“APPENDIX 6 ADDING WIRELESS PROFILE MANUALLY” at page 39.
h) The setting for the selected wireless access point / network will be shown except for the “Key” column.
Enter the password to access the selected wireless access point / router in “Key”, and click “Save”. The
selected wireless access point / network will be added to “Profile Name List” and activated.
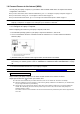
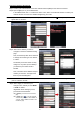
j) Disconnect the camera and your laptop, and close Internet Explorer.
k) Check the LAN status indicator ( ) on the camera, and see if it’s always on.
- If yes, the camera is connected to the wireless network successfully.
- If no, check if you enter the right password to join the wireless network, and try again.
Note: Please also remember to restore the IP setting of your laptop.
Continue to connect your camera to Internet.
If you don’t have iPhone, iPad or Android mobile device, go to “1.4.1 Configure on Laptop / Computer” at page 12.
If you have iPhone / iPad, go to “1.4.2 Configure on iPhone / iPad” at page 15.
If you have Android mobile device, go to “1.4.3 Configure on Android mobile phone or tablet” at page 17.
Note: The HTC Android mobile devices do not support this function. Please go to “1.4.1 Configure on
Laptop / Computer” at page 12 to configure your camera to Internet.