
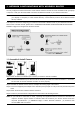
Specifications


10
e) Wait for iPhone / iPad to search available wireless networks, and select the one you want to connect this
camera to.
f) Enter the key to join the wireless network.
Continue to connect your camera to Internet with your iPhone, iPad or Android mobile device.
If you have iPhone / iPad, go to “1.4.2 Configure on iPhone / iPad” at page 15.
If you have Android mobile device, go to “1.4.3 Configure on Android mobile phone or tablet” at page 17.
Note: The HTC Android mobile devices do not support this function. Please go to “1.4.1 Configure on
Laptop / Computer” at page 12 to configure your camera to Internet.
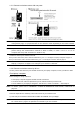
1.3.3 Connect to wireless routers by using RJ-45 network cables
Before starting the setup, make sure:
You know where the wireless router is located.
Find the RJ-45 network cable supplied with the package, or you can prepare a new one.
The IP address of your laptop / computer is changed to “192.168.1.xx”, where xx could be 1 ~ 255 except
10.
Your Windows operating system is Windows 7, Vista or XP.
You know the password to join the wireless network you want.
The camera is powered on.
Follow the steps below to wirelessly connect this camera to your wireless router:
a) Locate the wireless router you’re currently using.
b) Connect the network cable to the camera and your laptop.
c) Check the LAN status indicator ( ) on the camera, and see if it’s always on.
- If yes, the camera is connected to the router successfully.
- If no, replace the network cable with a new one, and try again.
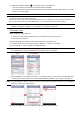
d) Open Internet Explorer, and enter “http://192.168.1.10:88” to access and log into the camera.
Note: The default user name and password for login are both “admin”.
e) Skip the wizard. If you’re prompted to install the add-on, “H264 Streaming Viewer”, please install it.