
User Manual


INSTALLATION & OPERATION GUIDE
PREPARATION
� Remove the speaker from the box and packaging.
� Remove the ceiling tile from the grid where you wish to install the speaker. NOTE: If you are installing the
speaker into a 2’ x 4’ ceiling tile space, you will need to cut the tile to fit the speaker and use a common
ceiling t-rail.
� Pull all needed wires.
�
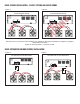
Adjust the transformer “tap” setting according to the level specified by the system designer.
*Use in conjunction with amplifier output/rating requirements.
**Do not feed 70 volt or 25 volt signal into the speakers when the 8 ohm bypass mode has been selected.
This will permanently damage the speaker
***Do not exceed the maximum power rating of the speaker.
TERMINATION
� Connect all wires.
INSTALLATION
� Thread the bare end of the hanging or safety cable through the Fastlink wire joiner.
� Attach the hanging or safety cable by securing it to or around the structure the speaker will hang from.
� Thread the cable back through the Fastlink wire joiner and pull to tighten.
PLEASE NOTE:
It is imperative that the needed cable length is measured precisely. The tension cannot be
loosened once pulled through the Fastlink.
� Attach the carabiner through one of the eye bolts on the back of the speaker.
� Repeat with each cable. All four eye bolts should have a safety cable attached.
�
Angle the SD4 to fit into the ceiling and place the speaker driver side down into the tile.
� Your speaker should now be securely installed.