SD4 CEILING SPEAKER ARRAY INSTALLATION AND OPERATION MANUAL Caution: Please read this manual carefully before operating. Damage caused by misuse is not covered by the warranty.
INTRODUCTION DESCRIPTION The SD4 SuperDispersion® omnidirectional drop tile ceiling speaker array has 360° of seamlessly smooth coverage which greatly improves speech intelligibility and provides powerful crystal clear music reproduction. Each 2' x 2' Array can replace over a dozen conventional ceiling speakers. Takes minutes to install, just remove one ceiling title and drop the SD4 into any standard drop ceiling. The 8 ohm and 70 volt inputs are compatible with any commercial or stereo sound system.
SAFETY PRECAUTIONS � Be sure to read the instructions in this section carefully before use. The included conventions of safety symbols and messages are regarded as very important precautions. � We recommend you keep this instruction manual handy for future reference. SAFETY SYMBOL AND MESSAGE CONVENTIONS Safety symbols and messages described below are used in this manual to prevent bodily injury and property damage which could result from mishandling.
INSTALLATION & OPERATION GUIDE PREPARATION � Remove the speaker from the box and packaging. � Remove the ceiling tile from the grid where you wish to install the speaker. NOTE: If you are installing the speaker into a 2’ x 4’ ceiling tile space, you will need to cut the tile to fit the speaker and use a common ceiling t-rail. � Pull all needed wires. � Adjust the transformer “tap” setting according to the level specified by the system designer. *Use in conjunction with amplifier output/rating requirements.
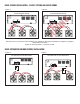
BASIC SPEAKER INSTALLATION - 70 VOLT SYSTEMS AND APPLICATIONS Figure 1. Figure 2. Correct Speaker Wiring Incorrect Speaker Wiring 4Ω 8Ω 16Ω 70V 100V WR ON G SPEAKER OUTPUT COM SPEAKER OUTPUT COM a. + - b. + - c. + - a. + 4Ω 8Ω 16Ω - 70V 100V b. + - + c. - Be careful not to cross wires when installing your speakers. Wiring should always be negative to negative and positive to positive (Figure 2. shows speaker c. incorrectly wired).
SERVICE Ensure the problem is not related to operator error, or system devices that are external to this unit. Information provided in the troubleshooting portion of this manual may help with this process. Once it is certain that the problem is related to the product contact your warranty provider as described in the warranty section of this manual. LIMITED WARRANTY PRO ACOUSTICS, LLC.