
User Manual


13
Installation
Suction-side joint
Suction valve
Draining of washing water
Suction-side pipe
(downward gradient)
Discharge-side joint
Air-release hose
Relief valve
Relief pipe
Tank
Main pipe
Air-release joint
3-way
valve
Metering
pump
Anti-siphon
check valve
w/ duck-bill cap
Discharge-
side pipe
3-way
joint
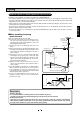
Installation is described with an example using ARPZ-31 and TACMINA tank.
•
Unlike other models, this pump has a discharge-side joint at the front of the pump head and an air-release side joint on its top.
• It is extremely dangerous for the user to forget to open the valve or for there to be the clogging of foreign matter inside
the pump’s discharge-side pipe. Be absolutely sure to install a relief valve, which will automatically release abnormally
high pressure levels, on the discharge-side pipe.
• Install a valve for releasing abnormal pressure that has built up inside the discharge-side pipe. The 3-way valve on the
washing water line may be used instead.
• To prevent gas lock and other such types of trouble, be absolutely sure to use the pump with a push-in pipe (when the
pump is to be placed lower than the tank).
• In order to prevent gas lock caused by gases generated and building up inside the pipes, make the pipe connections
as short as possible.
Piping
Model w/ automatic air-release function for injection of sodium hypochlorite: ARPZ-31/61/12
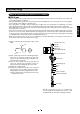
■ When installing the pump
below the tank
✽ Do not install the pump above the tank.
(1)
Connect the suction valve of the tank and the suction-
side joint of the pump using the hose. When doing
this, tilt the pipe at a downward gradient so that no air
will be trapped inside the pipe.
(2) Connect the tube to the discharge-side joint of the
pump.
(3) Attach a 3-way joint to the discharge-side tube (near
the pump’s discharge-side joint), and install a relief
valve. Return the end of the relief pipe to the tank or
other container.
(4) Connect the end of the other discharge-side tube
extending from the 3-way joint to the main pipe
(injection point). When doing this, attach the anti-
siphon check valve with duck-bill cap at the injec-
tion-point side end of the hose/tube.
(5) Attach one end of the air-release hose to the air-
release port, and return the other end to the tank or
other container.
✽ If it is unavoidable for the pump to be placed higher
than the tank, be absolutely sure to connect the foot
valve supplied to the end of the suction-side hose
to ensure that no dirt or foreign matter will be mixed
inside the pump head or valve seat.
✽ It is also recommended that a valve, meter, etc. be
installed to make it easy to carry out maintenance
and other such jobs.
IMPORTANT
<Washing water line>
• It is recommended that a washing water line be provided in the piping.
(A 3-way valve for releasing abnormally high pressure levels may be used instead.)
<Sodium hypochlorite>
•
Take steps to use up the sodium hypochlorite in as short a period as possible (10 to 20 days in hot weather).
• When diluting sodium hypochlorite, use (1) pure water (purified water), (2) water that has been passed
through a water softener or (3) city water that has been purified.
Metering pump
<Example of unacceptable installation>