
User manual
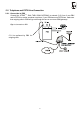

2.5. Power Supply Connection
• Make sure that the voltage in your mains corresponds with the data on the product label.
• Make sure that the antenna has been connected. If you connect a power supply to the
equipment without the antenna, you might cause damage to the GSM module transmitter.
• Connect your power cord. After a while, the green indicator “AC Supply O.K.” should go on.
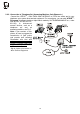
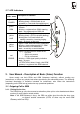
2.6. Functional verification
Recommendation: check GSM gateway functionality prior to connecting it to your PBX and
programming.
1. Connect GSM gateway to previously checked telephone set and PSTN line. Verify that this
telephone is switched to DTMF and its ringer is ON. It is better to check a SIM card too,
using a mobile phone. It is not necessary to fix GSM gateway to a wall for testing – it can lie
on flat surface as well. Excepting this, follow chapters 2.2 to 2.5 to connect all needed.
2. If the inserted SIM card requires a PIN, the red lamp “Enter PIN” will light up. In this case,
pick up the handset of connected a phone. You will hear a PIN tone
.
Enter PIN as described in chapter 3.9.2 and hang up, the red “Enter PIN” lamp will go out.
3. The GSM gateway will register itself into the GSM network. First, the red “No GSM network”
lamp must go out. After a moment, the green “GSM ready” lamp will light up.
4. Pick up the phone; you will hear the dialling tone
and the “Line ready” lamp will start
blinking. If it doesn’t, the phone or its connection is bad.
5. Now check for signal quality. Enter programming mode according to chapter 6.3.2, skipping step
No. 1 (this applies only in the case of connection to a PBX). Indication of GSM signal quality will
be turned on automatically. As more lamps are lit, signal quality is better. If at least one green
lamp is lit up, signal quality is excellent. Try to find a good place for the antenna. Keep the
antenna vertical and move it slowly – signal quality information is updated every three seconds.
Remember that a movement as small as 10 cm may have a considerable effect on signal
quality, as well as a position close to your body. The best way is to step aside after each
relocating of antenna. Hang up after positioning the antenna; do not program anything!
6. Make an outgoing call. Remember that all calls will be routed to GSM by the factory default.
If your GSM gateway is not used first time and the Call Sorting Table is not empty, choose a
number, which will be routed to GSM. Call your colleagues mobile e.g. and verify that you
hear each other well. In the case of a completely new pre-paid SIM card, one outgoing call is
necessary for SIM card activation. Until it is activated an incoming call cannot be received!
Make an incoming call now. Call the GSM gateway from some mobile; the phone should
ring.
7. To check PSTN interface, use an incoming call. Ask somebody to call from some phone to
PSTN line which is connected to your GSM gateway; the phone should ring. Pick it up and
verify, that you hear each other well.
8. The GSM gateway is now checked. You can now connect it to a C.O. line of the PBX. After
connection is completed, fill in the Call Sorting Table (for programming see chapter 6).
Check incoming call and outgoing calls again, both PSTN and GSM. This may, of course,
necessitate some programming or settings changes of the PBX. If everything is O.K., you
can go to programming, if it is required - see chapter 6.
12