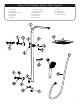
MONTE CARLO Monte Carlo Shower System Model #7004-CH & 7004-BN Owner's Manual
Monte Carlo Shower System Model #7004 Please Read The Following Instructions COMPLETELY Before Beginning! Our goal is to ensure your installation goes smoothly and safely. Please read these instructions carefully and follow recommendations for plumbing and mounting. After reading instructions, if you determine you do not have the necessary skills and/or tools, we recommend that a licensed plumbing contractor complete the installation.
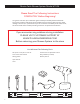
Monte Carlo Shower System Parts Legend 1. 2. 3. 4. 5. 6. Shower Bar Inlet Fitting Nipple and Extensions Escutcheon Set Screws Diverter 7. 8. 9. 10. 11. 12. Diverter Cartridge Hand held Holder Wall Anchor Bottom Mount Swivel Joint Allen Wrench 13. 14. 15. 16.
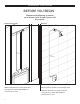
Installation Instructions BEFORE YOU BEGIN Measure the following to ensure your Monte Carlo Shower System will fit properly. New Construction Retrofit 24” minimum 24” minimum Make sure distance from water outlet and mixing valve trim (NOT INCLUDED) is a minimum 24" or more. 4 Remove existing shower arm and shower head. Make sure distance from water outlet and mixing valve trim (NOT INCLUDED) is a minimum 24" or more.
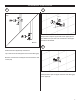
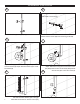
Installation Instructions 1 2 Top Step 1 Step 2 Add plumber's tape to nipple and screw nipple (3) into pipe. Make sure you leave 1/2" off the wall. Use nipple extensions as needed. Bottom 2.1 Slide escutcheon (6) off top and bottom. Top: Unscrew set screws (5) and remove inlet fitting (2). Bottom: Unscrew set screw (5) and remove bottom wall mount (10). 1/2” Add plumber's tape to nipple and screw inlet fitting (2) onto nipple (3).
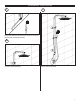
Installation Instructions 6 3 CAUTION: Live Plumbing Slide escutcheon (4) onto pipe (top). 4 Center mount into the outline of the bottom mount. Mount bottom mount (10) with mounting screw (16). 7 Step 2 Step 1 Step 1 Step 2 Step 3 Step 3 Step1: Slide top pipe onto inlet fitting (2). Step2: Secure with set screws (5). Step3: Slide escutcheon (4) to cover set screws (5). 8 5 6 Use level to assure shower pipe is straight. Mark desired location for bottom mount (10).
Installation Instructions 7 9 Attach hex head end of hose (13) to swivel joint (11) and tapered end to hand shower (14). 8 Connect showerhead (15).
MANUFACTURER'S LIFETIME LIMITED WARRANTY 1. Defects Covered; Warranty Period: Pulse Shower Spas, Inc. (“Pulse”) warrants to the original consumer purchaser who purchases this shower spa (the “Product”) for use in his or her own home, that the Product will be free from defects in material and manufacturing workmanship for as long as the original consumer purchaser owns that same home.