
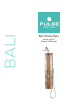
Installation Guide


5
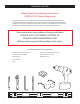
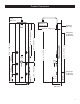
Assembly
After unpacking your ShowerSpa, some assembly is required prior to installation.
Shower Arm Assembly
1. OnthebackoftheShowerSpanearthetop,unscrewthehosettingfromthesafetyinsert(19)andretainrubberwasher.Re-
move the safety insert and discard with plastic nut (18).
2. Place escutcheon (2) over threaded end of shower arm (3) and insert through opening. Use stainless nut (6) to secure shower arm
to ShowerSpa. Then secure both set screws (10) located on the stainless nut.
3. Attachhosettingtoshowerarm(3)ensuringtherubberwasherisstillinhosetting.Donotover-tighten.
Hand Shower Holder Assembly
NOTE— The hand shower holder (11) is directional and must be installed so the set screw (4) is facing down in order for the tapered
endofthehosetotproperly.
1. Use 4mm allen wrench to remove allen bolt (12) from hand shower holder (11) and retain lock washer (13). Insert bolt through
lock washer, then opening on side of ShowerSpa. Tighten bolt to holder while adjusting its’ position (we recommend a slight
forward angle).
2. Secure set screw (10) on bottom side of holder to lock in place.
After ShowerSpa is mounted to the wall
Hand Shower Assembly
1. Insert washer (7) into hexagon shaped end of hand shower hose (8) and attach to threaded outlet on bottom of ShowerSpa. Do
not over-tighten.
2. Insert washer (7) into tapered end of hand shower hose (8) and attach to hand shower (9). Insert hand shower into hanger.
3. Check that rubber screen washer (4) is in shower head (5) and screw shower head onto the shower arm (3).