
Installation Guide

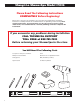


6
Installation
Retrofit – Existing Shower Replacement
1. TURN OFF WATER SUPPLY TO SHOWER. Ensure your hot/cold mixing valve is
turned off.
2. Determine length of brass NPT nipple (1) needed:
a. Place mark on existing shower arm at wall surface. Unscrew shower arm
from elbow in wall.
b. Measure distance from mark on shower arm to end of shower arm
threads. Add ½" to this measurement, and then round to nearest ½".
Example 1: If measurement = 1¼", add ½" = 1¾", rounded = 2" NPT nipple,
this is the length needed.
Example 2: If measurement = 1
5
⁄
8
", add ½" = 2
1
⁄
8
", rounded = 2" NPT
nipple, this is the length needed.
IMPORTANT: If shower arm is located in wall above tile/fiberglass wall surface
you must add distance from sheetrock to face of tile/fiberglass shower wall to
above measurement.
NOTE: If ½" nipple (1) provided is not correct length based on above formula, it
may be necessary to purchase required length ½" NPT brass nipple (available at
most hardware stores in ½" incremental lengths).
3. Apply a generous amount of PTFE (plumber's) tape to both ends of nipple (1)
and securely tighten into 90° water supply located in wall.
IMPORTANT: Do not damage final ½" of nipple threads protruding from wall.
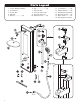
4. Determine wall bracket (13) location based on water supply outlet and
desired height of ShowerSpa. Use bracket as template for hole location. Mark
holes for bracket, making sure holes are level.
5. Drill ¼" holes through wall surface using a masonry bit. Drill slowly through
wall surface to avoid cracking and chipping.
6. Insert anchors (15) and securely screw bracket onto wall.
7. Place ShowerSpa on wall mounting bracket (13) and make sure ShowerSpa is
flush against wall with a secure fit.
8. Lift ShowerSpa upright and remove from wall mounting bracket (13).
9. Insert rubber washer (12) into 90° supply line fitting (16).
10. Hold ShowerSpa upright near mounting bracket and tighten 90° supply line
fitting (16) onto nipple (1). Secure with adjustable wrench.
CAUTION: DO NOT OVER-TIGHTEN!
11. Turn on water supply and ensure no leaks before placing ShowerSpa on wall
mounting bracket (13).
12. OPTIONAL—Seal around body of ShowerSpa with a bead of silicone. DO NOT
SEAL BOTTOM.