WAIMEA Waimea Showerspa Model #1034 Owner's Manual
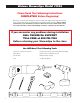
Waimea ShowerSpa Model #1034 Please Read The Following Instructions COMPLETELY Before Beginning! Our goal is to ensure your installation goes smoothly and safely. Please read these instructions carefully and follow recommendations for plumbing and mounting. After reading instructions, if you determine you do not have the necessary skills and/or tools, we recommend that a licensed plumbing contractor complete the installation.
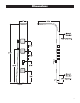
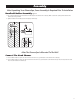
Dimensions 3
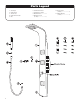
Parts Legend 1. ShowerSpa 6. Hand Holder Outlet 2. Hand Shower 7. Hand Shower Outlet 3. Shower Hose 8. Mount Bracket.................2 4. Hand Shower Holder 9. Mounting Screw (2 extra)...........................6 5. Nut 4 10. Nylon Anchor (2 extra)...........................6 11. Rubber Washer (3 extra)...........................
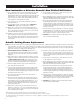
Assembly After Unpacking Your ShowerSpa, Some Assembly Is Required Prior To Installation Handheld Holder Assembly Figure 2 1. Place the threaded end of the hand shower holder (4) into the hand shower outlet (6). Make certain the opening in the hand shower holder (4) is facing forward. 2. Tighten hand shower holder (4) to ShowerSpa (1) with nut (5). After The ShowerSpa Is Mounted To The Wall Connect The Hand Shower 1.
Installation New Construction or Extensive Remodel – New Finished Wall Surface 1. Prior to sheetrock, stub-out ½" hot and cold supply lines beyond finished wall surface, 4" on center. For best results, attach 90° brass fittings (available at most hardware stores) to the stub-outs maintaining ¼" – ½" of space between the fitting and finished wall. The open end of the 90° brass fittings should point down so the supply lines attach parallel to the wall. 1 2.
Usage Pressure Balance Mixing Valve The Waimea ShowerSpa is equipped with a cUPC® pressure balance mixing valve to adjust water flow and temperature. The valve automatically adjusts to changes in water pressure (i.e. someone flushes a toilet), keeping your temperature constant and preventing accidental scalding. To turn on the ShowerSpa simply raise the handle until the desired flow rate is achieved. Rotate to the right to decrease temperature and rotate to the left to increase temperature.
Manufacturer’s Limited Warranty PULSE Shower Spas, Inc. warrants that all ShowerSpas are free from defect in workmanship and/or materials for a period of three years from the date of purchase. This warranty extends to the original purchaser only and is non-transferable.