
Installation Guide


3
Installation
Prior to installation
1. Remove your showerhead and trim plate (escutcheon) from
your existing shower arm.
2. Determine the length of brass NPT nipple
(13)
needed:
a. Place mark on existing shower arm at wall surface. Unscrew
shower arm from elbow in wall.
b. Measure distance from mark on shower arm to end of
shower arm threads. Add
1
⁄
2
" to this measurement, then
round to nearest
1
⁄
2
".
Example 1: If measurement = 1
1
⁄
4
", add
1
⁄
2
" = 1
3
⁄
4
", rounded = 2"
NPT nipple, this is the length needed.
IMPORTANT: If shower arm is located in wall above tile/fiberglass
wall surface you must add the distance from sheetrock to face
of tile/fiberglass shower wall to the above measurement.
NOTE: If supplied 2
1
⁄
2
" nipple (13) is not the correct length based
on above formula, you must obtain the correct size NPT brass
nipple (available at most hardware stores).
3. Apply a generous amount of Teflon® tape (29) to one side of
nipple (13). IMPORTANT: Do not damage final ½" of nipple
threads protruding from wall.
4. Insert mounting plate (6) into slots on back of Splash (1).
Hold Splash to wall and evaluate preferred mounting location
based on showerhead, body spray and existing valve height.
The Splash can be mounted over, below or adjacent to existing
shower arm outlet.
NOTE: If mounting over existing shower arm outlet, no drilling
required (use Method A). If mounting below or adjacent to
existing shower arm outlet, supply line extension (27) must be
installed and drilling wall surface is required (use Method B).
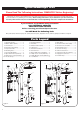
Method A (Figure A)
Mounted OVER Shower Arm Outlet
5. Determine which hole position (A, B or C) of mounting plate (6)
will be used for desired mounting height. If using position A,
skip to step 10.
6. If position B or C is used, the length of supply line (14) must
be shortened accordingly. To shorten supply line, first remove
compression nut (5) from 90° fitting (4) then remove 90° fitting
from supply line. Cut supply line to required length so that 90°
fitting when reinstalled is aligned with selected hole position (B
or C). Hint: Install mounting plate on Splash for reference.
IMPORTANT: Supply line must be cut clean & square to ensure no
leaks. Measure twice, cut once—Take your time!
7. Slide compression nut (5) onto supply line(14).
8. Push supply line (14) over 90° fitting (4) until it bottoms against
base of threads. Hint: Warm the supply line for easier re-
installation of 90° fitting.
9. Slide compression nut (5) onto 90° fitting (4) and securely
tighten.
10. Remove face of tape (10) from mounting plate (6) and slide
over nipple (7) through predetermined hole A, B or C. Level
plate before adhering to wall.
11. Push retaining washer (11) over nipple (7) securing mounting
plate (6) to wall and/or use nut (12). [OPTIONAL: Secure
mounting plate using supplied wall fasteners. Drill ¼" (7mm)
holes X 1½" (37mm) deep holes using a masonry/tile drill bit.
Insert anchors (8) and secure plate with screws (9)]
12. Insert washer (13) into 90° fitting (4) and connect to nipple (7).
Turn on water and check for leaks. Once leak free carefully slide
Splash (1) onto mounting plate (6) and push down to secure.
Skip to step 20.
Method B (Figure B)
Mounted BELOW or ADJACENT TO Shower Arm Outlet
13. Remove 90° fitting (4) from supply line (14) and attach supply
line extension (27) using connector (28). Remove shower arm
plug (25) from top of shower arm and insert extended supply
line through hole. Place escutcheon (22 or 26) onto nipple (7)
and attach 90° fitting (4).
14. Position Splash at desired location. Ensure supply line reaches
90° fitting (4). If using the optional escutcheon cover (23), make
certain it will not interfere with Splash (1) after mounting.
15. Mark shower wall at top and bottom of mounting plate (6). Use
plate as a guide, mark and drill ¼" (7mm) holes X 1½" (37mm)
deep. CAUTION: Live plumbing behind wall. Insert anchors
(8) into holes and secure mounting plate with screws (9).
NOTE: anchors provided are for solid surface walls; If you have
fiberglass walls with no backing, different type anchors must be
used (not included).
17. Place Splash (1) on mounting plate (6) and accurately mark
supply line (14) for cutting.
IMPORTANT: Supply line must be cut clean & square to ensure no
leaks. Measure twice, cut once—Take your time!
18. Follow steps 7–9 above.
19. Install escutcheon [either (22) or (26)], insert washer (3) into
90° fitting (4) and connect to nipple (7). Turn on water and
check for leaks. Once leak free, carefully slide Splash (1) onto
mounting plate (6) and push down to secure.
Final Steps
20. Hand shower mount (15) can be attached to side of Splash (Step
21) or secured to wall (Step 22).
21. Mounting to side of Splash (1): drill 5mm holes through side of
Splash (1). Use screws (19), washer (20) and nut (21) to secure.
CAUTION: Do not damage internal supply hoses. Skip to step 23.
22. Mounting to wall: use 7mm masonry/tile drill bit, nylon anchors
(17) and screws (18) to secure.
23. Insert washer (2) into showerhead (3) and attach to Splash (1).
Insert washer (13) into each end of hand shower hose (24).
Secure hex end to Splash and tapered end to hand shower (16).