
Installation Guide


5
Assembly
After installing your ShowerSpa, some assembly is required
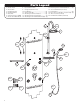
Shower Arm
1. Align two mounts with pre-drilled holes in ShowerSpa. To align top mount loosen allen set screw (#19) inside mount and adjust
accordingly to fit top hole. Insert threaded mount through holes in ShowerSpa and secure with soft washer (#10) and nut (#11)
supplied. Tighten set screw (#19) inside mount. CAUTION: Do NOT over-tighten set screw. Attach shower head supply line to the
lower shower arm mount. Make sure rubber washer is inserted inside fitting. Install shower head onto shower arm.
Glass Shelf
2.
Position glass shelf into slotted mounts. Secure allen set screws (#18) on the under side of the mounts. Do NOT over-tighten screws.
Handheld Hose and Wand
3. Attach hexagon nut end of hose (#9) to handheld hose outlet (#20). NOTE: make sure rubber washers are inserted in each end of
hose. Attach tapered end of hose (#8) to handheld wand (#3).
Installation
–
New Construction
Extensive Remodel – New Finished Wall Surface
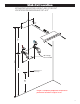
1. Prior to sheetrock, stub-out ½" hot and cold supply lines beyond finished wall surface, 4" on center. The height of the stub-outs is
completely dependent upon the desired mounting height of the Navajo ShowerSpa. For a person 5’8”-6’2” we recommend the
stub-outs to be 35” from the finished floor.
1
2.
After the finished wall surface has been completed, make certain the water is completely turned of to both hot and cold supply
lines of the shower. Connect the 90° male threaded fittings to the stub-outs maintaining a 1/4”-1/2” space between the fitting and
finished wall. The open endof the threaded male fitting should point down.
3. Mark the location of the holes for the mounting bracket making sure the bracket is level. For a person 5’8”-6’2” tall we recommend
53” from the finished floor height. Before drilling holes for the bracket, make sure the ShowerSpa will rest flat against the finished
wall surface at the desired mounting height with the supply lines connected.
4. Drill 1/4” holes through the wall surface using a masonry bit. Drill slowly through the wall surface to avoid cracking and chipping.
Insert anchor and securely screw bracket to wall. Before connecting hot and cold supply lines, mount the ShowerSpa on the wall,
checking the height, and making sure that the ShowerSpa feels secure.
6. Connect hot and cold water supply lines to stub-outs—DO NOT OVERTIGHTEN. Before mounting the ShowerSpa, check fittings to
make sure they are secure. Turn on water and check for leaks. When fittings are leak-free, mount ShowerSpa on wall.
7. OPTIONAL—Seal around body of ShowerSpa with a bead of silicone.
DO NOT SEAL BOTTOM.
1
The desired mounting height of ShowerSpa determines height of the ½" stub-outs. The stub-outs must be located at a height allowing
supply lines to be connected and body of ShowerSpa to rest flat against finished wall.
2
2
The mounting height may vary depending on several factors (i.e. location of supply lines, interference from ShowerSpa plumbing, old valve
access area, personal preference, etc.)