
Installation Guide


Installation
Valve Installation/Replacing Existing Valve
1. TURN OFF WATER SUPPLY TO SHOWER. Typically there is a gate valve where the water
mainentersthehouse.Turningthewatervalveoathotwatertankdoesnotturnocold
water supply line.
2. Makecertainwateriscompletelyturnedotobothhot&coldsupplylinesofshower.Turn
shower valve on, both hot and cold, to VERIFY WATER SUPPLY IS OFF
.
Open a sink faucet
in bathroom in which you are installing valve to relieve any pressure and help adequately
drain shower supply lines.
3. Remove handle(s) and trim cover(s) of your existing shower valve, exposing valve body
in wall.
4. Locate hot and cold supply lines entering valve. Using a reciprocating saw with sharp metal
saw blade and cut existing valve out. You should also cut riser within wall supplying existing
shower head. Carefully twist and remove valve.
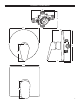
5. Install valve, making sure “up” outlet is facing up and use screws (not included) to mount
towall.Plasterguard(19)mustbeushwithnishedwallforproperpositioning.Connect
water supplies to valve (hot water to left side and cold water to right side). Use thread seal
compound or plumber's tape on all threaded connections to prevent leaks. Some soldering
ofjointsandttingsmaybenecessaryforcopperpipes.
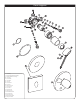
6. Connect riser pipe and tub spout outlet plumbing. If you have a shower only model, you will
need to cap valve's tub outlet with supplied cap (20). Likewise if you have a tub only model,
youwillneedtocapvalve'sshoweroutlet.Donotattachshowerheaduntilafterushingthe
shower's riser pipe.
7. Remove plaster guard (19). Place trim plate (18) over valve assembly. Install handle (14)
and tighten set screw (15).
5