
User Instructions


www.pulsar.pl ROUPS48V RACK POWER
6
2.2. Installation procedure.
1. Before installation, cut off the voltage in the 230V power-supply circuit.
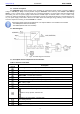
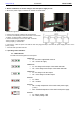
2. Mount the power supply in a RACK 19" cabinet as shown below:
- Mount M6 cage nuts
- Secure the enclosure with 4xM4 screws
3. Connect the receivers’ cables to the terminals AUX.
4. If needed, the following technical connections can be made:
- ALARM – technical output of collective failure
5. Connect the battery in series to the +BAT- terminals:
- battery output (+): terminal BAT+
- battery output (-): terminal BAT-
6. Connect the ~230V AC power cord with the IEC C13 plug (included) to the 230V AC power supply and turn on the
power (~230V).
7. Check the PSU operation indicator.
3. Operating status indication.
3.1. LED indication.
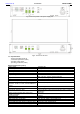
The PSU has 6 LED lights at the front panel:
GREEN LED:
on – the PSU is supplied with 230V AC
off – no 230V AC supply
GREEN LED:
on – DC voltage at the output of the switch mode PSU
off – no DC voltage at the output of the switch mode PSU
GREEN LED:
on – DC voltage in the AUX output
off – no DC voltage in the AUX output
RED LED:
on – failure
off – no failure
RED LED:
ON – too high temperature of the switch mode power supply
(>70°C)
OFF – standard temperature of the switch mode power supply
RED LED:
on – battery voltage <46V
off – battery voltage >46V