Interface WI-FI v.1.0 CODE: INTW EN* Edition: 3 from 05.12.2013 Supersedes the edition: 2 from 19.12.
www.pulsar.pl INTW CONTENTS 1. General description. ............................................................................................................................. 3 2. Components arrangements. ................................................................................................................. 3 3. Installation............................................................................................................................................. 4 4.
www.pulsar.pl INTW Features: • • • • • • • • • • wireless connection via Wi-Fi communication in the 2.4GHz band compliance with the IEEE 802.11b standard data encryption: WEP, WPA, WPA2 assigning a static or dynamic IP address (DHCP server) built-in web server for configuration power supply via the “SERIAL’” socket” cooperation with the PowerSecurity software optical indication warranty - 5 years from the production date 1. General description.
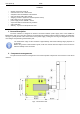
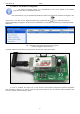
www.pulsar.pl INTW Table 1. Description of the components. Component Description No. LEDs – optical indication: PWR – supply’s voltage [1] TX – data transmission RX – receiving data [2] RST button – reset the interface settings [3] INIT button – initialization of the interface [4] RP-SMA antenna socket [5] SERIAL socket for connection with the power supply [6] green LED light – signaling the operating status [7] Yellow LED –Wi-Fi connection indication [8] Wi-Fi antenna 3. Installation.
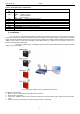
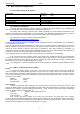
www.pulsar.pl INTW 4. Wi-Fi interface configuration. 4.1 The factory settings of the interface. Login page: Username - root Password - dbps assigned automatically from the routers DHCP server No name Connecting to any available Wi-Fi network No security settings Not configured IP address Network’s name (SSID) Wi-Fi network connection Network security Serial port communication parameters 4.2 Introductory information. The Wi-Fi interface parameters can be configured to adapt to the actual operation.
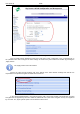
www.pulsar.pl INTW 4.4 STEP 2 – The IP address configuration. For proper IP address change, it is recommended to turn off the firewall of the antivirus program for the time of configuration process. If the yellow LED [8 - fig.1] is permanently illuminated, make sure whether the interface has logged to the icon. After launching, the proper router. To do that, run the „Digi Device Discovery” program with the program will display the logged-in Wi-Fi interface.
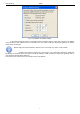
www.pulsar.pl INTW Fig. 5. The window of network settings. In the settings window, select the „Manually configure network settings” option and change the IP address of the interface in the unblocked area to 192.168.1.101. The subnet mask and the default gateway IP address should be left unchanged. Before setting the network address, make sure it is not used by any device on the network. Confirm the changes by pressing the „Save” button.
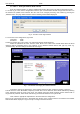
www.pulsar.pl INTW 4.5 STEP 3 – Setting the SSID for Wi-Fi network. Enter the network identifier, so that the RS485-WiFi interface will connect only with the designated router. To do that, log in to the router's configuration interface: open a web browser window and type the 192.168.1.1 in the address bar (default router address after the reset if not changed previously) and confirm by pressing the „ENTER” button. The page will be reloaded and the following window will be displayed: Fig. 6.
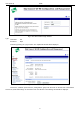
www.pulsar.pl INTW Fig. 8. The Wi-Fi interface login window. Type: Username: Password: root dbps Confirm by pressing the „Login” button. The adjustment window will be displayed. Fig. 9. The interface configuration panel. Choose the „Network” option from the „Configuration” group from the menu on the left side of the window. Choose the „WiFi LAN Settings” at the bottom of the next window.
www.pulsar.pl INTW Fig. 10. The “Wi-Fi LAN Settings” window”. Type the SSID network identifier that has been used during router configuration. Type: „PowerSecurity” in the „Network name” field. Configure the other settings as shown in the picture above and confirm by pressing the „Apply” button”. The „Apply” button cannot be omitted! Choose the „WiFi Security Settings” tab at the bottom of the same window. Settings from this tab are responsible for the protection against unauthorized connections.
www.pulsar.pl INTW Fig. 11. The „WiFi Security Settings” window. Next, in the „WPA PSK” section, enter any password in the „Passphrase” and „Confirm” fields. It will be used as a connection key. Type password e.g.: Passphrase: blackpower Confirm: blackpower Confirm by pressing the „Apply” button. The message informing about approved changes will be displayed. The interface has been reprogrammed.
www.pulsar.pl INTW Fig. 12. The „Wireless Security” window Confirm the changes by pressing the „Save Settings” button and then confirm by pressing „Continue”. The Wi-Fi interface can be reset now. To do that, press the „Reset” button on the module or simply disconnect the power supply for a few seconds. After the reset, the connection between the interface and the router should be back (the yellow LED is constantly illuminated). 4.6 STEP 4 – Setting the serial port parameters.
www.pulsar.pl INTW Select the "Port 1" once the window is loaded. Next, select „Custom” in the „Select Port Profile” field and confirm by pressing the „Apply” button. Fig. 14. The interface configuration panel – serial port parameters. After reloading the page, select the „Basic Serial Settings” tab at the bottom and enter the same settings as in the picture below. Confirm by pressing the „Apply” button.
www.pulsar.pl INTW The power supply units of the EN54 series allow higher transmission speeds - instead of 19.2k 8E1 it can be set to 115.2k 8E1. The changed values apply to all settings. Fig. 15. The communication parameters of the serial port. Next, choose the „Advanced Serial Settings” bar in the lower part of the window and enter the settings in the „TCP Settings” section as shown below. Confirm by pressing the „Apply” button. Fig. 16. The interface configuration panel – the TCP tab.
www.pulsar.pl INTW Reset the Wi-Fi interface again. To do that, press the „Reset” button on the module or simply disconnect the power supply for a few seconds. After the reset, the connection between the interface and the router should be reestablished (the yellow LED is permanently illuminated). The connection between the Wi-Fi interface and the power supply requires checking whether the serial port communication parameters are the same. 5. Configuration of power supplies. 5.
www.pulsar.pl INTW 5.2 Configuration of power supplies of the PSBEN series with LED display The PSU fitted with LED display enables setting the communication parameters of the serial port from the LED panel. To enter the setup mode, simultaneously press the „<,>” rightmost and leftmost buttons on the LED panel. Depending on the displayed information, the following parameters can be set: „Adr” – the device address, „trS” – transmission speed, „trP” – transmission parameters.
www.pulsar.pl INTW 5.3 Configuration of power supplies of the EN54 series with LCD display The power supply units of the EN54 series allow higher transmission speeds - instead of 19.2k 8E1 it can be set to 115.2k 8E1. The changed values apply to all settings. The PSU fitted with LCD display enables setting the communication parameters of the serial port from the LCD panel. To enter the setup mode, press the „SET” button from the main screen.
www.pulsar.pl INTW 5.4 Configuration of power supplies of the EN54 series with LED display The PSU fitted with LED display enables setting the communication parameters of the serial port from the LED panel. 5.4.
www.pulsar.pl INTW 5.4.
www.pulsar.pl INTW 6. Configuring the connection in the PowerSecurity program. For further configuration, the PowerSecurity program is required. The program can be downloaded at: http://www.pulsar.pl/pliki/PowerSecurity.exe The program is saved as an executable file and does not require installation. 1) Run the PowerSecurity.exe program. 2) Choose the Power Supplies > New Power Supply option from the menu bar.
www.pulsar.pl INTW Fig. 18. The preview window of the PSU of the PSBEN (left) and EN54 series (right) 7. Technical parameters. Power supply Current consumption TTL transmission speed Wi-Fi Transmission speed Encryption Indication (LED lights): Operating conditions Dimensions (LxWxH) Net / gross weight Storage temperature 5V from the ”SERIAL” socket of the PSU max 300mA Max 115200 bauds, with parity check max 11Mbps WEP, WPA, WPA2 Tx, Rx, PWR o o temperature -10 C ÷ 40 C relative humidity 20%...
www.pulsar.pl INTW WEEE LABEL Waste electrical and electronic equipment must not be disposed of with normal household waste. According to the European Union WEEE Directive, waste electrical and electronic equipment should be disposed of separately from normal household waste. WARRANTY Pulsar K.Bogusz Sp.j. Siedlec 150, 32-744 Łapczyca, Poland Phone (+48) 14-610-19-40, Fax. (+48) 14-610-19-50 E-mail: biuro@pulsar.pl, sales@pulsar.pl http:// www.pulsar.pl, www.zasilacze.