
Instruction manual


INSTALLATION
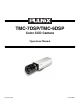
Page 4 TMC-7DSP/TMC-6DSP Color CCD Camera
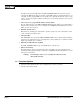
2 INSTALLATION
The following instructions are provided to help you to set up your video camera system quickly and
easily. It is suggested that you read through these instructions prior to unpacking and setting up your
camera system
2.1 Getting Started
2.1.1 Unpacking Instructions
It is recommended that the original packing cartons for the cameras and lenses be saved in case there is
a need to return or exchange an item. It is also recommended that any equipment being sent to another
location for field installation be bench tested to assure that everything is fully operational as a system.
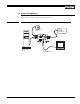
2.1.2 Components List
Please begin by checking your order against the Components List (below) to assure that you have
received everything as ordered, and that nothing has been overlooked in the packing materials. If any
item is missing, please contact your PULNiX representative immediately.
•
TMC-7DSP/TMC-6DSP camera
•
TMC-7DSP/TMC-6DSP data sheet
2.1.3 Accessories and Options
Following is a list of additional accessories and options that may be recommended or required for your
particular application. Please check with your PULNiX representative prior to the installation of your
video system to determine what you might need.
•
CamCom TMC7DSP/6DSP Software
•
RS-232C cable
•
K25-12, K-50-12, or PD-12P power supply
•
12P-02 power cable
•
DSP-2YC, Y/C output cable with RS-232
•
CBL-2R-7D, RGB output cable (for use with TMC-7DSP only)
•
TMC-7DSP/TMC/6DSP Operation Manual