
User guide


PingerPro User Guide
20
Psiber Data Systems Revision 1.00
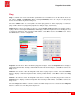
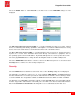
Select the Test Data by selecting the gray button next to the desired saved data. A dialog box will be
displayed. The Profile used for the test data is displayed as well as the Time the data was saved.
Below are three options: Load data, Rename File or Delete.
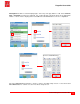
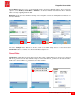
Load data will show a preview of the test data on the PingerPro.
Rename file allows a user defined name to be entered for the test data.
Delete will delete the test data on the PingerPro. Please note that once this is selected there is no way of
getting back the data.
Select Cancel to go back to the Saved Data screen without making any changes.
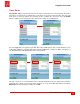
Select the Saved Data button with the < arrow to return to the Main Setup Screen or select the bottom
Upgrade button to continue on to the Upgrade Setup Screen.
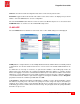
Upgrades
Upgrade allows for the upgrade of the PingerPro firmware. A unique License is displayed to upgrade the
Pinger Pro with new features. Select the License button to enter in the new unique license number given
by Psiber. Once that is entered, the INSTALL FILE dialog will be displayed, do not dismiss yet. Next,
the USB drive is exported to the PC so that the install file (*.sbx) can be copied. Plug the USB into a PC
and the PingerPro. Copy the install file to the PingerPro Drive on the PC then eject the drive. DO NOT
UNPLUG USB. Select OK to dismiss the dialog box on the PingerPro to finish the installation. On the top
banner you can watch the progress cycle through COPY, UNPACKING, VERIFY, INSTALLING… of the
new firmware. After installing and successful licensing, an UPGRADE COMPLETE dialog will appear,
then about 5-10 seconds later it will reboot to the newly installed application.
Setup Upgrade Screen
Select the Upgrade button with the < arrow to return to the Main Setup Screen or select the bottom Link
button to return to The Link Setup Screen.