PingerPro User Guide USER GUIDE PingerPro Model 70/75 Psiber Data Systems Revision 1.
PingerPro User Guide Copyright This guide is copyrighted by Psiber Data Systems Inc. with all rights reserved. Under the copyright laws, this guide cannot be reproduced in any form without the prior written permission of Psiber Data Systems Inc. No patent liability is assumed, however, with respect to the use of the information contained herein. © Copyright 2014 by Psiber Data Systems Inc. All rights reserved.
PingerPro User Guide Introduction Thousands of network professionals have relied on Psiber test tools for installing, troubleshooting and maintaining complex, and high performance networks. The PingerPro’s extensive feature set makes it even easier for managers and technicians to meet the growing challenges of cable and network management.
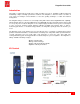
PingerPro User Guide Physical Hinged Hood to protect USB and RJ-45 connectors. (Also SFP Connector on the PingerPro75) Speaker Strap Connector Clips for cables Display /Touch screen Power Button Stand Specifications: Dimensions: Weight: Power Adaptor: Graphics Display: Interface: Power: Operating Temp: Storage Temp: 6.5 in. x 4.0 in. x 2.8 in. (165 mm x 102 mm x 71 mm) 13.2 oz.
PingerPro User Guide Preparing the Unit The PingerPro is portable and can be handheld or placed on a surface large enough for stable use. The PingerPro is designed to withstand the rigors of everyday use and travel. However, to keep your tester in prime operating condition, please observe the following precautions to further reduce the risk of personal injury or damage to the tester. Never apply heavy pressure to the tester, especially on or around the display area.
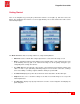
PingerPro User Guide Getting Started Turn on the PingerPro by pressing the power button until the screen lights up, and then release the button. The unit displays the welcome screen for approximately 10 seconds and then the Home Screen automatically displays. Copper Home Screen Fiber Home Screen The Home Screen has Auto Test, Ping, Cable Test, Setup and Help Buttons. • Auto Test tests the network with configured parameters selected from the Setup screen.
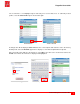
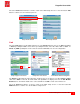
PingerPro User Guide Setup Select the SETUP button from the Home Screen. The available configurable categories are displayed on the screen. Select a category to expand the button. When completed with any setup configuration, select Save and then the Psiber button to return to the Home Screen. Home Screen Main Setup Screen Main Setup Screen 2 Profiles Select the Profile button to show a listing of all the profile names. There are 11 customizable profiles and one Factory Default.
PingerPro User Guide The User Profile 1 is now highlighted green and ready to be used for Auto Test. To edit newly created profiles, select the User Profile 1 green checked box again. Profile Screen Profile 2 Screen A dialogue box will be displayed. Clear will delete the selected profile and return the unit to the Factory Default profile. Select the Rename gray button to display a screen with an alphanumeric keyboard. Enter any profile name with up to 20 characters.
PingerPro User Guide Select the Profile button with the < arrow to return to the Main Setup Screen or select the bottom Link button to continue on to the Link Setup Screen. Setup Profile Screen Main Setup Screen Link Select the Link Button from the Main Setup Screen. The Speed parameter choices are Auto-negotiating or Fixed speed/duplex. Auto selects all five speed/duplex modes; 10H, 10F, 100H, 100F or 1000F. In Fixed, only ONE speed/duplex can be selected.
PingerPro User Guide IP address The IP Address settings allow for the selection of a Fixed or DHCP address. This must match the network to which the PingerPro is being connected. If the network does not have a DHCP Server, select the Fixed button. Fixed allows the IP, Subnet, Gateway and DNS fields to be available to change. Select the Address button to change the IP address of the PingerPro. A numerical keyboard will be displayed to enter in the desired address.
PingerPro User Guide MAC Address In this screen, the MAC Address parameters are displayed. The user has a choice of the Factory or a User Defined MAC address. The Factory Default MAC Address of the PingerPro CANNOT be changed. User Defined allows the user to enter a MAC address of their choice for device cloning purposes. MAC cloning allows the PingerPro to simulate another network device by using its own MAC address to detect issues originating from that device.
PingerPro User Guide Ping Ping is a network tool used to test whether a particular host is reachable across an IP network. There are two options; Single or Continuous. When selecting Continuous, there can only be one ping target device selected and it only works in Ping Test. Select the Jumbo button to send a jumbo size frame ping packet for either single ping or continuous pings. Jumbo allows for a ping packet payload to be 2K bytes large.
PingerPro User Guide Ping List The Ping List screen allows the user to select the devices the PingerPro will ping. Select one target, or any combination of targets from the list. The options are Gateway, DHCP Server, IP Range (user defined), or up to nine separate User Defined Targets (Ping List Entries). GATEWAY allows for the pinging of the established gateway. DHCP SERVER allows for the pinging of the established DHCP Server. Select the∨arrow to display more targets.
PingerPro User Guide Unassigned 1 to 9 are user defined ping targets. Select any of the gray buttons to edit. Select Set IPv4, IPv6 or Hostname to bring up a numerical, hex or full keyboard respectively. Enter in the appropriate address or device name to be pinged and select OK. Select the Save button to save the configuration.
PingerPro User Guide Trace Route Trace Route displays the path and measures the delay of the packet across an IP network. The path of the packet is recorded as the round-trip time received from each remote node in the path. The sum of the mean times in each hop indicates the total time spent to establish the connection. Select the Enable button to add this test to the Ping Test. The Trace Route settings are now displayed.
PingerPro User Guide Timeout is the amount of time the PingerPro waits before a Trace Route packet returns. Hostnames toggles between Off and On. This allows for the device name to be displayed or just the IP address. Select the Save button to save the configuration. Select the Trace Route button with the < arrow to return to the Main Setup Screen or select the bottom VLAN/LLDP button to continue on to the VLAN/LLDP Setup Screen. VLAN/LLDP Select the Enable button to add this test to the Auto Test set.
PingerPro User Guide Select the Enable button to add LLDP/CDP to the Auto Test set. The LLDP/CDP settings are now displayed. Setup VLAN/LLDP Screen Setup LLDP Screen-Enabled The Link Layer Discovery Protocol (LLDP) is a vendor-neutral link layer protocol used by network devices for advertising their identity, capabilities, and neighbors on a network. LLDP information is sent by devices from each of their interfaces at a fixed interval in the form of an Ethernet frame.
PingerPro User Guide Select the Username then enter in the correct username from the 802.1X Server and select OK. Follow the same steps for entering the Password. Select the Save button to save the configuration. Setup Security Screen Setup Security Screen-Enabled Full Keyboard- Username Select the Security button with the < arrow to return to the Main Setup Screen or select the bottom Settings button to continue on to the Settings Setup Screen.
PingerPro User Guide Secure Delete allows the user to set the PingerPro back to the Factory Default settings. The user has the option to select Profiles, Saved Data or All data to be deleted. Please note that once this is selected there is no way of getting back the data. Build Info shows the latest firmware running on the PingerPro. Check the www.psiber.com website for the latest firmware. 1.
PingerPro User Guide Select the Test Data by selecting the gray button next to the desired saved data. A dialog box will be displayed. The Profile used for the test data is displayed as well as the Time the data was saved. Below are three options: Load data, Rename File or Delete. Load data will show a preview of the test data on the PingerPro. Rename file allows a user defined name to be entered for the test data. Delete will delete the test data on the PingerPro.
PingerPro User Guide Auto Test Once Setup has been configured, select the Auto Test button on the Home Screen to display the Main Auto Test page. Select the play button to start the Auto Test. Note: The Auto Test can be performed immediately, using Factory Default Profile, without navigating through and changing parameters within the Setup Menu. Home Screen Auto Test Screen w/all tests Auto Test Screen w/few tests Depending on how the Auto Test is setup, the test will range from 5 to 60 seconds.
PingerPro User Guide Once the Auto Test is complete, select the Save button to save the current Auto Test data. Selecting Save will save the data with the automatic file name. Selecting Save As will allow the user to rename the file. Selecting Cancel will cancel the Save process and return the user back to the Auto Test Results. Main Auto Test Screen Auto Test Save Screen Auto Test Save As Screen Press the Refresh or Play button to start a new Auto Test.
PingerPro User Guide Select the Link button to bring up the Link Results Screen. This screen will display the partner’s capabilities and actual connected link status. The linked port is shown with the actual link parameters including connection type (LAN or NIC), speed (10/100/1000) and duplex mode (Half or Full). If VLAN was selected under setup, the VLAN ID and Priority will be displayed.
PingerPro User Guide IPv4 Address displays the IP address, Subnet Mask, Gateway IP address and DNS (Domain Name System) Server IP address. IPv4 Info displays DHCP or Fixed from the configuration set in setup. IPv4 Address Screen Select the IPv4 Address button with the < arrow to return to the Main Auto Test Screen or select the bottom button to continue to the IPv4 Ping Results Screen.
PingerPro User Guide The Switch Info (LLDP/CDP) Screen decodes LLDP (Link Layer Discovery Protocol) and CDP (Cisco Discovery Protocol) frames which are detected from the nearest connected switch. Scroll through the entire data by selecting the up and down arrows or by swiping the stylus on the screen up/down and side to side.
PingerPro User Guide The PingerPro goes through the following common steps to authorize a connection to an 802.1X secure network: 1. The authenticator sends an "EAP Request/Identity" packet to the PingerPro as soon as it detects that the link is active. 2. The PingerPro sends an "EAP Response/Identity" packet containing a unique User ID for the PingerPro to the authenticator, which is then passed on to the authentication (RADIUS) server. 3.
PingerPro User Guide Ping Test The PING test is the quickest way to verify connectivity, measure round trip communication time, check data integrity, determine a MAC address and search a stored list or a range of IP addresses. Select the PING test button from the Home Screen. Select the play button to start the test. Home Screen Main Ping Screen Once the test is complete, a summary of the responsive or unresponsive devices are displayed. The Factory Default profile will only ping the Gateway address.
PingerPro User Guide Select the Target IP address button to display the Ping Target Details. Ping target details include the Hostname, IP address, MAC address, attempted ping packets sent and the round trip time to the device and back. The Clone button will appear when the IP address is within the Subnet mask the PingerPro is connected to. Select Clone to change the MAC address of the PingerPro to the target device. Select OK to set the MAC address or Cancel to return to the Ping Target Details page.
PingerPro User Guide Select the Settings button to display the Settings Screen. Select the Show Hostname button and then select OK to display the targets name on the Main Ping Screen. Main Ping Screen Settings Screen Main Ping Screen w/Hostname Select the Settings button again to display the Settings Screen. Select the Show MAC button and then select OK to display the target's MAC address on the Main Ping Screen. Settings Screen Main Ping Screen w/MAC address Psiber Data Systems Revision 1.
PingerPro User Guide Select the Settings button again to display the Settings Screen. Select all three buttons including Show Hostname, Show MAC and Replies only. Select OK to display only the targets that have passed the ping test with both the Hostname and MAC address displayed on the Main Ping Screen. Settings Screen Main Ping Screen Selecting the Psiber Home button or the Refresh button before saving will result in a warning message being displayed.
PingerPro User Guide Select the Settings button again to display the Settings screen. Select the < and > arrows to scroll through the User Defined Profiles. Select OK to set a new User Defined Profile and return to the Main Ping Screen to run a new test. Select the Refresh button to start the test. LINK INFO Settings w/Factory Default Settings w/TEST Profile Main Ping Test Screen This new test displays ping packet responses sent across the entire subnet.
PingerPro User Guide Select the Settings button again to display the Settings screen. Select all three buttons including Show Hostname, Show MAC and Replies only. Select OK to display only the targets that have passed the ping test with both the Hostname and MAC address displayed on the Main Ping Screen. Select any tested device for more information. Select the Save button to save the results.
PingerPro User Guide Cable Test The Cable Test will check the physical wire connected to the PingerPro. Cable Test includes Wiremap, Length, Tone and Port ID. Select the Cable Test button from the Home Screen. Select the Wiremap to test the cable. Home Screen Main Cable Test Screen Wiremap verifies proper cable wiring and detects split pairs. Connect the Wiremap Terminator to the cable under test before starting the Wiremap test. Selecting the Play button will start the test.
PingerPro User Guide Length measures and displays the distance to an open or short of each wire pair in a cable. Disconnect the cable under test from a switch or Wiremap Terminator prior to starting the length measurement. Select the Settings button to change the NVP for the connected cable by selecting the gray button to display a numerical keyboard. The highest NVP is 74 and the lowest is 65. Select either Meters or Feet to display the length in that unit of measurement.
PingerPro User Guide Port ID is used to determine which port of a hub or switch is wired to a particular wall jack by blinking the Link LED on the port. The blink rate is adjustable for compatibility with most switches and hubs. Select the rate at which the LED will blink SLOW, MEDIUM, FAST, or VERY FAST. Port ID Screen Select the Tone button with the < arrow to return to the Main Cable Test Screen or select the bottom Port ID button to send a signal to the attached Port.
PingerPro User Guide Help The Help Screen displays this step-by-step user guide on how to use the PingerPro and displays the quick start guide. Home Screen Main Help Screen The Help Screen is divided into five categories to easily guide through the different tests the PingerPro can perform. Select the Quick Start Guide button and scroll through the pages. Sample helps screens are displayed below.