
Installation Instructions

3. Please read through all instructions and notes before beginning installation. You may also want to review the addi-
tional accessories that are available and ensure that you have gathered all desired materials and made appropriate plans
to utilize additional components. Many installer has completed waterproofing and started installing tile before the installer
or the home owner realized that there had been no plan for a niche. Attempting to add niches, shelves or benches after
installation has begun can be difficult and/or expensive. These “essential” additions can often enhance or disrupt the tile
design depending upon if they were included in the planning or not.
2. Creating a supremely watertight installation using multiple pieces of WP waterproofing membrane requires an overlap
from piece to piece of at least 2”. Furthermore, each floor-to-wall and wall-to-wall transition requires additional overlapping
pieces to ensure the integrity of the waterproof and crack-resistant installation. Although these overlaps can occur in any
order, the preferred method involves cascading pieces from floor to wall in a generally upward direction. However, many
installers prefer to install their corner pieces and edge seams before proceeding with any large sheets. We will show our
preferred order of bottom to top.
WP( Installation Instructions
Shower and Tub
WP may be installed with either modified or non-modified thin-set mortar. However, for best installation and results, we recom-
mend the use of a high-quality polymer-modified thinset mortar. There are many choices available from quality manufacturers
like TEC, Laticrete, Mapei, Ardex, Custom Building Supplies and others. DO NOT USE ANY TYPE OF PRE-MIXED READY-
TO-GO-IN-A-BUCKET PRODUCT FROM ANY MANUFACTURER! These typically will not work with any type or brand of
waterproofing system or even in any shower or bath installation. Accordingly, DO NOT use any bucket of “ceramic or tile adhe-
sive” no matter what the claim is regarding use in wet areas.
1. Mixed thin-set mortar should take on a somewhat fluid-like consistency but should remain rigid enough to hold the integrity
of trowel notches. On all substrates, rough pre-finishing (taping) of sheet-to-sheet seams before installing WP is recom-
mended to improve ease of installation (starting as flat as possible.) If you choose to use un-modified thin-set mortar, you
must pre-dampen wall board to ensure a proper cure and bond. Modified thin-set mortar eliminates wetting requirements.
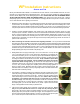
4. Starting with the floor area, apply mortar using a 1/4” x 3/16” V-notch trowel. You may also use
a 1/8” x 1/8” square trowel or a 3/16” x 3/16” square trowel. Depending on your substrate, thin-
set brand and consistency, the 1/8” x 1/8” trowel may require frequent additional reapplication of
mortar. The larger trowels will typically need more thin-set “squeezed” out while pressing and
smoothing the membrane with the flat side of the trowel. Proper installation requires 100%
coverage on the back of the membrane. Peel the membrane back often to check for this
required 100% thinset coverage (see Fig 1). Measure and cut the appropriate size piece of
membrane for the floor area. If the floor area is larger than the width of the membrane (1 meter
or 3.3 ft or 39.5”), ensure the largest piece completely covers the drain opening regardless of
where your drain is located. Membrane will be later cut away to expose the drain opening. Fig
2 shows the drain hole completely covered by a single large section of membrane and the mem-
brane at the drain hole already cut away.
Fig 1
Fig 2
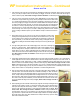
5. The membrane is installed by carefully (proper alignment) laying the membrane piece into the
mortar and pressing in in with the flat-edge (back) of the trowel (many installers find using a non-
notched margin trowel a convenience for this step.) Continue to work the membrane into the
mortar while working out excess mortar at the edges of the sheet. Ensure 100% coverage of
the membrane. Peel membrane back often (see Fig 1) to ensure that you are achieving
the 100% coverage. At the drain flange, some drains like our PSC Gen II or Schluter or ProVa
will simply continue the use of mortar on the fleece of the flange. If using a Noble-Flex flashing
and clamping drain, you will use Noble Sealant 150 to provide a superior bond to the drain
flange. Follow applicable instructions with your particular drain.
Fig 3
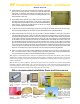
6. If the floor area requires another piece of membrane, measure and cut the next piece. Ensure
that you cut a piece that allows for at least a 2” overlap over the previously laid piece.
Apply mortar to the new floor section and include application of mortar over at least 2” on the
adjoining edge of the previously laid membrane piece. Fig 3 shows full application of mortar to
the uncovered area and the installer beginning to cover the 2” overlap area of the previously laid
piece. Continue this process until the entire floor area is covered by membrane.