
Installation Instructions

WP( Installation Instructions - Continued
Shower and Tub
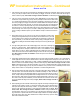
15. Some installers will also install tile on the ceiling. If the shower will be enclosed
and subject to long periods of high humidity or vapor pressure, applying WP to
the ceiling would be recommended as well. You would need additional WP and
inside corners to complete this task. Fig 10 shows an example of a finished
shower area that included an integrated bench.
Fig 10
16. For tub surrounds, the same procedures apply except many of the steps may be skipped (like floor and drain procedures).
Some tub-surround installations may also require a bead of caulk between the base of the tile and the tub.
17. Before allowing the thin-set mortar to fully cure, run your hand over the entire installation to ensure that no there are no
previously undetected air pockets or other areas where the membrane did not properly adhere. If procedures were prop-
erly followed and high-quality thin-set mortar of the proper consistency was used, bubbles will be unlikely. Any air pockets
or other adhesion problems should be addressed before the thin-set mortar cures. Although you could technically install
tile immediately, most code requires that you flood test your installation. Before water testing, allow at least 24 hours cure
time. Modified thin-set mortar does take longer to cure than unmodified mortar. A box fan or other method for maintaining
good air movement within the space will help shorten cure times. There are many factors that can affect cure time, so be
sure to test for mortar cure after the 24 hour wait. One possible method for determining if sufficient cure time has occurred
is to test if the point of a razor blade can easily penetrate an exposed area of mortar. If the point does little more than dent
the thin-set, it is probably safe to proceed. Proceed with proper flood testing of the waterproofing installation.
18. Again, run your hand over the entire membrane installation to ensure that there are no air pockets or other adhesion prob-
lems. If by remote chance you discover a problem previously unforeseen, please call us for the most suitable remedy.
You may now install your tile using a trowel and methods appropriate to your particular tile.
Note 1: When a soap/shampoo niche is desired, use of preformed niches like those from Noble, Innovis and other
manufacturers is highly recommended. Membrane should be simply overlapped onto the front face or lip of these
niches to provide seamless waterproofing throughout the installation. Use of Noble Sealant 150 for this purpose is
highly recommended.
Note 2: With any shower installation, plumbing and pipes must come through the tile wall and waterproofing
membrane underneath. Noble Sealant 150 or the equivalent provides a good method for sealing the membrane to
the plumbing where it comes through. Depending on your mixing valve(s), you may evaluate if Noble Sealant 150
or other sealing method not provided with the mixing valve may be needed.
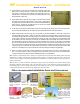
Prova Flex Crack Isolation
Membrane - ultimate
underlayment for floor tile.
Other recommended installation Items and Accessories
14. Install membrane over the curb area using the same methodology. Please note
that if you are not using a Pro curb, a concrete curb or other pre-shaped foam
curb product, you will need to ensure that the 2x4’s forming the curb are cov-
ered with either a concrete board or drywall before installing membrane. Do not
install membrane on bare wood.
Noble Sealant 150 Water-
proofing adhesive for
bonding polyethylene
materials.
Pro Shower Curb -
preformed high-
density foam curb.
Noble factory water
-proofed preformed
niches for tiling - in
many shapes/sizes
WP Preformed Corners
available in inside and
outside shapes.
WP Sealing band 5” wide or
wider - offered in 16’ 5”, 33’
and 98’ 5”.
PSC Gen II Drain Kit for Tiled
Showers - The highest-
performance Drain system
available for use with surface
membrane systems like WP.
Designed for polystyrene pre-
sloped pans and packed sloped
mud floors (by hand or with
guide sticks.)