
Installation Instructions

WP( Installation Instructions - Continued
Shower and Tub
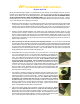
7. Take off heavy boots and avoid any activity that may disturbed the installed floor membrane. Apply mortar to each inside
corner, press the pre-shaped corners into the mortar (see Fig 4) and smooth out excess mortar with the flat-edge of
trowel. As with every step, ensure 100% coverage of mortar to membrane. Continue this process for all inside corners.
8. If all of your corners are typical 90 deg square corners, skip step 8. If you have inside corners
smaller than or larger than 90 deg, you may slit the pre-shaped corner down the middle of the
“V” to provide the appropriate amount of relief to allow overlapping or expansion of each “foot” of
the corner (see Fig 5). It is highly recommended to use Noble Sealant 150 waterproof adhesive
or similar product (Prova Seal, Kerdi-fix, etc.) at these overlap areas where you technically will
not achieve a 2” overlap - especially at the very corner. Cured Noble Sealant 150 is waterproof -
thin-set by itself is not. Corners larger than 90 deg are more critical with need for a sealant in the
corner becoming more critical If you do not have a waterproofing sealant for these modified
corners, creating an additional “patch” to provide additional overlap at critical areas will be nec-
essary.
Fig 4
Fig 5
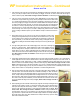
9. Apply outside corners to your curb area or any other area requiring an outside corner
overlap (like an integrated bench) in the same fashion as the inside corners. If you forgot
to order outside corners or they were not included with your kit because an optional curb
was not purchased, you can make an outside corner by cutting a rectangular section of
membrane and slitting the membrane halfway down the piece in the long direction (see
Fig 6.)
Fig 6
10. The edge sealing band will now be installed. Apply mortar to the floor-to-wall edge (at
least 2-1/2” in each direction). Include application of mortar over the installed corners to
allow the sealing band to overlap the corner areas as well. To ease installation, fold the
sealing band of 5” wide or greater longitudinally down the middle then press into the
mortar. Smooth out excess mortar with the flat-edge of trowel. As with every step, en-
sure 100% coverage of mortar to membrane. Continue this process for all floor-to-wall
edges (see Fig 7.)
Fig 7
11. Vertical edge sealing band will now be installed. Apply mortar to the wall-to-wall edges (at least 2-1/2” in each direction).
Include application of mortar over the installed corners to allow the sealing band to overlap the corner areas as well. To
ease installation, fold the sealing band of 5” wide or greater longitudinally down the middle then press into the mortar.
Smooth out excess mortar with the flat-edge of trowel. As with every step, ensure 100% coverage of mortar to mem-
brane. Continue this process for all wall-to-wall edges. If you run out of sealing band but have enough membrane to wa-
terproof up to a greater height, you may cut pieces of membrane out of your main roll as a substitute (ensure at least 5”
width.) Ensure at least a 2” overlap with any continuation of a vertical sealing band section.
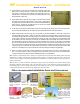
12. After all vertical wall-to-wall edges have been covered with sealing band, begin installing your
main wall sheets. The membrane sheets will be installed horizontally. For each wall section,
carefully measure and cut the appropriate length to cover the wall section and also provide at
least 2” overlap at each previously-installed vertical sealing band and also over the floor sealing
band and corners. Apply mortar to wall area and to adjoining sealing band on each side. As you
have done at each step of the installation, press the sheet into the mortar and smooth out ex-
cess mortar with the flat-edge of the trowel (see Fig 8). Ensure 100% coverage of mortar to
membrane.
13. After completing your first horizontal membrane layer, begin the second layer following the same
measure and cut method as in step 12. This time the bottom edge of the new horizontal mem-
brane piece will overlap the lower sheet by at least 2”. For proper installation, ensure your appli-
cation of mortar includes at least the top 2” of the previously installed sheet (see Fig 9). At all
times, ensure 100% coverage of mortar to membrane. Continue until you achieve the de-
sired tile height or until you run out of membrane (if you are planning to install tile up to the ceil-
ing). Most kits for a specific sized shower come with enough membrane to vertically waterproof
beyond the shower spray zone. Many installers like to waterproof all the way up to the ceiling.
Order extra membrane as needed.
Fig 8
Fig 9