PSB Universal Speakers OWNER’S GUIDE www.psbspeakers.
CONTENTS I. Speaker Placement - Maximizing your Enjoyment 4 II. Mounting The Speakers 4 III. Aiming and Positioning the Speakers 6 IV. Weather Resistance 6 V. Connecting the Speakers 7 VI. Painting 7 VII. Protecting your Investment 8 VIII.
Thank you for your purchase. Our speakers are designed to make high-performance sound easy to bring into your life. They have wide frequency and dynamic range, natural tonal balance and precise spatial imaging needed to make music lifelike and enjoyable. I. SPEAKER PLACEMENT—MAXIMIZING YOUR ENJOYMENT In most installations, ideal speaker placement relative to the listening positions and surrounding areas can be difficult to achieve.
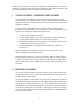
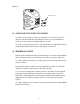
1. 2. 3. 4. Remove the Aluminium Bracket assembly from the speaker by removing two plastic Knobs. Please refer to Figure 1. Hold the bracket assembly against the intended mounting surface, ensuring that such location allows for full adjustment range of the speaker orientation without interfering with close-by objects. Using the Plastic Wall Plate of the Aluminium Bracket as your template, mark screw hole locations.
Figure 3: Rubber Terminal Cover III. AIMING AND POSITIONING THE SPEAKERS The speaker can be tilted up or down by loosening the two Set Screws located on the right side of the Plastic Wall Plate and sliding the speaker on the curved Aluminium Bracket to the desired position and tightening the Set Screws. The speaker can be turned to the left or to the right side by loosening both plastic Knobs and then tightening them again after the desired position is achieved. IV.
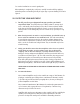
Figure 4: 2 5 3 4 6 1 V. CONNECTING THE SPEAKERS Connect each speaker with a standard two-wire cable to the signal source either directly or through a local volume control. The speakers must be wired appropriately for the intended control. The impedance loads of the speakers must be balanced with the capabilities of the amplifier. In some mono-only systems, a single wire may be connecting speakers in series, entering from one speaker to another—beginning and ending at the amplifier.
For outdoor installations use exterior grade paint. When painting is completely dry on all parts, carefully insert the Grille by applying minimum pressure and working it slowly along its edge to prevent bending as shown in Figure 4. VII. PROTECTING YOUR INVESTMENT A. For full, year-after-year enjoyment from your speakers, you should respect their limits. They will produce space-filling volume in average-sized areas—and handle peak momentary levels at those volumes without audible strain.
E. Cabinet Care If necessary, wipe the cabinets carefully with a slightly dampened cloth. Do not use solvents or any abrasive materials. F. Grilles and Ports A lint brush does a good job of cleaning Grilles. The Grilles can be taken off and vacuumed if you prefer. If need be, you can use a lint brush to clean ports. Avoid touching speaker diaphragms. Particularly, pushing in the tweeter domes will permanently damage tweeters. VIII. TROUBLESHOOTING A.
Notes on environmental protection At the end of its useful life, this product must not be disposed of with regular household waste but must be returned to a collection point for the recycling of electrical and electronic equipment. The symbol on the product, user’s manual and packaging, points this out. The materials can be reused in accordance with their markings.
PSB Speakers 633 Granite Court Pickering, Ontario L1W 3K1 CANADA www.psbspeakers.
CustomSound CS1000 Universal Loudspeaker Frequency Response (Anechoic Chamber) On Axis @ 0°±3dB On Axis @ 0°±1 1/2dB Off Axis @ 30°±1 1/2dB LF Cutoff -10dB Sensitivity Anechoic Chamber Listening Room CS500 Universal Loudspeaker 45-23,000Hz 59-20,000Hz 59-10,000Hz 40Hz 63-23,000Hz 65-20,000Hz 65-10,000Hz 50Hz (1W (2.