
Instructions


5
Installation - Timber
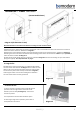
1. Remove Rear Bracket
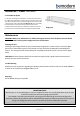
2. Fit Wall Brackets
Unpack your new suite and remove the rear wall mount bracket
which has been screwed to the rear of the fire for transit. See
Diagram 1.
Note: Please discard the screws
Diagram 1
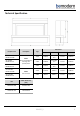
Diagram 2 (all dimension in mm)
601227_2
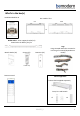
This is a 2 adult person lift.
Do not attempt to lift from the centre of the top panel,
lift from under the hearth and underside of the trim as
shown below.
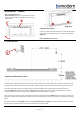
The first step to installation will be the fitment of the wall mount bracket in the desired position in the room. Dependant on the
model purchased, decide whether the suite will be floor standing with the optional plinth (Vardo suites Only) or wall mounted.
If the suite is planned to be floor standing (with the plinth positioned below the suite) the wall mount bracket must be
positioned 205mm from the floor as indicated in Diagram 2. Alternatively if the suite is planned to be positioned as a wall
mounted model the wall mount bracket may be positioned at the desired height on the wall.
Using a spirit level mark a line equal to the length of the wall mount bracket at either 205mm (for floor standing) or the desired
base position of the wall mounted suite. Position the wall mount bracket level on the line and mark the appropriate screw fixing
points.
We advise a minimum of 6-off fixings must be used (see ‘Important Note’ on page 7). Screw the wall mount bracket securely to
the wall using the marked positions, with the correct fixing for your wall material.