
User manual


–Adapt the feed to the requirements by sawblade, speed and work
piece material.
–H
ard materials, fine sawblades and thicker work pieces do not “tol-
erate” as much feed as soft materials, rough sawblades and thin
work pieces. Youcan also experiment with various speeds.
–Guide the work piece slowly into the sawblade, particularly if the
blade is verythin and the teeth veryfine or if the work piece is very
thick.
–Only use perfect sawblades.
–Donot let the device operate unsupervised.
–Carefully mark out/block the check line.
–Make sure there is good lighting.
–A
lways work with connected vacuum cleaner and carefully set the
air nozzle (8, fig. 1).
–You will achieve the best results if the wood thickness is under
25 mm
.
–With wood thicknesses of greater than 25 mm, the work piece
must be verycarefully guided to stop the sawblade from jam-
ming, bending, twisting or breaking.
–For precise cutting, note thatthe sawblade will always trytofol-
lowthe direction of the fibre (applies particularly to thin sawblades).
7.1.1 Selecting the sawblade
As alreadymentioned, the correct selection of material has avery
greatinfluence on the quality of the result. The table belowshould
serve as asmall guide. Extensive experience with manymaterials and
types of sawblade is, of course, always helpful with selection. You
can experiment here.
Tip: The sawblades are mostly only particularly worn at places where
the teeth are particularly highly utilised when sawing and, therefore,
become blunt veryquickly.To“use up” the non-worn teeth and thus
increase the edge life of the sawing blades, you can artificially “raise”
the bearing surface for the work piece somewhat.
To do this, simply secure asmooth, table-sized underlay with the required
thickness to the sawtable, using, for example, double-sided sticky tape.
The non-worn parts of the sawblade are nowsawing the work piece.
This is particularly sensible if you often sawveryhard and wear-in-
tensive materials with thin blades.
The numerical data for characterising the “fineness” of the toothing
is related to the number of teeth per inch of sawblade length:
Teeth/inches Material
approx. 10-14 Soft and hard wood (from approx. 6-50 mm),
plastics, soft materials, thicker work pieces
approx. 17-18 Fine sawing work, wood (up to 6mm), plastics,
soft materials, thinner work pieces
approx. 25-28 Plastic, GRP,non-ferrous metal, Plexiglas, iron
with restriction Pertinax
approx. 41 Iron, Pertinax
Round sawing blades (with flatends) can ideally be used for plastic,
hard and soft wood. They cut on all sides, so it is not necessaryto
turn the work piece when sawing.
7.1.2 Selecting the speed
This
representation can, of course, only give instructions on the gen-
eral direction to take. As in the previous section, you have to "exper-
iment” alittle to find the optimal result. The appropriate speed also,
of course, depends on the blade used, the material of the work piece,
the feed etc.
Level Material
900
strokes/min Steel, brass, non-ferrous metals, GRP,plastics
1400 strokes/min Aluminium, wood, polystyrene,rubber,leather,
cork
7.1.3 Possible causes of faults
The following causes may break the sawblade:
–Ifblade is tensioned too tightly or not tightly enough
–Mechanical overloading of the blade by feeding too quickly.
–Bending or twisting of the blade when turning the work piece too
quickly when cutting curves.
–When the wear limit of the sawblade has been reached.
–Ifthe screws are tightened on sawblades with cross pin.
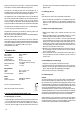
7.1.3.1 Set sawblade alignment (fig. 2)
In averyfew cases (slanted cutting edge in the work piece, strong
blade drift during operation) it could be necessarytomake minor ad-
justments to the blade alignment at the upper sawblade mount (see
pos. 2, fig. 2). By rotating the sawblade mount, the sawblade align-
ment will be changed as desired.
1. Clamp the sawblade and check the parallelism of the sawblade
using an angle 5(or angled work piece) arranged as shown in the
graphic.
2. The sawblade can be aligned if necessary. Release screw 11 us-
ing an Allen key and swivel the sawblade mount into the correct
position to align the sawblade in parallel to the angle.
3. Tighten the sawblade mount in the correctly set position using the
Allen key 11.
7.2 Sawing (fig. 7)
After you have fixed the sawtothe work space, adjusted the work
table, prepared the dust exhaust and air nozzle and have clamped the
suitable sawblades, switch on the machine and guide the work piece
as shown in fig. 7.
Remember: Adapt the feed according to the material, the sawblade
and the work piece thickness. Hard materials, fine sawblades and
thick work pieces do not “tolerate” as much feed as soft materials,
rough sawblades and thin materials.
Youcan also experiment with various speeds.
Note:
Safe and precise work is only possible with careful fixing!
The mechanical fret sawispredominantly amachine for sawing
curves. Forgood results, please note the following points:
-16-