USER’S GUIDE Multimedia LCD Projector (Not actual front cover)
WARRANTY Proxima Corporation warrants that the Proxima® Desktop Projector™ product manufactured by Proxima is free from defects in materials and workmanship under normal use during the Warranty Period. The Warranty Period commences on the day of purchase by the end-user. The Warranty Period is one year. The projector lamp is not covered by this Warranty. Each Proxima product is manufactured from new parts, or new and some used parts.
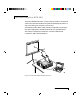
Introducing the DP9100 The Proxima® Desktop Projector™ family consists of portable, color data and video LCD projectors that make sharing data and presenting information as easy as connecting your computer to your monitor. The Desktop Projector 9100 is a high-resolution multimedia LCD projector that offers a high-quality, extremely bright image. It is compatible with a wide range of computers and resolutions—from 640 x 480 personal computers to 1280 x 1024 workstations.
CYCLOPS INTERACTIVE POINTER SYSTEM All Proxima Desktop Projector products come Cyclops®-ready. The Cyclops interactive pointer system functions like a cordless mouse, allowing you to control your computer and software by pointing at the projection screen. INTRODUCING THE MEDIAEXPRESS SYSTEM The MediaExpress™ Image Display System is a hybrid, next-generation product that brings the functionality of computers and projectors much closer together.
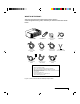
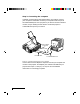
WHAT’S IN THE BOX? After you open the box and remove the projector and the shrink-wrapped accessory packs, make sure you have all of the items shown below.
QUICK START To connect the projector to your computer, read the section appropriate for your hardware (or read Chapter 1, which lists these steps in greater detail).
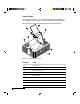
Step 1: Setting up the projector 1 Place the projector on a solid, flat surface. 2 Position the projector so that the side with the handle is facing the projection screen. 3 Locate the arm release lever (see the next figure). Slide it gently in the direction of the arrow. Figure i-4, Pressing the lever to release the arm 4 The arm pops up. Gently lift the arm. It raises automatically until it is fully extended. Do not force the arm further.
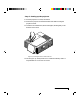
5 Locate the flip mirror release lever on the top of the arm (see Figure i-5). Push it in the direction of the arrow while pulling up on the lift tab. This releases the flip mirror.
6 Gently tilt the mirror to approximately 45 degrees. (You can adjust the angle later to raise or lower the projected image.) Figure i-6, Flipping the mirror to a 45-degree angle CAUTION! Never push on or force the mirror. Always use care when opening the mirror assembly. Avoid touching the surface of the mirror with your fingers.
Step 2: Connecting the computer In general, use the Proxima cable appropriate for your system to connect your computer to the DP9100. Connect your computer's video out port to the COMPUTER IN port on the projector. If you want to connect an external monitor, use your existing monitor cable to connect the projector's COMPUTER OUT port to your monitor.
Step 3: Connecting video and audio Connect audio and video sources to the projector, using this table as a guide. If you need more information, see the appropriate section in Chapter 2. TO SET THIS UP: CONNECT THIS CABLE: FROM HERE: TO HERE: Video from VCR/ laserdisc Composite audio/video cable (C497-6). VIDEO 1, 2 ports on projector. RCA port on VCR marked “VIDEO OUT” or something similar. Video from S-Video device S-Video cable (C466-6). S-Video 1, 2 ports Video Out port on projector.
THE CYCLOPS REMOTE CONTROL AND CONTROL PANEL MUTE 6 5 13 3 – VOLUME + 12 2 7 4 8 SOURCE 5 11 3 MENU 3 SETUP 2 9 PROG 1 PROG 2 1 7 4 3 MENU 8 10 SETUP 14 ll FIT-TO-VIEW™ SOURCE CLEAR ® PROXIMA 9 3 Figure i-8, The Cyclops remote control and control panel KEY 1 MouseDisk (remote only) FUNCTION • Emulates a left-button mouse click when you press the center. • Acts like an arrow key when you press the edges.
KEY 5 6 FUNCTION (Volume +/-) Adjusts the audio level. Mute (remote Mutes the audio, or returns the sound. only) 7 Menu Turns the menus on and off. 8 Setup Adjusts the sync, contrast, brightness, tint, and image position settings. 9 Fit-To-View/ /Prog 2 • In computer or video mode, the Fit-to-View key enlarges or compresses the image to fit the projector’s 1024 x 768 resolution. To return the image to its original size, press this key again.
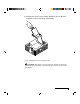
Chapter 1 Setting up your projector OPENING THE PROJECTOR To open the projector: 1 Place the projector on a solid, flat surface. 2 Position the projector so that the side with the handle is facing the projection screen. The connector panel will be facing away from the projection screen (see Figure 1-1).
MENU SETUP VOLUME SOURCE FIT-TO-VIEW REPL LAMP POWER OVERTEMP CLEAR 3 The projector must be parallel to the floor. If you’re using a media cart, make sure the wheels are locked to prevent it from moving. Perpendicular to the projection screen Projection Screen Top View Side View Parallel to the floor Figure 1-2, Top view and side view of the projector 4 Locate the arm release lever beside the control panel, on the top of the projector (see Figure 1-3).
5 The arm pops up. Gently lift the arm. It raises automatically until it is fully extended. Do not force the arm further. Figure 1-4, The arm pops up 6 Locate the flip mirror release lever on the top of the arm. Press it in the direction of the arrow while pulling up on the lift tab. This releases the mirror.
7 Gently tilt the mirror open to approximately 45 degrees (you can adjust the angle of the mirror later, to raise or lower the projected image). Figure 1-6, Opening the flip mirror CAUTION! Never push on or force the mirror. Always use care when opening the mirror assembly. Avoid touching the surface of the mirror with your fingers. Closing the projector To close the projector, reverse the opening procedures. 1 Tilt the mirror down into the arm until it latches.
POWER FIT-TO-VIEW SOURCE VOLUME REPL LAMP CLEAR SETUP MENU OVERTEM P Figure 1-7, Accessing the recessed handle If you must move the projector while it is open, grasp it securely at the sides by the lower part of the housing to support its weight.
TURNING ON THE PROJECTOR The projector and the external monitor (if you’re using one) should be turned on before you turn on your computer. This ensures that the computer properly senses the display during it’s start-up process. On the rear panel of the projector there is a power cord receptacle and a power switch. Figure 1-9, The power switch To turn on the projector: 1 Plug the power cord into the projector’s power receptacle.
CONNECTING THE PROJECTOR TO YOUR COMPUTER Take a moment to review the projector’s connector panel. Audio 1 In Video 1 S-Video 1 Audio 2 In Video 2 S-Video 2 MIC Cyclops Computer Audio In Computer In Audio Out Computer Out VGA Out Figure 1-10, The connector panel PORT CONNECTS TO... ...WITH THIS CABLE AUDIO 1 In Left and right ports connect to Composite audio/video cable AUDIO 2 In a video source, brings audio (C497-6). into the projector.
PORT CONNECTS TO... ...WITH THIS CABLE MIC Connects an external External microphone cable. microphone to the projector. COMPUTER Connects to the computer to PC: C800-6, Mac: C802-6, Sun: C801-6 IN bring computer video into the SGI: C943-6, DEC: C948-6. projector. COMPUTER Connects a workstation Existing monitor cable. You may also OUT monitor to the projector for need to use an adapter. simultaneous display. VGA OUT Connects a PC or Macintosh Existing monitor cable.
Audio In Computer In Figure 1-11, The projector’s COMPUTER IN connector You can display data on a separate monitor in addition to the projector. Computer out connections can be made with the projector and computer power on. Computer Out VGA Out Figure 1-12, Projector’s video output connectors Projecting without an attached monitor Some display cards rely on sense line information from the monitor to configure themselves for the correct display resolution.
PCs 1 Disconnect your computer-to-monitor cable at the computer end. 2 Connect the free end of the monitor cable to the VGA OUT connector on the projector. 3 Use the Proxima VGA to LCD connector cable (C800-6) between the projector and the computer. Connect the end of the cable marked “LCD” to the projector’s COMPUTER IN connector, and the end marked “COMPUTER” to the computer’s video output connector.
P r o xi m le a C ab MACINTOSH PROJECTOR Figure 1-14, The Proxima Mac to LCD adapter 3 Connect the free end of the Mac to LCD adapter to the projector’s VGA OUT connector. Note: Macintosh users who do not connect an external monitor may need to set DP9100 sense lines to achieve the desired display resolution. See Appendix C: Sense Lines for more information. DP9100 VGA OUT Port MAC MAC Monitor LCD 4 Use the Proxima MAC to LCD connector cable (C802-6) between the projector and the computer.
Notebook computers Use the appropriate Proxima video cable to connect your notebook to the projector: 1 Connect the end of the Proxima video cable marked “COMPUTER” to the external monitor connector on your notebook (or to the video cable adapter supplied with your notebook). 2 Connect the end of the Proxima video cable marked “LCD” to the COMPUTER IN connector on the projector.
Workstations 13C3 Video Connections (except Silicon Graphics workstations) If your workstation has a 13C3 connector at the computer video port: 1 Disconnect your computer-to-monitor cable at the computer end. 2 Connect the free end of the monitor cable to the projector’s COMPUTER OUT connector. 3 Use the Proxima 13C3 to LCD Connector Cable (C801-6) between the projector and the computer.
Silicon Graphics 13C3 Video Connections If you have a Silicon Graphics workstation with 13C3 connectors at the computer and monitor video ports: 1 Disconnect your computer-to-monitor cable at the computer end. 2 Connect the free end of the monitor cable to the Proxima SGI to LCD adapter (C947-12). 3 Connect the free end of the SGI to LCD adapter to the projector’s COMPUTER OUT connector.
DEC 3C3 Video Connections If you have a DEC workstation with 3C3 connectors at the computer and monitor video ports: Figure 1-19, 3C3 connector 1 Disconnect your computer-to-monitor cable at the computer end. 2 Connect the free end of the monitor cable to the Proxima DEC 3C3 to LCD adapter (C947-10). 3 Connect the free end of the DEC 3C3 to LCD adapter to the projector’s COMPUTER OUT connector. 4 Use the Proxima DEC 3C3 to LCD connector cable (C948-6) between the projector and the computer.
3 Connect the optional Proxima BNC to LCD Connector Cable (C803-6) between the projector’s COMPUTER OUT connector and the monitor’s BNC video input. Use the same BNC connections used with the monitor. 13C3 t BNC C t C bl Figure 1-21, BNC to LCD Connector cable Connecting the Cyclops interactive pointer system The Cyclops interactive pointer system uses a built-in camera to function like a cordless mouse.
CONNECTING VIDEO AND AUDIO TO THE PROJECTOR This section shows how to connect audio and video to your projector. The DP9100 has multiple inputs for audio and video. If you are connecting only one audio or video source to your projector, use the VIDEO 1 and AUDIO 1 ports. Make sure that you connect your audio and video to the corresponding group. If you connect video to group one and audio to group two, you won’t hear the audio.
The Composite Audio/Video cable (C497-6) has a yellow, red, and white RCA plug at each end. To connect an NTSC, PAL, or SECAM source to your projector: CABLE (C497-6) PROJECTOR PORT VCR CONNECTOR Yellow VIDEO 1 or 2. Video Out, To Monitor, etc. White AUDIO 1 or 2 IN (white plug). Left Audio Out. Red AUDIO 1 or 2 IN (red plug). Right Audio Out. Connecting video from S-Video sources The Desktop Projector 9100 can also project video from an S-Video source.
Connecting external speakers The Desktop Projector 9100 contains an internal stereo system consisting of an amplifier and two speakers. Although this system provides high-quality stereo output, a multimedia presentation may require external powered speakers or an external sound system. When connecting external speakers, use the optional Proxima Powered Loudspeaker System (A55) or a similar system. References in the following procedure are to Figure 1-24.
Connecting an external stereo system To connect the projector to an external stereo system: 1 Using the Composite Video/Audio cable (C497-6), insert the white and red RCA plugs into the projector’s left and right AUDIO OUT ports. 2 Insert the white and red RCA plugs at the other end of the cable into the external amplifier’s left and right AUDIO IN ports.
IMPORTANT PRECAUTIONS To avoid any potential hazards to the projector, make sure the air intake and exhaust grills are unobstructed. Do not operate the projector if these areas are clogged or blocked. Figure 1-26, Allow sufficient air flow CAUTION! The lamp chamber gets very hot during operation, especially the ceramic sockets at each end of the lamp. Be very careful when opening the lamp chamber or changing the lamp.
Turning the lamp on and off The lamp is off when you first turn on the projector. Press the key on the on the Cyclops remote control or control panel to turn the lamp on. The green power indicator light illuminates. It takes a few seconds for the lamp to warm up. MUTE – VOLUME + MENU SOURCE PROG 1 SETUP PROG 2 FIT-TO-VIEW™ Figure 1-27, The key To turn the lamp off, press and hold the key for about two seconds.
In the unlikely event that an overtemperature conditions occurs, see Chapter 6, Troubleshooting for information on restarting your projector. ADJUSTING THE IMAGE Raising or lowering the image To raise or lower the projected image, tilt the mirror on top of the arm up (to move the image higher) or down (to move the image lower). Focusing the image To focus the image, rotate the ring just below the projection lens, beneath the mirror, until the image is sharp and clear.
Correcting keystoning The normal projected image will have a rectangular shape. An image is keystoned when it appears trapezoidal. Figure 1-30, Normal image vs. keystoned image Keystoning occurs when the front of the projector is not perpendicular to the projection screen (the vertical plane) or when the projector is not parallel to the floor (the horizontal plane). Keystoning can also occur when the projector is tilted sideways.
Chapter 2 Using your projector The Desktop Projector 9100 was designed with ease of use and simplicity in mind. With the Cyclops remote control or the control panel, most of the common functions are right at your fingertips. To perform most of the actions you’ll need during your presentation, such as adjusting or muting the volume and proceeding from one slide to the next, just press a button on the Cyclops remote control or the control panel.
Source key Use the Source key to switch between the various video input sources you connect, such as the computer video input, NTSC/PAL/SECAM video input, S-Video input, or MediaExpress input. Setup key Use the Setup key to make your pre-presentation adjustments, such as sync, brightness, contrast, tint, and image position. (Volume) Use the Volume keys to adjust the volume from the projector’s internal speakers and any connected external speakers.
Menu Press the Menu key to activate the onscreen menus. Press it again to exit the menus. / (Lamp on/off) This key turns the lamp on and off. On the remote, press and release this key once quickly to display a black screen. To turn the lamp off, press and hold this key for at least two seconds. This key does NOT turn off the projector.
(Overtemp indicator light) This light illuminates if the projector becomes too hot or when one of the fans malfunctions. When this light is illuminated, the lamp automatically turns off. In the unlikely event of an overtemperature condition, see Chapter 6, Troubleshooting for more information. (Lamp indicator light) This light illuminates when the lamp needs to be replaced. It also flashes for about 90 seconds after you turn off the lamp.
For most settings, you make incremental adjustments by moving a slide bar. To move a slide bar, press the edges of the MouseDisk, press the up and down arrow keys on the projector’s control panel, or use the optional Cyclops wand or laser pointer. Changing the language on the menus To change the menus to a different language, choose Language on the Preferences menu. Then choose the language you prefer. You can select between English, Spanish, French, German, and Italian.
Adjusting the contrast To adjust the contrast, press the Setup key until the Contrast slider appears. Press the edges of the MouseDisk, use the optional Cyclops wand or laser pointer, or press the left and right arrow keys to move the slider. You can also adjust the contrast by accessing the projector’s menus and choosing Contrast from the Image menu. Correcting shimmering or streaks If your projected image has horizontal streaks, or seems to “shimmer” slightly, adjust the Sync setting.
Switching to rear projection mode To switch to rear projection mode (projecting from behind the projection screen instead of in front of the screen), choose Projection, Rear from the Projector menu. ADJUSTING THE AUDIO You can adjust the volume from the Cyclops remote control, the control panel, or the menus. The Audio menu contains additional audio controls. Displaying and hiding the volume indicator You can display a volume indicator while you increase or decrease the volume of the internal speakers.
Adjusting fade and balance The fade slider allows you to choose between the projector's internal speakers and an external loudspeaker system like the Proxima Powered Loudspeaker System (A55). The balance slider allows you to control the level of sound between the left and right sides of your sound system. To adjust the fade and balance, choose the corresponding command on the Audio menu, then move the slide bar in the appropriate direction.
2 From the Tools menu, choose LightBoard mode, then specify whether you want the Overlay, WhiteBoard, or BlackBoard. 3 From the Tools menu, choose LightBoard, On. The Draw toolbar appears in the upper left corner of the projected image. It has four buttons: Figure 2-2, The Draw toolbar BUTTON FUNCTION Click this button to select the Drawing tool. Click this button to select the Eraser. You can erase any of your annotations. Click the Clear All button to erase all previous annotations.
4 Select one of these buttons, then use the Cyclops wand, laser pointer, or the MouseDisk to draw on the projected image. To open the color palette: 1 Click the Color box or the icon in the upper right corner of the projected image. Eight color selection boxes appear. Figure 2-3, The Color selection boxes 2 Click the color you want to use, then click the Color box or icon again to hide the color selection boxes. To draw, click and hold the MouseDisk for about two seconds, then release.
If you find that you use LightBoard features frequently, consider programming either the Prog 1 or Prog 2 key, so you can access the LightBoard tool with the press of a key. Setting the timer (for audience intermission) The DP9100 includes a break timer, for lunch breaks, intermissions, question and answer sessions, or any other timed pause. Your audience will see a “countdown” of the number of minutes remaining. To use the timer, first set the length of the break.
Cyclops F/X Your projector comes with Cyclops F/X—software effects that you can use to make your presentations more interesting and effective. For more information on Cyclops F/X, see Chapter 4, Cyclops F/X. ADVANCED FEATURES There are several advanced features of the DP9100 that make giving presentations even easier. For example, you can program two keys on the remote control, assigning them specific options.
Chapter 3 Menus and keys PROJECTOR MENUS The Main menu Menus Tools Cyclops Input Source Image Audio Projector Preferences Advanced Figure 3-1, The Main menu MENU WHAT IT CONTAINS Tools Settings for the LightBoard tool, Break Timer, and mouse tracking. Cyclops Commands for calibrating the Cyclops interactive pointer system and button selection.
The Tools menu Menus LightBoard Mode LightBoard Break Timer Tools Overlay Off Off Cyclops WhiteBoard On On Input Source BlackBoard Break Timer Value 15:00 Image Audio Projector Preferences Advanced Figure 3-2, The Tools menu USE THIS OPTION... ...TO DO THIS: LightBoard Mode Sets the background for LightBoard drawing: • Overlay (transparent) • WhiteBoard (white background) • BlackBoard (black background) 3-2 Chapter Three LightBoard Turns the LightBoard tool on and off.
The Cyclops menu Button Menus Calibrate Tools No Calibrate Left Cyclops Calibrate Right Input Source Center Image None Audio Projector Preferences Advanced Figure 3-3, The Cyclops menu USE THIS OPTION... ...TO DO THIS: Calibrate Starts the Cyclops calibration procedure. Button Sets the Cyclops wand or laser pointer to emulate a left, right, or center mouse button (or none).
The Input Source menu Menus Source Select Tools Computer Cyclops Video 1 Input Source Image S-Video 1 Video 2 Audio S-Video 2 Projector MediaExpress SourceMode Cancel Input Measurements Select EWS1 (140 MHz) 1280 x 1024 81.97 KHz 76 HZ VSync: 0.00 Hz HSync: 0.00 KHz Lines: 0 Sense: HHHH EWS2 (130 MHz) 1280 x 1024 81.25 KHz 76 Hz EWS3 (135 MHz) 1280 x 1024 80 KHz 76 Hz Preferences Current Mode: Advanced Figure 3-4, The Input source menu USE THIS OPTION... ...
The Image menu (computer or MediaExpress input source) Menus Sync DotClk. Bright Contrast Red Green Blue Tools Factory Default No Reset Cyclops Reset Input Source Interlace Even Odd Image Audio Projector Preferences Advanced Figure 3-5, The Image menu USE THIS OPTION... ...TO DO THIS: *Sync Adjusts the sync setting. *DotClk Adjusts the dot clock setting. Bright Adjusts the brightness of the image. Contrast Adjusts the RGB bias levels. Red Adjusts the red level.
The Image menu (video or S-Video input source) Menus Contrast Bright Tint Saturation Tools Cyclops Input Source Image Audio Projector Preferences Advanced Figure 3-6, The Image menu 3-6 Chapter Three USE THIS OPTION... ...TO DO THIS: Contrast Adjusts the video contrast. Bright Adjusts the video brightness. Tint Adjusts the video tint. Saturation Adjusts the video color saturation.
The Audio menu Menus Volume Mute Tools Normal Cyclops Mute Balance Bass Treble Fade Input Source Mic. Volume Audio Mode Stereo Mono Image Audio Projector Preferences Advanced Figure 3-7, The Audio menu USE THIS OPTION... ...TO DO THIS: Volume Adjusts the audio volume. Mute Mutes the audio or turns it back on. Balance Adjusts the left/right audio balance. Bass Adjusts the bass. Treble Adjusts the treble. Fade Adjusts front/rear audio balance. Mic.
The Projector menu Menus Projection Lamp Hours Lamp Hours Tools Front No Reset 65:25:54 Cyclops Rear Reset Input Source Image Audio Projector Preferences Advanced Figure 3-8, The Projector menu USE THIS OPTION... ...TO DO THIS: Projection Switches between front and rear projection. Lamp Hours Resets the lamp hours counter. Use this option after you change the lamp. Lamp Hours 3-8 Chapter Three Displays the number of hours elapsed on the lamp hours counter.
The Preferences menu Menus Colors Language On-Screen Prog. Key1 Prog. Key2 Tools 226K English Display Fit-to-View Fit-toView Cyclops Millions Deutsch Hide LightBoard LightBoard Reverse Input Source Francais Reverse Image Español Clear Clear Audio Italiano Freeze Freeze Projector Preferences Advanced Figure 3-9, The Preferences menu USE THIS OPTION... ...TO DO THIS: Colors Sets the number of colors to use. Language Sets the default language for the menus.
The Advanced menu Menus User Horiz. Pos. Vert. Pos. VCO Gain Sense 3 Sense 2 Sense 1 Sense 0 Tools Defaults High High High High Cyclops User A Low Low Low Low Input Source User B Image Audio Projector Preferences Advanced Figure 3-10, The Advanced menu USE THIS OPTION... ...TO DO THIS: User Sets a user profile of projector settings: • Defaults • User A (user defined) • User B (user defined) Hor. (Horizontal) Adjusts the horizontal position of the image on the screen.
Chapter 4 Cyclops F/X Your projector comes with Cyclops F/X — software effects that you can use to make your presentations more interesting and effective. For example, you can use the Spotlight to call attention to specific areas on the image, use the Zoom or Magnify effects to focus on important information in the image, or use See-it/Show-it to preview images on your computer without distracting your audience.
INSTALLING CYCLOPS F/X Follow these steps to install the Cyclops F/X software: 1 Insert the disk labeled Proxima Cyclops F/X into your computer's floppy drive. 2 Do one of the following: • In Windows 95, choose Start, Run, then type a:\setup.exe (or the drive letter for your floppy drive). • In Windows 3.x, choose File, Run, then type a:\setup.exe (or the drive letter for your floppy drive).
The main screen of the F/X program appears: Figure 4-2, Cyclops F/X special effects On the left side of this window is a list of the special effects. The Assignments area in the middle of the window provides options that allow you to customize your remote and software. Note: If you open a menu, or if you're using the LightBoard tool, Cyclops F/X will be suspended. ASSIGNMENTS AREA The Assignments area displays the custom remote keys and their current assignments.
The Assignments area also contains five buttons: BUTTON FUNCTION Setup Remote Lets you switch the assignments display between the included Cyclops remote control and the optional Cyclops wand or laser pointer. Put Away Minimizes the F/X screen. Edit Effect Allows you to assign a shortcut key to the effect. You can also use this option to customize an effect. Projector Setting Allows you to adjust image, audio, and general settings on your projector.
Note: To access effects that are assigned to the Prog 1 and Prog 2 keys, assign the settings for those keys (in the projector's Preferences menu) to Host. USING THE CYCLOPS INTERACTIVE POINTER SYSTEM You can use the Cyclops interactive pointer system with Cyclops F/X. To set up the software, click Setup Remote in the Assignments area of the mains screen. Choose Cyclops Wand or Laser Pointer.
Click on the Edit Navigation Bar button. The following screen appears: Figure 4-4, Edit Cyclops Navigation screen Use this screen to assign different options to the navigation bar. To assign a new function to the navigation bar, click the Next or Previous areas and assign a function using the list boxes to the right. You can also use this screen to define where the navigation bar will appear on your display. The default is Lower Left.
SEE-IT/SHOW-IT See-it/Show-it is a feature of Cyclops F/X that previews the next slide in your presentation on your computer monitor—without switching from the slide your audience sees. The See-it/Show-it feature displays the image, along with a timer that counts down on your computer monitor until See-it/Show-it displays the next slide. You can use See-it/Show-it to preview slides so that you can interact with your audience, while preparing for the message on the next slide.
FREEZE The Freeze option freezes the image on your projector so you can use your remote to control your computer. This might be handy when you want to perform functions on your computer without distracting your audience from your presentation. To edit the Freeze key settings, click the Edit Freeze Key option in the Assignments area. The following screen appears: Figure 4-6, Edit Freeze Key screen To use Freeze: 1 Press Pause on your Cyclops remote. 2 Use any of the remote keys to control your computer.
STARTING AN EFFECT Once you’ve customized an effect, you’re ready to use it. 1 Before the presentation, start Cyclops F/X, then minimize the main screen. 2 During your presentation, press the key or button that you assigned to each effect to start the desired effect. THE PRESENTATION EFFECTS The following are the Presentation Effects. To end any of the effects, press the Esc key on your keyboard or the key on remote that you assigned for that effect.
Magnify enlarges a rectangular area around the mouse pointer. You can choose from three levels of magnification (200 percent, 400 percent, or 800 percent). Note: To enlarge the entire screen, use the Zoom effect. Next/Previous advances to the next or previous slide. Object allows you to draw rectangles, squares, ellipses, and circles. You can change the color and width of each shape. Refresh repaints the projected image. Use this feature to erase “remnants” of Stamp and Telestrator effects.
Title Screen projects an image from a .BMP file. You can use this effect to show a predefined image with transition effects during a presentation. You can also play an associated sound. Just specify which file to play and indicate whether to play it when the image appears or continuously. Zoom enlarges the entire image to 200%,400%, or 800% of its original size. You choose whether to show the mouse pointer during a Zoom and indicate the level of magnification.
Options menu The Options menu offers commands that allow you to set up assignments on the remote, wand, or laser pointer, change the look and feel of the cursor, and change the COM port settings. MENU ITEM FUNCTION Setup Remote Allows you to display the assignments area for the Cyclops remote control or the optional Cyclops wand or laser pointer. Cursor Options Changes the look and feel of the cursor.
Chapter 5 Maintenance Periodic maintenance will keep your DP9100 in top working condition. CLEANING THE LENS AND MIRROR To clean the projection lens and mirror: 1 Take a piece of lens tissue and form it into a loose swab. Wet it with lens cleaning fluid or denatured alcohol, and gently wipe it over the surface of the lens or mirror. 2 Take another clean piece of lens tissue and repeat the process, wiping it over the lens or mirror in the opposite direction.
Figure 5-1, Blowing air into the projector 2 Take a piece of lens tissue and form it into a loose swab. Wet it with a solution of approximately ten percent Isopropyl alcohol and water, and gently wipe it over the surface of the projection window. 3 Take another clean piece of lens tissue and repeat the process, wiping it over the projection window in the opposite direction. 4 Repeat if necessary. Caution: Do NOT use lens cleaning fluid to clean the projection window. It may damage the to the surface.
REPLACING THE LAMP For best performance, you should replace the lamp after 700 hours of operation. Note: Do not touch the lamp with your bare hands. Use gloves or a soft cloth and handle it using the metal ends only. Removing the old lamp 1 Leave the projector running with the lamp off for at least five minutes before you change the lamp. This allows the fan to cool the lamp chamber. 2 After the lamp has cooled sufficiently, turn off the projector and unplug the power cord.
5 Locate the door to the lamp chamber on the right side of the left panel. It has one slotted captive screw. With a screwdriver or coin, loosen the screw, then open the lamp chamber door (see Figure 5-3). Figure 5-3, Opening the lamp chamber door 6 Locate the thumbscrew on the right side of the lamp and unscrew it. When the thumbscrew is loose enough, gently pull the lamp from the right socket and then slide it out from the left.
3 Slide the end of the lamp without the thumbscrew into the slot on the left side of the lamp chamber (see the Figure below). Figure 5-4, Sliding the lamp into place 4 Slide the end of the lamp with the thumbscrew into place, with the glass pinch-off on the lamp pointing up, and tighten the thumbscrew. Make sure to tighten the thumbscrew as much as possible. Pull the lamp to make sure that it's securely seated. 5 Close the lamp chamber door and tighten the captive screw.
Figure 5-5, The three left-top retaining screws 3 Unsnap the top left cover by lifting it up and pulling it out (see Figure 5-6). Figure 5-6, Lifting the top left cover out The filter is located on the inside of the top left cover (see Figure 5-7).
4 There is a plastic grill covering the filter. Pull on the handle in the center of the grill to access the filter. To replace the top cover, reverse steps one through three, taking care to align the cover before snapping it into place. Accessing the right filters Before you can access the right filters, you must remove the left side door and top left cover. See steps 1 through 3 above for more information.
4 Locate the screws holding the main top cover in place (see Figure 5-9). Remove the three screws and lift up on the screw mountings until the cover is loose. Gently pull the cover up and to the left of the projector until it releases. POWER FIT-TO-VIEW CLEAR SOURCE SETUP VOLUME MENU REPL LAMP OVERTEMP Figure 5-9, The three top cover screws 5 While still holding the cover, remove the ribbon cable on the underside of the control panel. Place the cover on a soft cloth.
6 Locate the three screws at the top of the right side panel. Remove the screws and unsnap the panel, from the rear first. Figure 5-10, The screws at the top of the right side panel 7 The filters are now exposed (see Figure 5-11). Remove the retaining screw to access the rear filter. Pull the front filter out. Figure 5-11, The two right side filters To replace the covers, reverse steps one through five, taking care to align the top and side covers.
REPLACING THE BATTERIES IN THE REMOTE CONTROL 1 Locate the battery compartment on the end of the remote control. Press down while you slide the cover off of the compartment. Figure 5-12, Installing batteries in the remote control 2 Remove the old batteries and replace them with new ones. Make sure you align the batteries in the proper direction. 3 Slide the cover back onto the battery compartment, snapping it into place.
Chapter 6 Troubleshooting This chapter provides answers to some commonly asked questions about the Desktop Projector 9100. TROUBLESHOOTING CHART Please refer to this troubleshooting chart and the following adjustment recommendations before calling for assistance. PROBLEM LIKELY CAUSE No computer image 1. Loose cable. projected. POSSIBLE SOLUTION(S) 1. Check and secure cable connections. 2. No power to computer. 2. Turn on computer. 3. Incompatible video system. 3. If possible, check computer 4.
PROBLEM LIKELY CAUSE POSSIBLE SOLUTION(S) Image off-center. Position controls (arrow keys) Adjust position controls. If or the Hpos/Vpos controls image will not center, check for in the menus. compatibility problems. Cannot get entire image on screen; scrambled image. 1. The default resolution for all 1. Press the Fit-to-View key to images larger than 1024 x 768 see the entire image, or use is 1024 x 768. the arrow keys to pan the image. 2. Compatibility problem. 2.
PROBLEM LIKELY CAUSE POSSIBLE SOLUTION(S) Remote control does not work. Batteries upside-down or old. Check battery placement or replace with new batteries. Tiny dim or colored This is a normal LCD effect. points of light. None. Overtemp light is illuminated. 2. Filters are clogged. 1. Ensure that the shorter sides are unobstructed. Cycle the power and try again. 2. Clean or replace filters. 3. Fan is malfuntioning. 3. Projector needs service. Rainbow image. 1. Airflow is blocked.
3 After you have determined your video specifications, find the closest computer parameter entry in the compatibility list. Next, open the DP9100’s Source Mode menu and scroll up or down through selections to find the closest source mode. Use the right arrow key to load the mode of choice. Further parameter adjustments may be required to correct image problems for the “best” input source selection. A basic explanation of the adjustment functions follows.
Adjusting the Vertical Position The Vert. Pos (Vertical Position) control adjusts the amount of blanking before each video frame. Incorrect vertical position adjustment can cause the projected image to extend above or below the viewing area, video frame overlap (lines from the bottom of one frame superimposed on the top of the next frame, or a horizontal or vertical double image).
Half-Normal Height Display Figure 6-3, Adjusting the half-normal height display Use the arrow keys, the Setup key on the control panel, or use the following procedure to adjust the half-normal height display: 1 Press the Menu key. The Main menu displays. 2 Select Advanced from the Main menu. 3 Select the Hor. Pos (Horizontal Position) slide bar. 4 Press the down arrow key until the is properly aligned. (If this adjustment does not correct the problem, reset the Hor. Pos control.
Vertical Double Image Figure 6-4, Adjusting the vertical position Use the Setup key or the following procedure to adjust the Vert. Pos control: 1 Open the Main menu. 2 Select Advanced. 3 Select Vert. Pos (Vertical Position). 4 Press the down arrow key until the image is properly aligned. Note: There are separate Vert. Pos values for Normal and Fit-to-View Modes. Adjustments in one mode are not made in the other. If this adjustment does not correct the problem, try a different Source Mode setting.
Dark Lines in Fit-to-View Mode Only 1 With the menus closed, use the arrow keys on the control panel to pan the image down until it stabilizes. 2 Adjust the contrast. 3 Change the colors to 226k. 4 Change the computer screen’s background colors. Certain colors may cause this pattern to appear in Fit-to-View Mode. Dark Lines in Normal Mode Only 1 Adjust the contrast. 2 Change the colors (Preferences menu; Colors) to 226k.
4 Check the Input Measurements window and record the V Sync, H Sync, and Lines values for the incoming video signal. Consult your computer’s documentation for the Video Data Rate (dot clock) specifications. Input Measurements V Sync: 72.00 Hz H Sync: 78.00 KHz Lines: 1057 Sense: HLHL Figure 6-5, Input measurement window Note: The Lines value will be larger than the vertical lines of data displayed.
Label Manufacturer Model/Video Sys Dot Clk (MHz) H Sync (KHz) V Sync (Hz) EWS1 SGI Indy, Indigo2, XL, XZ, Extreme 1280 x 1024 140 81.97 76 EWS2 Intergraph TD-2, TD-4, TD-5, G90 1280 x 1024 130 81.25 76 EWS3 Generic 1280 x 1024 135 80 76 EWS4 Sun 1280 x 1024 135 80 76 VESA Generic 1280 x 1024 134.3 78.43 74 EWS5 HP 1280 x 1024 135 78 72 VESA Generic 1280 x 1024 128 77 72 EWS6 DEC 3000/300 1280 x 1024 132.6 76.
Label Manufacturer Model/Video Sys VESA Generic EWS21 Tadpole *MAC Apple XGA Apple XGA Generic VESA VESA VESA Generic EWS22 SGI Indy, Indigo2, XL, XZ, Extreme EWS23 HP EWS24 RDI VESA VESA Resolution Dot Clk (MHz) H Sync (KHz) V Sync (Hz) 1024 x 768 84.5 62.5 78 SPARCbook 3 1024 x 768 81.3 61.2 76 PowerPC 1024 x 768 80 60 75 Quadra 605 (19"), PowerMac 1024 x 768 74.7 56.4 70 1024 x 768 80 53.3 67 Generic 1024 x 768 64.3 48.88 60 Generic 1024 x 768 77.
WHERE TO GET HELP If you still need help after checking the Troubleshooting Chart and making adjustments, or you need replacement parts, call your dealer’s technical support line. If your dealer cannot solve your problem, please call Proxima Customer Service at: U.S.A. and Canada (619) 457-5500 Press 1 for Customer Service Fax: (619) 457-8542 Europe: +31-43-358 5200 +31-43-358 5201 (Fax) Outside U.S.A.
Appendix A DP9100 SPECIFICATIONS Color 16.7 Million Colors Display Technology LCD: Active Matrix 1024 x 768 Resolution Multiple Graphics Modes (640 x 480, 800 x 600, 1024 x 768, 1152 x 900, 1280 x 1024 Contrast Ratio 100:1 Typical Video Compatibility NTSC M 3.58 MHz; PAL B, G, H, I 4.42 MHz; SECAM 4.43 MHz; S-VIDEO Projection Lamp 575 Watt Metal Halide Brightness 300 ANSI Lumens (typical) Keystone Correction 4.
Appendix B Accessories and Replacement Parts REPLACEMENT PARTS PART PART NUMBER Replacement lamp L71 Cyclops remote control A95 Power Cord, IEC, North America C1002-10 Power Cord, IEC, Europe C1001-10 Power Cord, IEC, Italy C1003-10 Power Cord, IEC, UK C1004-10 VGA to LCD cable C800-6 Mac to LCD adapter C804-0 Mac to LCD cable C802-6 Mac ADB cable C470-6 13C3 to LCD cable C801-6 SGI to LCD adapter C947-12 SGI 13C3 to LCD cable C943-6 DEC 3C3 to LCD adapter C947-10 DEC 3C3 to L
ACCESSORIES B-2 Appendix B PART PART NUMBER MediaExpress Image Display System ME90H Cyclops Interactive Pointer System A2079 Cyclops Laser Pointer A90 Powered Loudspeaker System A55 Desktop Projector Rolling Hard Case A297 BNC Cable Kit A37
Appendix C Sense Lines This appendix explains how to adjust the projector if you’re having trouble connecting to a computer with no external monitor. WHAT ARE SENSE LINES? Certain display cards and video systems rely on sense line information from the monitor to correctly configure themselves for display resolution. The absence of sense line information causes some display cards to output a default video signal, and actually prevents some video cards from outputting video at all.
MACINTOSH DISPLAYS The next table shows typical sense line settings for Macintosh systems, based on the system’s resolution. Try these settings only if you have trouble projecting an image without an external monitor connected to the computer. Remember to restart your computer after you make these changes.
Sense line settings for popular video cards: SYSTEM GRAPHIC CARD OR MONITOR TYPE RESOLUTION SENSE 3 SENSE 2 SENSE 1 SENSE 0 Low Hewlett-Packard OmniBook 640 x 480 High High High MAC / PowerBook1 RGB 13" 640 x 480 High High High Low 16" (with terminator2) 832 x 624 High High High High High Sun SPARCstation RGB 19" (with terminator2) 1024 x 768 High High High RGB 21" 1152 x 870 High Low Low Low GX 1152 x 900 66 Hz High Low High High 1152 x 900 76 Hz High High Low
Index A C Adapters 1-8 Adjusting the volume Volume keys 2-7 Advanced features 2-12 Advanced menu 3-10 Hor. Pos 3-10 Sense 3, 2, 1, 0 3-10 User 3-10 VCO gain 3-10 Vert. Pos 3-10 air flow 1-21 arm release lever 1-2 Arrow keys i-11, 2-3 AUDIO 1/2 In 1-7 audio adjustments 2-7 balance 2-8 bass control 2-7 displaying the volume slider 2-7 fade 2-8 treble control 2-7 Audio menu 3-7 Audio Mode 3-7 Balance 3-7 Bass 3-7 Fade 3-7 Mic.
Correcting shimmering or streaks 2-6 Adjusting the Sync 2-6 Correcting vertical banding 2-6 Adjusting the Dot Clock 2-6 Adjusting the Red, Green, and Blue settings 2-6 Adjusting the Tint 2-6 Cyclops F/X i-11, 2-2, 4-1 Cyclops interactive pointer system i-2 connecting 1-16 Cyclops menu 3-3 Button 3-3 Calibrate 3-3 CYCLOPS port 1-7 Cyclops remote control i-10, 2-1, 2-2 batteries 5-10 Fit-To-View/MediaExpress key i-11, 2-3 Lamp key i-10, 2-3 Menu key i-11, 2-3 MouseDisk i-10, 2-2 Mute key i-11, 2-2 Prog 1, 2 k
K keystoning 1-24 L lamp replacing 5-3 installing the new lamp 5-4 lamp type A-1 removing the old lamp 5-3 Lamp indicator 2-4 Lamp key i-10, 1-22, 2-3 LightBoard tool 2-2, 2-8 Draw toolbar 2-9 lighting the lamp i-9 M Mac to LCD Adapter 1-11 MAC to LCD connector cable 1-11 Macintosh connections 1-10 Main menu 3-1 Advanced 3-1 Audio 3-1 Cyclops 3-1 Image 3-1 Input Source 3-1 Preferences 3-1 Projector 3-1 Tools 3-1 maintenance 5-1 cleaning the air filters 5-5 cleaning the lens and mirror 5-1 cleaning the pro
Q Quick Start i-4 connecting video and audio i-9 connecting your computer i-8 setting up the projector i-5 turning on the projector i-9 R rear projection 2-7 recessed carrying handle 1-4 remote mouse tracking 2-8 Replace Lamp indicator i-11 Replacement Parts B-1 Return Material Authorization Number 6-12 Reverse key i-11, 2-2 reverse video 3-9 S S-Video-1/2 1-7 See-it/Show it i-11, 2-2, 4-6 sense lines 1-9 definition C-1 Macintosh displays C-2 Setting up the projector i-5 Setup key i-11, 2-2 SGI 13C3 to LC