
User guide
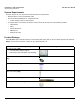
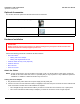
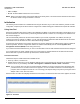
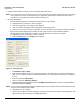
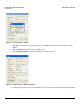
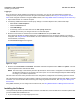
Table Of Contents
- Introduction
- Installation and Initialization
- Managing the Access Point
- Basic Configuration for an Enterprise
- Access Point Features
- Using Web Interface to Manage the Access Point
- Using SNMP Interface to Manage the Access Point
- Using CLI to Manage the Access Point
- Global Configuration Mode
- General Notes
- Configuring the AP using CLI Commands
- Command Line Interface Mode Overview
- User Exec Mode
- Privileged Exec Mode
- Show Command Tree Structure Command
- Show VLAN Command
- Show MAC ACL Command
- Show RADIUS Server Table Command
- Show RADIUS Supported Profile Table Command
- Show Security Wireless Config Table Command
- Show QoS Profile and Policy Command
- Show QoS EDCA Command
- Show Wireless Properties Command
- Show 11n Wireless Properties Command
- Wireless VAP Command
- Ethernet Interface Command
- Network Configuration Command
- Advaned Filter and Global Filter Command
- TCP-UDP and Static MAC Address Table Commands
- Protocl Filter, Filter Type and Filter Control Table Command
- Access Control and HTTP, Telnet and TFTP Commands
- SNMP Read, Read-Write Password and Trap Host Table Command
- Country Code and Management Commands
- System Information Command
- System Inventory Management Command
- Event Logand ICMP Commands
- IP ARP Statistics and SNTP Command
- Syslog configuration and RADIUS Client Authentication Table Commands
- RADIUS Client Access Command
- Interface Statistics Command
- Wireless Station Statistics Command
- IP Address, Subnet Mask and Gateway Command
- Scalar Objects Commands
- Table Entries Commands
- Table Entry Deletion Command
- Table Entry Edition Command
- VAP Table Commands
- Troubleshooting
- ASCII Character Chart
- Bootloader CLI
- Specifications
- Technical Services and Support
- Statement of Warranty
Installation and Initialization AP-800 User Guide
Initialization
19
Figure 2-6 Change Screen - Reboot
j. After allowing sufficient time for the device to reboot, click Rescan to verify that your changes have been
applied.
k. Click the Change button to return to the Change screen.
l. Click the Web Configuration button at the bottom of the Change screen.
Figure 2-7 Change Screen - Web Configuration
m. Proceed to the Logging In section for information on how to access the HTTP interface using this IP address.