
User guide
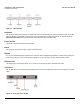
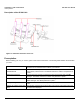
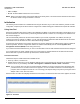
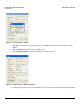
Table Of Contents
- Introduction
- Installation and Initialization
- Managing the Access Point
- Basic Configuration for an Enterprise
- Access Point Features
- Using Web Interface to Manage the Access Point
- Using SNMP Interface to Manage the Access Point
- Using CLI to Manage the Access Point
- Global Configuration Mode
- General Notes
- Configuring the AP using CLI Commands
- Command Line Interface Mode Overview
- User Exec Mode
- Privileged Exec Mode
- Show Command Tree Structure Command
- Show VLAN Command
- Show MAC ACL Command
- Show RADIUS Server Table Command
- Show RADIUS Supported Profile Table Command
- Show Security Wireless Config Table Command
- Show QoS Profile and Policy Command
- Show QoS EDCA Command
- Show Wireless Properties Command
- Show 11n Wireless Properties Command
- Wireless VAP Command
- Ethernet Interface Command
- Network Configuration Command
- Advaned Filter and Global Filter Command
- TCP-UDP and Static MAC Address Table Commands
- Protocl Filter, Filter Type and Filter Control Table Command
- Access Control and HTTP, Telnet and TFTP Commands
- SNMP Read, Read-Write Password and Trap Host Table Command
- Country Code and Management Commands
- System Information Command
- System Inventory Management Command
- Event Logand ICMP Commands
- IP ARP Statistics and SNTP Command
- Syslog configuration and RADIUS Client Authentication Table Commands
- RADIUS Client Access Command
- Interface Statistics Command
- Wireless Station Statistics Command
- IP Address, Subnet Mask and Gateway Command
- Scalar Objects Commands
- Table Entries Commands
- Table Entry Deletion Command
- Table Entry Edition Command
- VAP Table Commands
- Troubleshooting
- ASCII Character Chart
- Bootloader CLI
- Specifications
- Technical Services and Support
- Statement of Warranty

Installation and Initialization AP-800 User Guide
Initialization
18
3. Locate the MAC address of the AP you want to initialize within the Scan List.
NOTE: If your Access Point does not appear in the Scan List, click the Rescan button to update the display. If the unit still
does not appear in the list, see Troubleshooting for suggestions. Note that after rebooting an Access Point, it
may take up to five minutes for the unit to appear in the Scan List.
4. Do one of the following:
• If the AP has been assigned an IP address by a DHCP server on the network:
a. Highlight the entry for the AP you want to configure.
b. Click the Change button. The Change screen appears.
c. Click on the Web Configuration button at the bottom of the change screen.
d. Proceed to the Logging In section for information on how to access the HTTP interface using the IP address.
• If the AP has not been assigned an IP address (in other words, the unit is using its default IP address,
169.254.128.132), follow these steps to assign it a static IP address that is valid on your network:
a. Highlighting the entry for the AP you want to configure.
b. Click the Change button. The Change screen appears.
Figure 2-5 Change Screen
c. Set IP Address Type to Static.
d. Enter a static IP Address for the AP in the field provided. You must assign the unit a unique address that is
valid on your IP subnet. Contact your network administrator if you need assistance selecting an IP address for
the unit.
e. Enter your network’s Subnet Mask.
f. Enter your network’s Gateway IP Address.
g. Enter the SNMP Read/Write password in the Read/Write Password field (for new units, the default SNMP
Read/Write password is public).
NOTE: The TFTP Server IP Address and Image File Name fields are only available if ScanTool detects that the AP does
not have a valid software image installed.
h. Click OK to save your changes.
i. The Access Point will need reboot to apply any changes you made. When the reboot message appears, click
OK to reboot the device and return to the Scan List screen.