
User guide
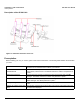
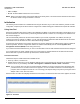
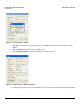
Table Of Contents
- Introduction
- Installation and Initialization
- Managing the Access Point
- Basic Configuration for an Enterprise
- Access Point Features
- Using Web Interface to Manage the Access Point
- Using SNMP Interface to Manage the Access Point
- Using CLI to Manage the Access Point
- Global Configuration Mode
- General Notes
- Configuring the AP using CLI Commands
- Command Line Interface Mode Overview
- User Exec Mode
- Privileged Exec Mode
- Show Command Tree Structure Command
- Show VLAN Command
- Show MAC ACL Command
- Show RADIUS Server Table Command
- Show RADIUS Supported Profile Table Command
- Show Security Wireless Config Table Command
- Show QoS Profile and Policy Command
- Show QoS EDCA Command
- Show Wireless Properties Command
- Show 11n Wireless Properties Command
- Wireless VAP Command
- Ethernet Interface Command
- Network Configuration Command
- Advaned Filter and Global Filter Command
- TCP-UDP and Static MAC Address Table Commands
- Protocl Filter, Filter Type and Filter Control Table Command
- Access Control and HTTP, Telnet and TFTP Commands
- SNMP Read, Read-Write Password and Trap Host Table Command
- Country Code and Management Commands
- System Information Command
- System Inventory Management Command
- Event Logand ICMP Commands
- IP ARP Statistics and SNTP Command
- Syslog configuration and RADIUS Client Authentication Table Commands
- RADIUS Client Access Command
- Interface Statistics Command
- Wireless Station Statistics Command
- IP Address, Subnet Mask and Gateway Command
- Scalar Objects Commands
- Table Entries Commands
- Table Entry Deletion Command
- Table Entry Edition Command
- VAP Table Commands
- Troubleshooting
- ASCII Character Chart
- Bootloader CLI
- Specifications
- Technical Services and Support
- Statement of Warranty

Installation and Initialization AP-800 User Guide
Initialization
17
• RED: 100 Mbps
• BLANK: No link available or Ethernet is not connected
NOTE: When in operational status, the wireless LEDs will be steady Green. The wireless LEDs would blink Green when
the wireless traffic is being transmitted or received.
Initialization
The following sections detail how to initialize the AP using the ScanTool, log in to the HTTP interface, perform an initial
configuration if required (the Access Points are configured to a default settings) and download the required AP software.
Using ScanTool
ScanTool is a software utility that is included in the installation CD-ROM. It is an initial configuration tool that allows you to
find the IP address of an Access Point by referencing the MAC address in a Scan List, or to assign an IP address if one
has not been assigned.
The tool automatically detects the Access Points installed in your network, regardless of IP address, and lets you
configure each unit’s IP settings. In addition, you can use set initial device parameters that will allows the AP to retrieve
new software to an AP that does not have a valid software image installed.
To access the HTTP interface and configure the AP, the AP must be assigned an IP address that is valid on its Ethernet
network. By default, the AP is configured to obtain an IP address automatically from the network Dynamic Host
Configuration Protocol (DHCP) server during the boot-up.
If your network contains a DHCP server, you can run the ScanTool to find out what IP address the AP has been assigned.
If your network does not contain a DHCP server, the Access Point’s IP address defaults to 169.254.128.132 and the
device starts with a dynamic IP address. By default, the IP address is Static.
ScanTool Instructions
Follow these steps to install ScanTool and initialize the AP:
1. Power up, reboot, or reset the AP.
2. Double-click the ScanTool icon on the Windows desktop to launch the program (if the program is not already running).
If the icon is not on your desktop, click Start > All Programs > ORiNOCO > AP-800 > Xtras > ScanTool.
NOTE: If your computer has more than one network adapter installed, you will be prompted to select the adapter that
you want ScanTool to use before the Scan List appears. You can use either an Ethernet or wireless adaptor. If
prompted, select an adapter and click OK. You can change your adapter setting at any time by clicking the Select
Adapter button on the Scan List screen.
ScanTool scans the subnet and displays all detected Access Points. The ScanTool’s Scan List screen appears, as shown
Figure 2-4 ScanTool