P/N 70443r2 Tsunami QuickBridge II T1/E1 Version 2.
Tsunami QuickBridge II T1/E1 Quick Install Guide Introduction The QuickBridge is a complete kit for enabling a wireless broad bandwidth link between two locations. The equipment is pre-configured at the factory to be mounted and connected to your LAN network. Both ends of the link are provided in this kit along with cables and mounting hardware. The product’s principle components consist of a radio unit and a power & Ethernet adapter.
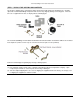
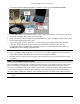
Tsunami QuickBridge II T1/E1 Quick Install Guide STEP 2. UNPACK THE SHIPPING BOX CONTENTS The product’s shipping boxes should be left intact and sheltered until arrival at the installation site. Carefully unpack the Tsunami QuickBridge II shipment and check for any shipping damage or missing parts. There are two sets of equipment in the box, as displayed in the following figure. The Tsunami QuickBridge II T1/E1 Quick Install Guide and a Documentation and Software CD also are included in the shipment.
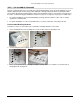
Tsunami QuickBridge II T1/E1 Quick Install Guide STEP 3. PRE-ASSEMBLE HARDWARE Proxim recommends that you pre-assemble the radio mounting hardware on the ground to familiarize yourself with the equipment and check for any possible damaged or missing components before mounting the radios. This includes attaching the mounting bracket and loosely attaching the washers, lock washers, and lock nuts to the radios.
Tsunami QuickBridge II T1/E1 Quick Install Guide 4. Place the other mounting bracket section on the two bracket mounting screws and loosely secure them with the bolts supplied. These bolts are used later to mount the radio unit to a pole (as shown in the second figure below). STEP 4. CONNECT THE CABLES When you initially install the radios, you should configure the radios in the same room. A brief overview of the recommended computer/network configuration follows.
Tsunami QuickBridge II T1/E1 Quick Install Guide 3. Connect the RJ45 connector on the interface cable to the RJ45 port on the back of the radio. Hand-tighten the connector nut; do not use the wrench to tighten the connector. Connect the other end of the interface cable to the Power & Ethernet Adapter. 4. Connect an RJ45 connector from a standard CAT 5 or CAT 5e cable (not supplied) to the RJ45 port on the Power & Ethernet Adapter.
Tsunami QuickBridge II T1/E1 Quick Install Guide To connect the Power & Ethernet Adapter to a switch or a hub, use a crossover Ethernet cable. 5. If your installed radio is connected to a switch or a hub, connect your PC to the same switch or hub . Each PC is used to configure and control its associated radio. 6. Connect the Power & Ethernet Adapter to a grounded AC power source. A chirping sound should be heard from the radio indicating power to the radio. 7.
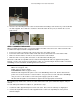
Tsunami QuickBridge II T1/E1 Quick Install Guide POLYPROPYLENE FIBER SOUND ABSORPTION PAD STEP 6. INSTALL THE SOFTWARE The QuickBridge II includes configuration software (the QuickBridge Manager), which provides basic setup and operating capabilities. Before installing the software, be sure you have configured the radios as described in “Step 4. Connect the Cables.” Note: Install a copy of the QuickBridge Manager on any PC from which you want to control a radio. To install the QuickBridge Manager: 1.
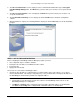
Tsunami QuickBridge II T1/E1 Quick Install Guide 4. The Choose Install Folder screen is displayed. The recommended installation directory is C:\Program Files\QuickBridge Manager 2.1. Click Next when you have made your selection or to accept the default folder. 5. The Choose Shortcut Folder screen is displayed; click Next when you have made your selections or to accept the default folder. 6. The Pre-Installation Summary screen is displayed; click the Install button to install the configuration software. 7.
Tsunami QuickBridge II T1/E1 Quick Install Guide 2. Connect the PC to the Master unit; start the Manager program by clicking on the QuickBridge Manager icon. You can connect to the Slave unit as well; however, this guide steps you through the initialization process by locally connecting to the Primary. Note: The QuickBridge Manager program can run on two PCs connected to both ends of the link without interfering with one another. 3.
Tsunami QuickBridge II T1/E1 Quick Install Guide Mounting the Radio to a Pole The radio is designed to mount directly to a pole. Using optional mounting brackets, you can mount the radio to a wall or other flat surface (see “Mounting the Radio to a Flat Surface”). 1. Remove the nuts you loosely attached in “Pre-Assemble Mounting Hardware.” 2. Slide the top part of the mounting bracket off of the mounting screws. 3.
Tsunami QuickBridge II T1/E1 Quick Install Guide Configuring the QuickBridge Radios ESTABLISHING A CONNECTION From the Connection window, click on Discover Radio(s). The QuickBridge Manager program should discover all local radios and display the IP address of each discovered unit in the Radio(s) Available field. Notes: • If you want to connect to a different radio, you can enter the IP address and click the Login button for the Manager to connect to the specified radio.
Tsunami QuickBridge II T1/E1 Quick Install Guide 4. If the wireless link is established, you can select either the Local or Remote device to control from the Selected Radio box. Note: The Selected Radio box is available on all configuration windows. It indicates which radio is currently selected, Local or Remote. You can change the currently selected radio by clicking the radio button to the left of the selection. 5.
Tsunami QuickBridge II T1/E1 Quick Install Guide REVIEWING THE MASTER UNIT’S STATUS From the Link Status window, review the current status of both ends of the QuickBridge link; in this case, the locally connected radio (Master) and the remote radio (Slave). This window is updated as changes occur. Note: When the link has not been established to the remote unit, the remote status is shaded gray and shows incorrect status. After the link is established, the correct status is reported.
Tsunami QuickBridge II T1/E1 Quick Install Guide TECHNICAL SUPPORT If you are having a problem using a Tsunami QuickBridge product and cannot resolve it with the information in “Troubleshooting” in the Installation and Management manual, gather the following information and contact Proxim Technical Support: • • • • What kind of network are you using? What were you doing when the error occurred? What error message did you see? Can you reproduce the problem? Be sure to: • Note the serial number of the pro