
User's Manual

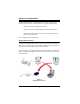

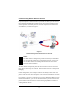
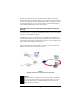
Table Of Contents
- Contents
- Introduction
- Wireless Networking With the Base Station
- Installing the Base Station
- Software Installation for Adapters
- Symphony Composer Installation Wizard
- Symphony Maestro Configuration Tool
- Symphony Location Switcher
- Using the Wireless Network
- About the Base Station
- Uninstalling Symphony Products
- Troubleshooting
- How to Reach Technical Support
- Specifications
- Regulatory Information
- Index

12
Note:
Use the Symphony HomeRF Base Station only with the power
adapter supplied by Proxim with the product. Using another
power supply may damage the Symphony HomeRF Base Station.
The three LEDs on the top of the Base Station will momentarily light up. In
addition, the green Link LED, located to the left of the Ethernet ports, should
light up.
4. If the Link LED is on, go to Step #10; if the LED is not on, go to Step #5.
5. Remove the connector plug from Ethernet Port II.
6. Remove the Ethernet cable from Port I and insert the cable into Port II.
The Link LED should now light up.
7. If the Link LED is on, proceed to Step #9. If the Link LED is not on,
proceed to Step #8.
8. If the Link LED does not turn on when the Ethernet cable is connected to
either Ethernet Port I or Port II, try the following:
❑ Confirm that both the Base Station and the attached Ethernet device
are powered up and operational.
❑ Try using another Ethernet cable, if available.
❑ Try connecting the Ethernet cable to another port on the Ethernet
device.
❑ Contact Symphony Technical Support for assistance if none of these
suggestions solve the problem.
9. Insert the connector plug into the Ethernet port that is not in use.
10. Proceed with the installation of the other Symphony HomeRF products in
your home or small office following the instructions in Chapters 4 and 5.
Note:
The Symphony HomeRF Base Station must remain powered on
during the installation of the other Symphony products.