
System information


Running Probes with Multiple Interface Cards
29
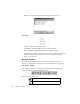
Activate Map mode by selecting View > Show Probe List as a Map.
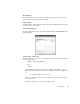
Once a Probe is displayed on the map, you will need to place the Probe in the desired
location on the map. Click and drag a Probe icon to move it on the map.
Customizing the Probe Map
When the list of Probes is in map format, you can display your network graphically,
either geographically or topologically, with respect to the positions of the Probes. The
size of the network map can be bigger than the window, in which case you may move
around the map using the horizontal and vertical scroll bars.
You can use one of the maps provided or import your own map in BMP or DIB format.
If you choose to use your own map, copy the bitmap into the
C:\Observer Files\MAPS directory. Observer supports two-color, 16-color, 256-color,
or 24-bit full-color bitmaps (if supported by your monitor/adapter). Observer includes a
number of geographical maps.
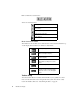
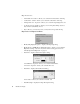
To select a map, right-click anywhere on the Map and select the “Modify Map Display
Properties” menu item. This will display the Map Setup dialog.
• “Map background bitmap” textbox—the current map name.
• Select button—allows you to select the bitmap to use for the Probe; only active if
“Show background bitmap” checkbox is selected.
• “Show background bitmap” checkbox—allows you to select to view the bitmap as
a background image.