
Installation guide


Wireless Guide 57
Installing the Cisco Aironet Adapter / Driver
NOTE: Occasionally, Windows NT may have some difficulty installing
the wireless adapter’s driver even after allocating free resources. If this
happens, try changing some of the resource settings for the card (I/O
Base Address or Interrupt) to other free resources.
h
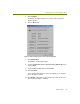
When you have finished configuring the Cisco Aironet adapter in
the Aironet Wireless Communications, Inc. Adapter Setup dialog
box, click OK.
i Click Close in the Network control panel.
The system installs the card according to your settings and
updates the bindings.
j When installation finishes, the system prompts you to configure
the TCP/IP properties for the Aironet 340 adapter (if TCP/IP is
bound to it).
Binding TCP/IP to the Aironet 340 adapter is not required for the
Sniffer software. However, to use the Aironet 340 adapter for
normal wireless LAN operations, you must set the TCP/IP
properties to match your network. Click OK when you have
finished.
k When installation has finished, the system prompts you to restart
the computer. Click Yes to restart the computer.
Client Name Not necessary for the Sniffer software.
Data Rates
Set to
Auto.
Infrastructure Mode
Set to
Yes.
Interrupt Set to the same value you recorded in
Step 7 on page 54.
IO Base Address Set to the same value you recorded in
Step 7 on page 54.
Power Save Mode
Set to
CAM.
SSID Not necessary for the Sniffer software.
However, if you want to use the Aironet
340/350 adapter for normal wireless
LAN activities, you will need to set both
this option (either here or in the Aironet
Client Utility) and the WEP Encryption
option (which can only be set in the
Aironet Client Utility).