
Installation guide


Chapter 2
8 Sniffer Technologies
To install the 802.11a/b/g adapter and driver in Windows XP:
1 After installing the Sniffer software, log into Windows XP as an
Administrator.
2 Insert the 802.11a/b/g based wireless card in an available card slot or
PCMCIA slot on the target machine. Windows XP will automatically
detect the new card and install its native device driver.
NOTE: If Windows XP does not install the device driver for the wireless
card, then install the original driver from the CD provided by the vendor
of the wireless card.
3
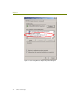
Open the Network Connections folder through Start > Control Panel >
Network Connections.
4 Right-click the Wireless Network Connection entry associated with the
802.11a/b/g adapter and select Properties.
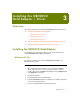
5 Click Configure in the Wireless Network Connections Properties
dialog box to open the Adapter Properties dialog box for the
802.11a/b/g adapter.
6 Click the Driver tab.
7 Click Update Driver to open the Hardware Update Wizard.
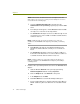
8 Select Install from a list or specific location (Advanced) and click
Next.
9 Select the Don’t search option and click Next.
10 Click Have Disk.
11 In the Install from Disk dialog box, click Browse and navigate to the
Atheros.ABG\ WinXP subdirectory where the driver files for the
802.11a/b/g adapter are installed.
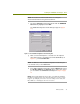
NOTE: The location for Sniffer Portable drivers is C:\Program
Files\NAI\SnifferNT\Driver\en\Atheros.ABG\WinXP.
12
Click OK in the Install from Disk dialog box.
13 If the operating system is configured to alert you to unsigned drivers, a
dialog box will appear warning you that you are about to install a driver
that has not been verified by Microsoft Corporation. Click Continue
Anyway to continue the installation.